
In this article, we will learn how Angular 4 application connects to JAVA EE application(its backend) and fetches data from backend and displays them in Angular UI.
Here we will be using two separate applications, one for JAVA EE and another for Angular 4 front end, Though we can create both applications under the single project.
Developing JAVA EE application
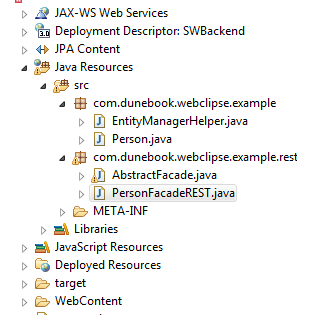
Though we can use any eclipse here IDE is luna eclipse IDE(4.4.2). Please find below project structure(created in Eclipse).
We will discuss technologies used in more detail one by one.
JPA:
Our Java EE application uses an embedded Derby database and EclipseLink as a provider with JPA. We are
initially creating SCHEMA named as ‘PERSONDB’ with few some data that application can show sample data.
REST web service design:
JAVA EE application will expose REST web service using Jersey client(2.0 version). we use Jersey(2.0) client for
REST->Mainly Jersey RESTful Web Services framework is an open source framework for developing RESTful Web
Services in Java. It provides support for JAX-RS APIs and serves as a JAX-RS (JSR 311 & JSR 339) Reference
Implementation.
Jersey and supporting libraries can be imported like below select Project >Configure Facets… > Install JAX-RS Facet and proceed to select version 2.0 of JAX-RS.
Alternatively, if you are using MAVEN, then all supporting dependencies have to be put in pom.xml file like
below

Configuration file
web.xml
On the server side, Jersey provides a servlet implementation which scans predefined classes to identify RESTful resources. In your web.xml configuration file your register this servlet for your web application. We also define context root path that will be used in REST URL.
In our case, Rest URL pattern will contain ‘/jaxrs/rest/v1.1/*’.

JPA Classes
In our case, We create and use schema “PERSONDB” and with the single table named “PERSON” table. For this table, we
create JPA entity Person using JPA annotation.
Person.java
package com.dunebook.webclipse.example;
import javax.persistence.Column;
import javax.persistence.Entity;
import javax.persistence.Id;
import javax.persistence.Table;
import javax.xml.bind.annotation.XmlRootElement;
/**
 * Person entity. @author vikas
 */
@XmlRootElement
@Entity
@Table(name = "PERSON", schema = "PERSONDB")
public class Person implements java.io.Serializable {
    // Fields
    private static final long serialVersionUID = 1L;
    private Integer id;
    private String name;
    private String gender;
    private String city;
    // Constructors
    /** default constructor */
    public Person() {
    }

    public Person(Integer id) {
        this.id = id;
    }

    public Person(Integer id, String name,
            String gender, String city) {
        this.id = id;
        this.name = name;
        this.gender = gender;
        this.city = city;
    }
    // Property accessors
    @Id
    @Column(name = "ID")
    public Integer getId() {
        return this.id;
    }

    public void setId(Integer id) {
        this.id = id;
    }

    @Column(name = "NAME", length = 50)
    public String getName() {
        return this.name;
    }

    public void setName(String name) {
        this.name = name;
    }

    @Column(name = "GENDER", length = 20)
    public String getGender() {
        return this.gender;
    }
    public void setGender(String gender) {
        this.gender = gender;
    }

    @Column(name = "CITY", length = 30)
    public String getCity() {
        return city;
    }
    public void setCity(String city) {
        this.city = city;
    }
    }   }
    }
Rest web service
This class exposes REST services via JAX-RS.
PersonFacadeREST.java
package com.dunebook.webclipse.example.rest;
import java.util.List;
import javax.persistence.EntityManager;
import javax.ws.rs.Consumes;
import javax.ws.rs.DELETE;
import javax.ws.rs.GET;
import javax.ws.rs.PUT;
import javax.ws.rs.Path;
import javax.ws.rs.PathParam;
import javax.ws.rs.Produces;
import javax.ws.rs.core.MediaType;
import javax.ws.rs.core.Response;
import javax.ws.rs.core.Response.Status;
import com.dunebook.webclipse.example.EntityManagerHelper;
import com.dunebook.webclipse.example.Person;
/**
 * @author vikas
 */
@javax.inject.Singleton
@Path("Person")
public class PersonFacadeREST extends AbstractFacade {
    private EntityManager em;
    public PersonFacadeREST() {
        super(Person.class);
    }
    @PUT
    @Override
    @Consumes({ "application/xml", "application/json" })
    public Response edit(Person entity) {
        if (entity.getName().length() <= 3) {
            return Response.status(Status.CONFLICT).entity("Customer name is too short").type(MediaType.TEXT_PLAIN).build();
        }
        return super.edit(entity);
    }
    @DELETE
    @Path("remove/{id}")
    public Response remove(@PathParam("id") Integer id) {
        return super.remove(super.find(id));
    }
    @GET
    @Path("{id}")
    @Produces({ "application/json" })
    public Person find(@PathParam("id") Integer id) {
        return super.find(id);
    }

    @GET
    @Override
    @Produces({ "application/json" })
    public List findAll() {
        return super.findAll();
    }

    @GET
    @Path("{from}/{to}")
    @Produces({ "application/xml", "application/json" })
    public List findRange(@PathParam("from") Integer from,
            @PathParam("to") Integer to) {
        return super.findRange(new int[] { from, to });
    }

    @GET
    @Path("count")
    @Produces("text/plain")
    public String countREST() {
        return String.valueOf(super.count());
    }

    @Override
    protected EntityManager getEntityManager() {
        em = EntityManagerHelper.getEntityManager();
        return em;
    }
}
A few key annotations and methods:
@Path(“Person”)
public class PersonFacadeREST
Our person services will be available at the JAX-RS service relative path, Person – i.e.,
/jaxrs/rest/v1.1/*/Person relative to our application’s webroot.
 @GET
 @Override
 @Produces({ "application/json" })
 public List findAll() {
 return super.findAll();
 }
If a call is made to /jaxrs/rest/v1.1/*/Person with the HTTP GET method, a list of all people is returned. The
@Produces annotation tells JAX-RS that this method can produce JSON output.
 @GET
 @Path("{id}")
 @Produces({ "application/xml", "application/json" })
 public Person find(@PathParam("id") Integer id) {
 return super.find(id);
}
At /jaxrs/rest/v1.1//Person/{id} (/jaxrs/rest/v1.1//Person/2 for example) you will get Person object
containing the details of the person with the specified Id.
Developing Angular 4 Application
Now we are going to develop Angular 4 application. here we will explain how to create component, services
, interfaces and run them.
IDE: Angular IDE by Webclipse.
Note – RxJS: Angular 4 will use this to communicate REST service exposed by JAVA EE application.
Create the Project
The first step is to create a new Angular 4 project using the New Angular 4 Project wizard. To get started,
select File > New > Angular Project. Type in a name for the project, and then click “Finish” to accept
the default settings.

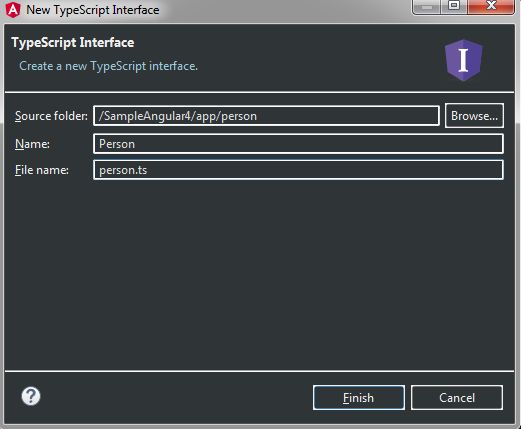
Create the Person Interface
To create interface, use project wizard and select New > Interface. Note that we’ve added a person segment to the path so that we can
group all the functionality in this single folder.
In our Person interface, we simply define different attributes of the Person we will be displaying and
manipulating.
Replace the code generated in person.ts with the following:
Person.ts source
export interface Person {
  id: number;
  name: string;
  gender: string;
  city: string
}
Create the Person Service
To create the service, select New > Service. Be sure to expand the Advanced group and select “Do not create
the code in its own directory” so that we don’t get another subfolder.
Use project wizard to create service

The Person service is only responsible for hitting REST services exposed by JAVA EE application. this service will perform read/write operation to our database.
Replace the code generated in person.service.ts with the following:
Person.service.ts source:
import { Injectable } from '@angular/core';
import { Http, Response, Headers } from '@angular/http';
import { Observable } from 'rxjs/Observable';
import { Person } from './person';
import 'rxjs/add/operator/map';

@Injectable()
export class PersonService {

  private baseUrl = 'http://localhost:8080/SWBackend/jaxrs/rest/v1.1/';

  constructor(private http: Http) {
  }

get(id: number): Observable {
    const person$ = this.http
      .get(`${this.baseUrl}/Person/${id}`, {headers: this.getHeaders()})
      .map(mapPerson);
      return person$;
  }

  getAll(): Observable {
     const person$ = this.http
      .get(`${this.baseUrl}/Person`, {headers: this.getHeaders()})
      .map(mapPersons);
    return person$;
  }
   private getHeaders() {
    const headers = new Headers();
    headers.append('Accept', 'application/json');
    headers.append('Content-Type', 'application/json');
    return headers;
  }
}
function mapPersons(response: Response): Person[] {
  return response.json().map(toPerson);
}
function mapPerson(response: Response): Person {
  return toPerson(response.json());
}
function toPerson(r: any): Person {
  return r;
}
Some important key REST method:
get method Used to get the details of a single Person.
getAll method Used to get a list of Persons.
both methods make HTTP call to REST service exposed by JAVA EE application.
toPerson method Used to make the conversion of the received JSON to our local Person interface.
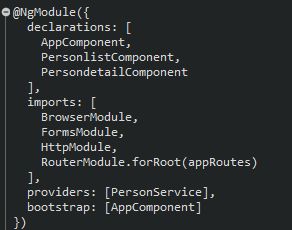
Finally, we have to register our service as a provider in the app module – app.module.ts.
We need to import the service class and list it in the providers array. Please find same below in providers
tag.
Creating Components
Now We’re going to display a list of people, For that, we create Person list component like below
Angular components.
Create the Person List Component
From the app/person context menu, choose New > Component. Again, uncheck the “Do not create the code in its own directory” option (do this for each component you create).
The component is automatically imported and declared in the app module, app.module.ts, so you don’t have to do
this yourself.
On clicking finish, we will get the Personlist.component.ts class and the personlist.component.html template class. Replace the generated code with the code below.
Personlist.component.html source:
 <div class="personlistcss">
<section *ngIf="people" class = "panel-body">
    <table class = "table-striped table-bordered table-hover table-condensed">
        <tr *ngFor="let person of people">
            <td><a href="#" [routerLink]="['/person', person.id]">
                    {{person.name}} </a>  </td>
    </table>
</section>
</div>
Create the Person Details Component
Persondetails.component.ts
import { Component, OnInit } from '@angular/core';
import { ActivatedRoute, Router } from '@angular/router';
import { Person } from './person';
import { PersonService } from './person.service';
@Component({
  selector: 'app-persondetail',
  templateUrl: './persondetail.component.html',
  styleUrls: ['./persondetail.component.css']
})
export class PersondetailComponent implements OnInit {
  person: Person;
  sub: any;
  constructor(private personService: PersonService,
    private route: ActivatedRoute,
    private router: Router) { }

  ngOnInit() {
    this.sub = this.route.params.subscribe(params => {
      const id = Number.parseInt(params['id']);
      this.personService.get(id).subscribe(p => this.person = p);
    });
  }

}
Persondetails.component.html
< div align="center">
<p>
  Person Detail information!
</p>
</div>
<section *ngIf="person" class = "panel">
< div class="input-group">

            <span>Id:</span>
            <input type="text" class = "form-control textCss" [(ngModel)]="person.id">
            <span>Name:</span>
            <input type="text" class = "form-control textCss" [(ngModel)]="person.name">
            <span>Gender:</span>
            <input type="text" class = "form-control textCss" [(ngModel)]="person.gender">
            <span>City:</span>
            <input type="text" class = "form-control textCss" [(ngModel)]="person.city">

        < /div>
< /section>
Setting up Routes
So we’ve created a number of components, Now we have to wire them so that they can work together . Please see app.modules.ts file where in we define all route.
import { BrowserModule } from '@angular/platform-browser';
import { NgModule } from '@angular/core';

import { AppComponent } from './app.component';
import { HttpModule } from '@angular/http';
import { FormsModule } from '@angular/forms';
import { RouterModule, Routes } from '@angular/router';
import { PersonService } from './person/person.service';
import { PersonlistComponent } from './person/personlist.component';
import { PersondetailComponent } from './person/persondetail.component';

const appRoutes: Routes = [
// map '/persons' to the people list component
  { path: 'people', component: PersonlistComponent },

 // map '/persons/:id' to person details component
  { path: 'person/:id', component: PersondetailComponent },

// map '/' to '/persons' as our default route
  { path: '', redirectTo: '/people',pathMatch: 'full' },
];

@NgModule({
  declarations: [
    AppComponent,
    PersonlistComponent,
    PersondetailComponent
  ],
  imports: [
    BrowserModule,
    FormsModule,
    HttpModule,
    RouterModule.forRoot(appRoutes)
  ],
  providers: [PersonService],
  bootstrap: [AppComponent]
})
export class AppModule { }
Running Your Application
Deploy the back-end application
Since we have two different application and Angular 4 fetches data from JAVA EE application so Please make sure
that JAVA EE backend application should start running first. You can now deploy your
application using Run As > Run on Server Application to deploy the back end to your preferred Java EE
server.
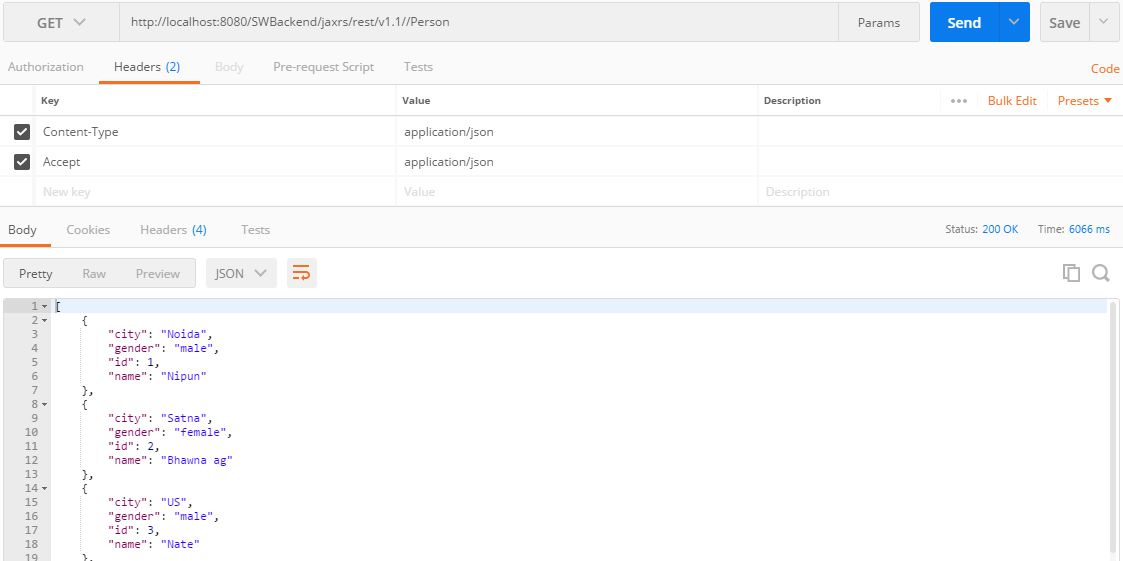
To verify whether service is running perfectly:
Use google postman agent as client to test rest web service URL
http://localhost:8080/SWBackend/jaxrs/rest/v1.1//Person like below. It returns response in json format.
Deploy the front-end application
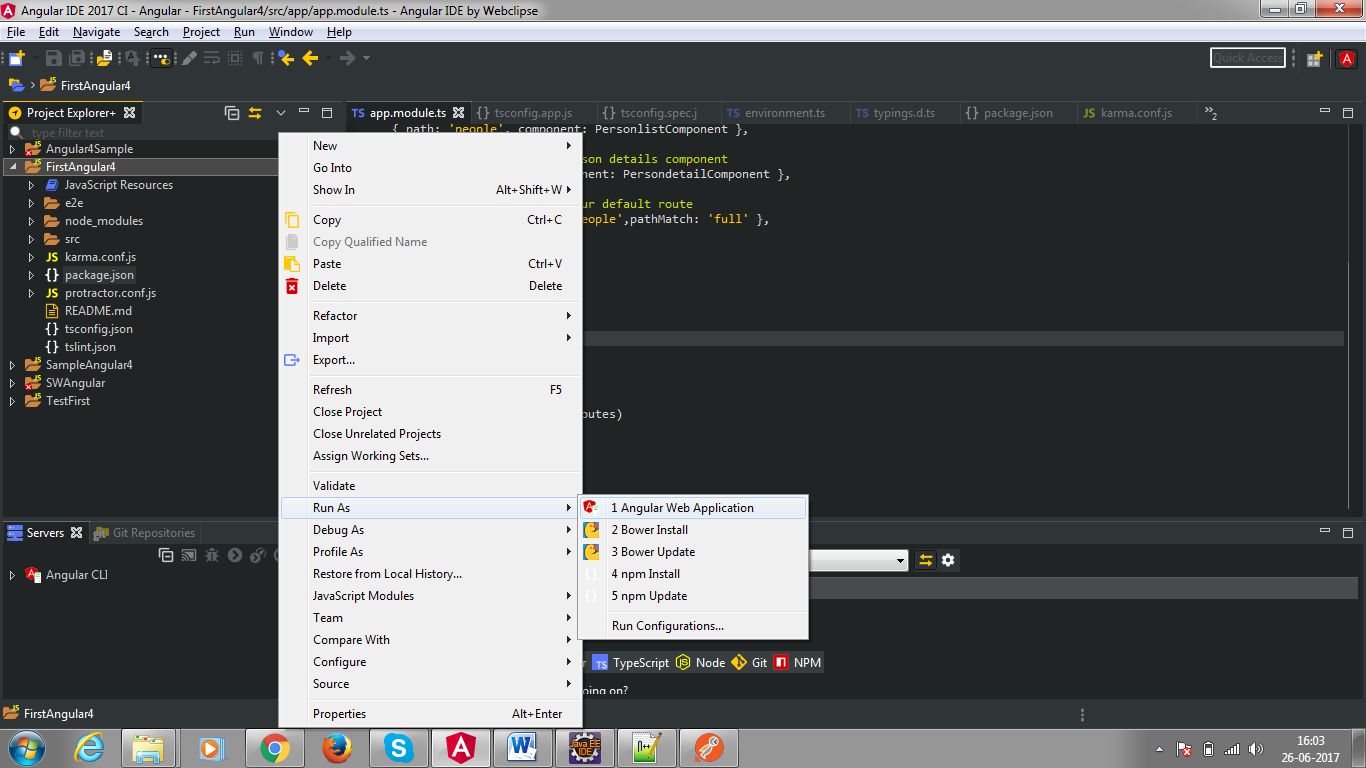
Now this is the time to deploy your application from the project’s context menu, choose Run As > Angular
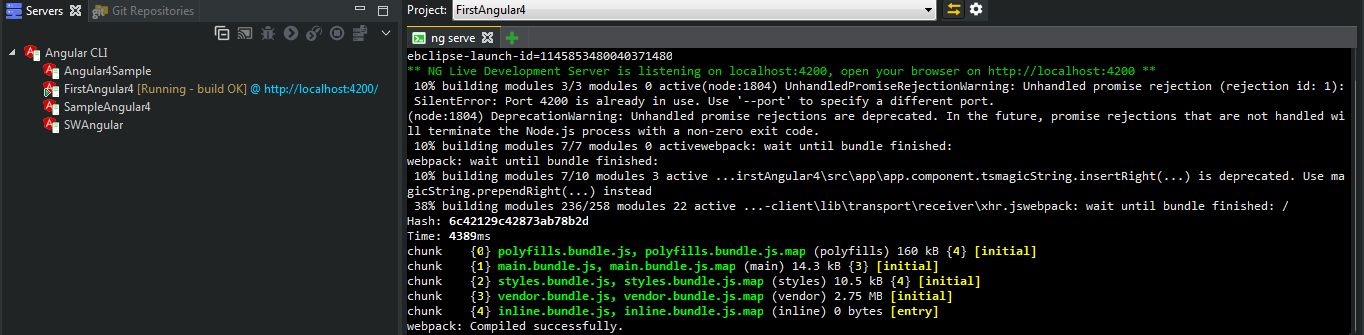
Web Application or you can even start the application from the Servers view – FirstAngular4 will be listed
under the Angular CLI node. Again, in the Terminal+ view, you should see the output of the “ng serve” process
that is deploying your application.
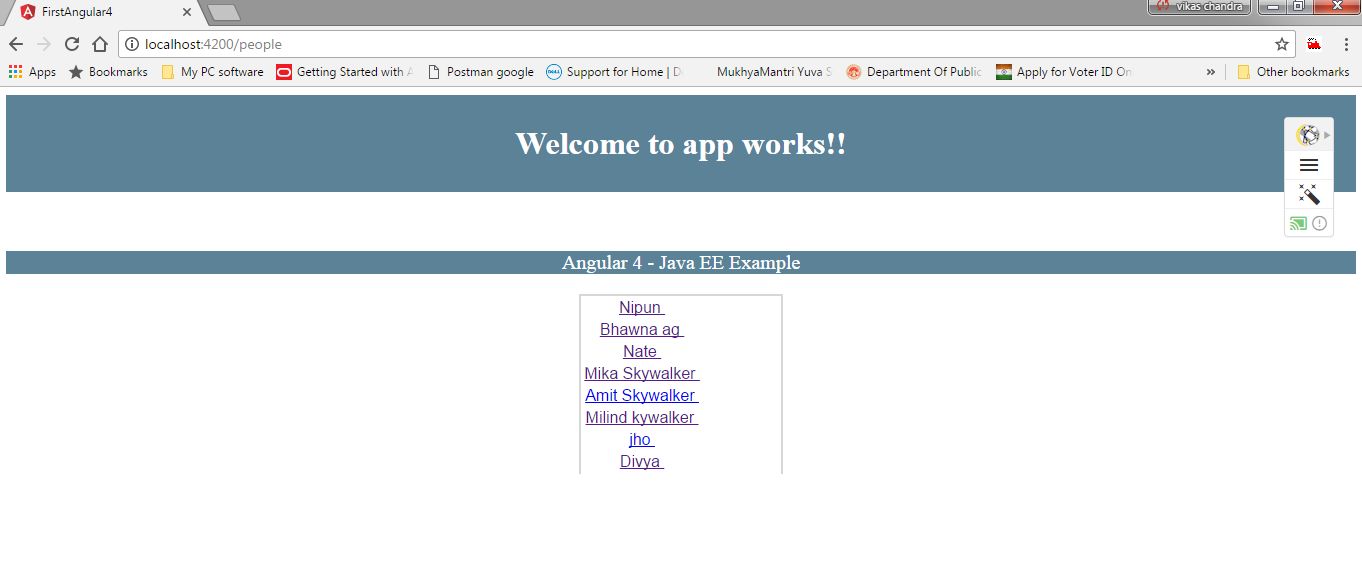
if you used the Run As action, chrome will automatically open with the deployed application – if not, open a
browser and navigate to http://localhost:4200/ to see the front end in action.
Finally our application is running
Angular 4 UI(list of Person)
On clicking on any of Person listed, it will display detail of that particular Person
