Building a Cross-platform Android and iOS app using Ionic + Angular
In this tutorial, we are going to be creating an Ideas Logging App in Angular and the Ionic Framework, more like a note-taking app dedicated to only logging your ideas and prioritizing them. We will be using the latest version of Angular – v5, Angular IDE, and the Ionic Framework – v3 to build this app.
In a world that is constantly changing so fast, it has become very important to log our ideas in one place. Because it has happened to me so many times, where I have an idea this minute and then by tomorrow I had already forgotten about that idea. When you write down your ideas, you’ve simply created an opportunity for yourself to execute and expand on that idea. According to a research on an article on Huffington Post – The Power of Writing Down Your Goals and Dreams. The research found out that you become 42% more likely to achieve your goals and dreams, simply by writing them down on a regular basis.
So enough with the story, let’s get to work. In our app, you will be able to create an idea with a title and a body where you will write the description and details of that idea. I’ll start by introducing you to Ionic.
WHAT IS IONIC?
Ionic is an HTML5 mobile app development framework targeted at building hybrid mobile apps. Hybrid apps are small websites running in a browser shell in an app that has access to the native platform layer. Ionic was built on the premise that HTML5 will rule on mobile over time, exactly as it has on the desktop. At its core, an Ionic app is just a web page running in a native app shell. That means we can use any kind of HTML, CSS, and JavaScript we want. The only difference is, instead of creating a website that others can link to, Ionic is a self-contained application experience. Read More
WHAT ARE THE BENEFITS OF USING IONIC?
Developing your hybrid mobile app with the Ionic Framework lets you quickly create versatile cross-platform apps with a unified look and feel. With ionic, you can create a highly interactive, cross-platform mobile application that can be installed on various operating systems like iOS, Android, and Windows.
Ionic has a huge library of default components that can help you get started really quickly (just take a look at the documentation), not only that, all the libraries from NPM, the world’s largest software registry are available to reuse in your application.
And the greatest benefit of Ionic and the reason why you are reading this tutorial right now is Angular. Ionic framework shares compatibility with Angular, hence the benefits of developing in Angular can be put to use in Ionic, not only that, your Angular code written to work on the web browser can also be reused in your mobile app.
WHAT YOU WILL LEARN
In this article, you will learn about developing a mobile application that can run on iOS and Android using the Ionic Framework.
PREREQUISITES
In order to follow along with this tutorial please ensure you have downloaded and installed the Angular IDE. You also need to follow the instructions on the Ionic Framework website (Getting Started Page) to install ionic on your system. As at the time of this writing. Running ionic -v from my terminal returned back the version of ionic that is installed on my system (3.19.0). You should confirm that this works before moving on to the next section of this tutorial.
ideas-logger git:(master) ionic -v
STEP 1 – CREATE AN ANGULAR + IONIC PROJECT
From your terminal (if you are on Mac or Linux) and command line (if you are on windows). Run the following command to create an ionic project.
ionic start ideas-logger --type=ionic-angular
This command will create a new ionic app named ideas-logger inside the folder where you are located. But before that it will prompt you to pick a starter template to use, the output log is long so I’m just going to show the option that we need to choose like so:
ionic start ideas-logger --type=ionic-angular
? What starter would you like to use:
❯ blank ………….. ionic-angular A blank starter project
You need to choose to create a blank application so as to have full control of the customization of our app. After you have chosen to create a blank app, hit enter, then it will ask you the next question:
? Would you like to integrate your new app with Cordova to target native iOS and Android? (y/N) y
Just type in a y to signify yes and then hit enter. After few mins, the app will be created for you.
STEP 2 – IMPORTING THE IONIC PROJECT TO ANGULAR IDE
Next, we need to open the created app with Angular IDE. Open up the Angular IDE. You can choose to use the default workspace or direct the app to use any folder you want on your computer. We are going to open up the newly created ideas-logger app, so click on File from the Angular IDE menu, my display looks like this:
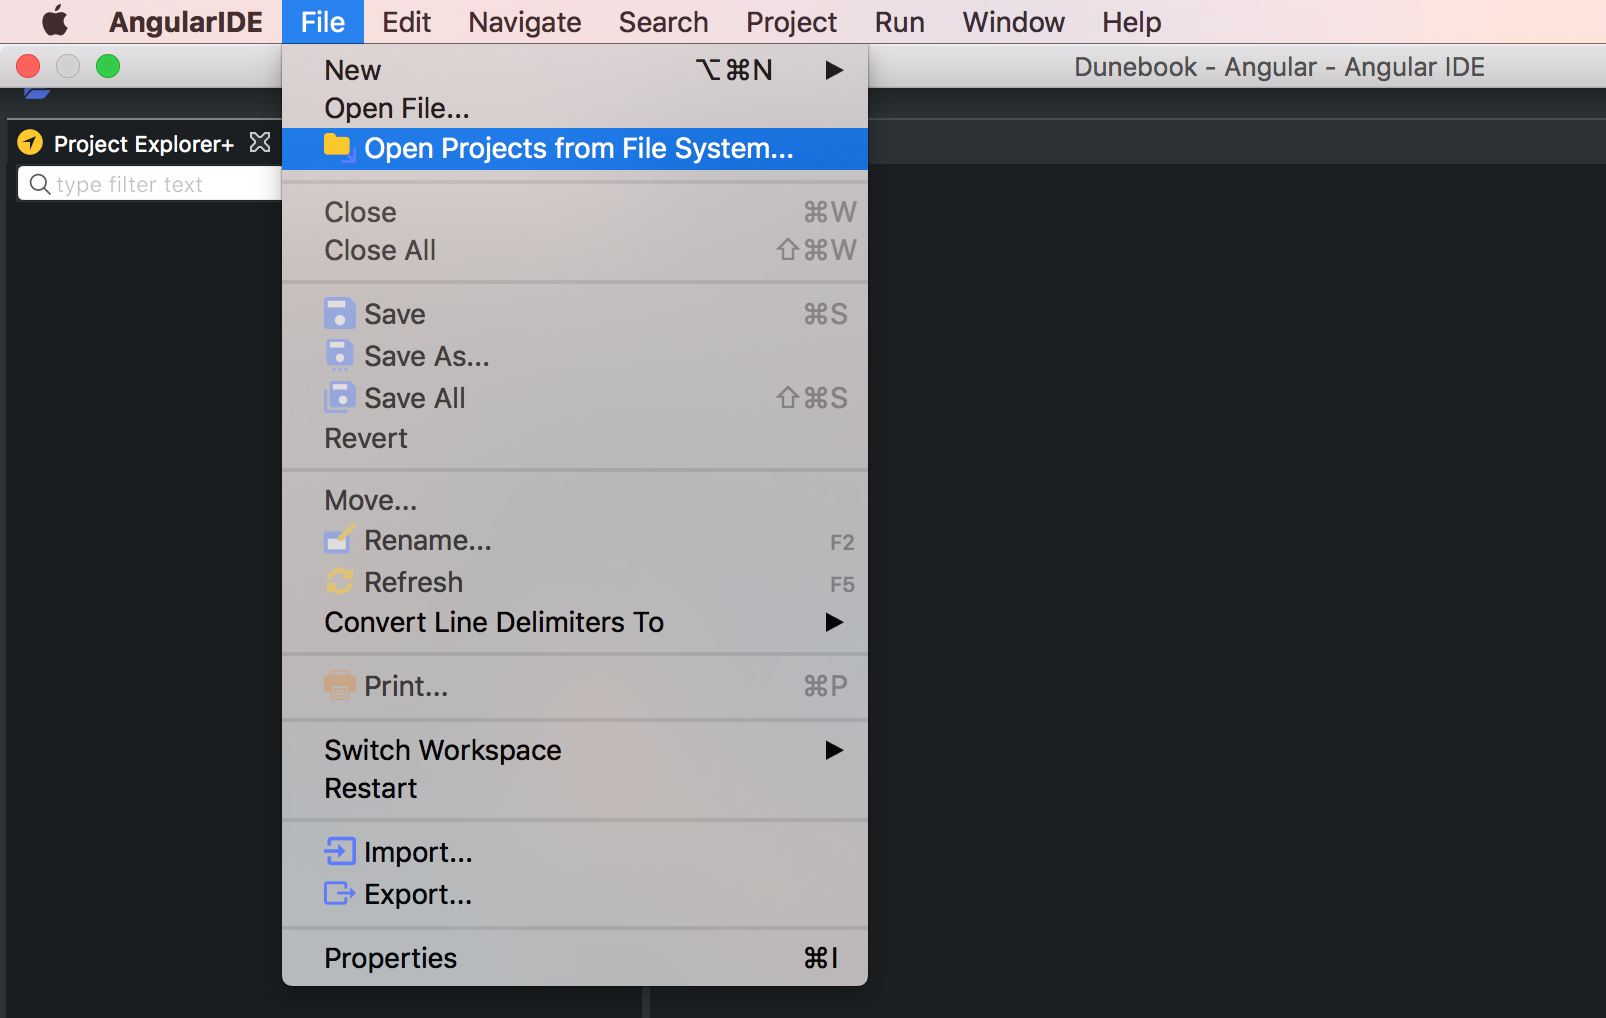
This Screenshot shows where to click to be able to import an existing Ionic project to Angular IDE
Click on Open Projects from File System, after this, it will give you a pop up where you will click on Directory, from where you can navigate to the location of the app you just created with the terminal. My screen looks like this after successfully importing the project into the Angular IDE.
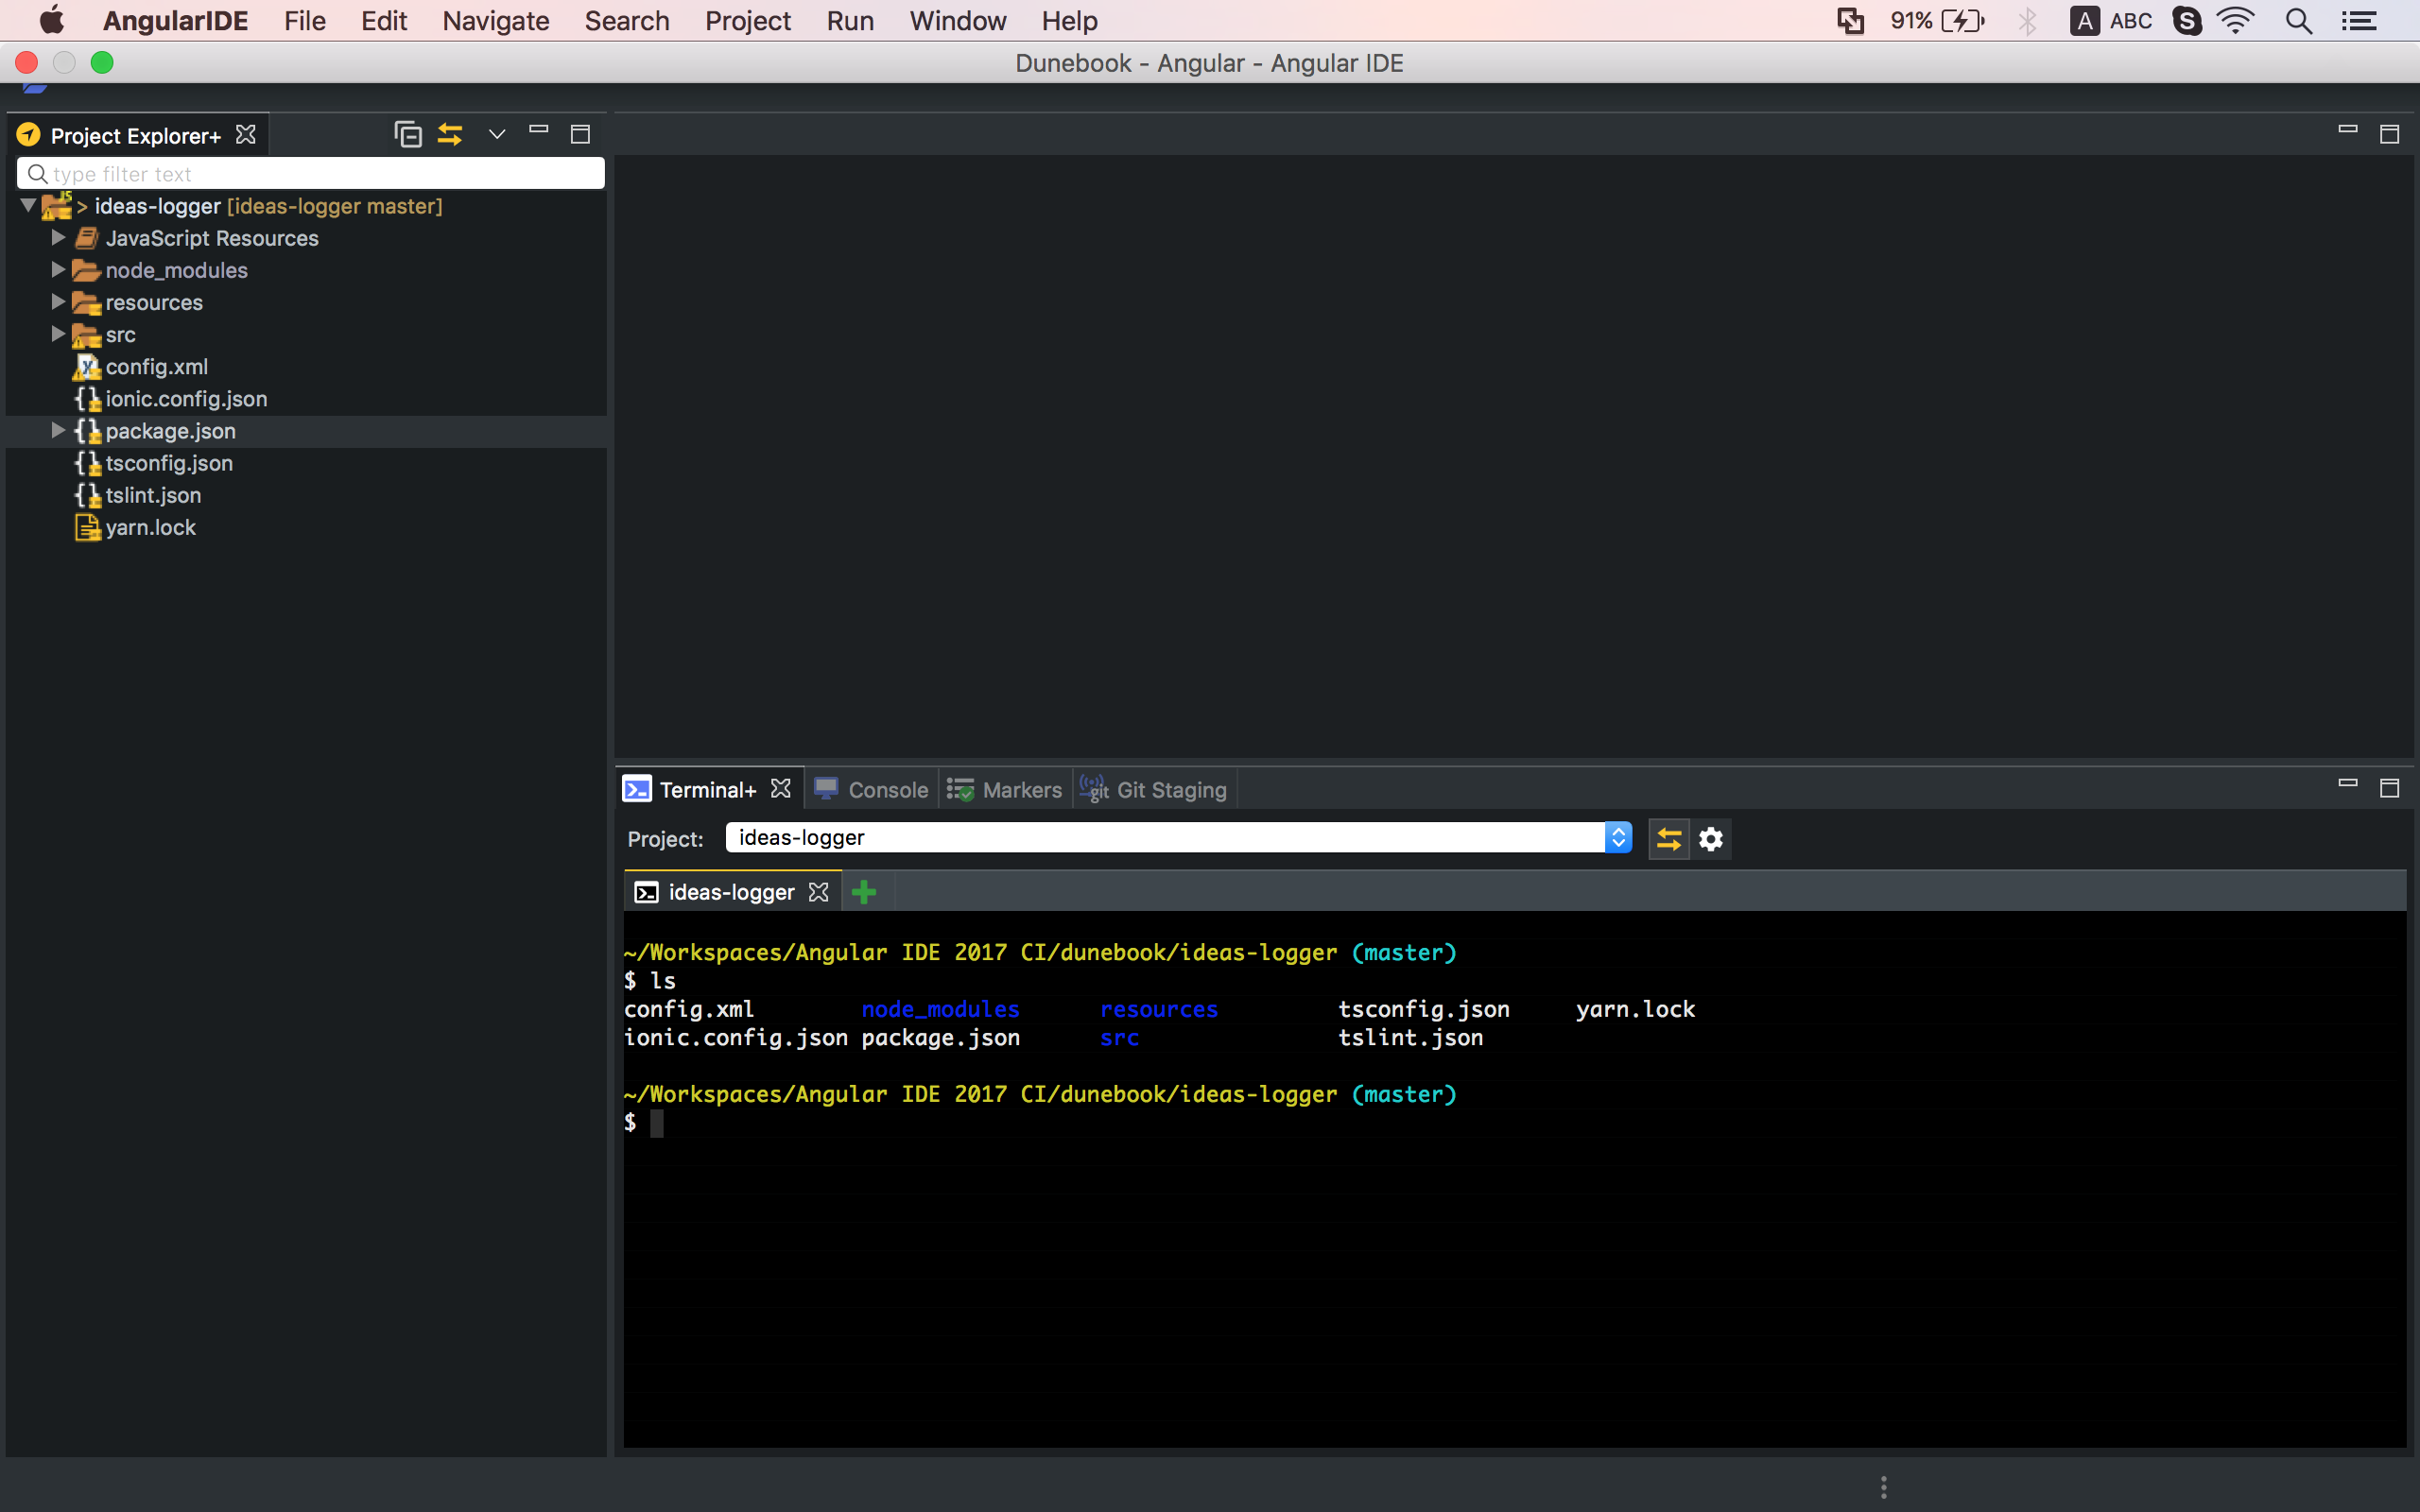
This Screenshot shows the way your IDE should look like after successful import to Angular IDE.
STEP 3 – RUNNING THE IONIC PROJECT WITH ANGULAR IDE
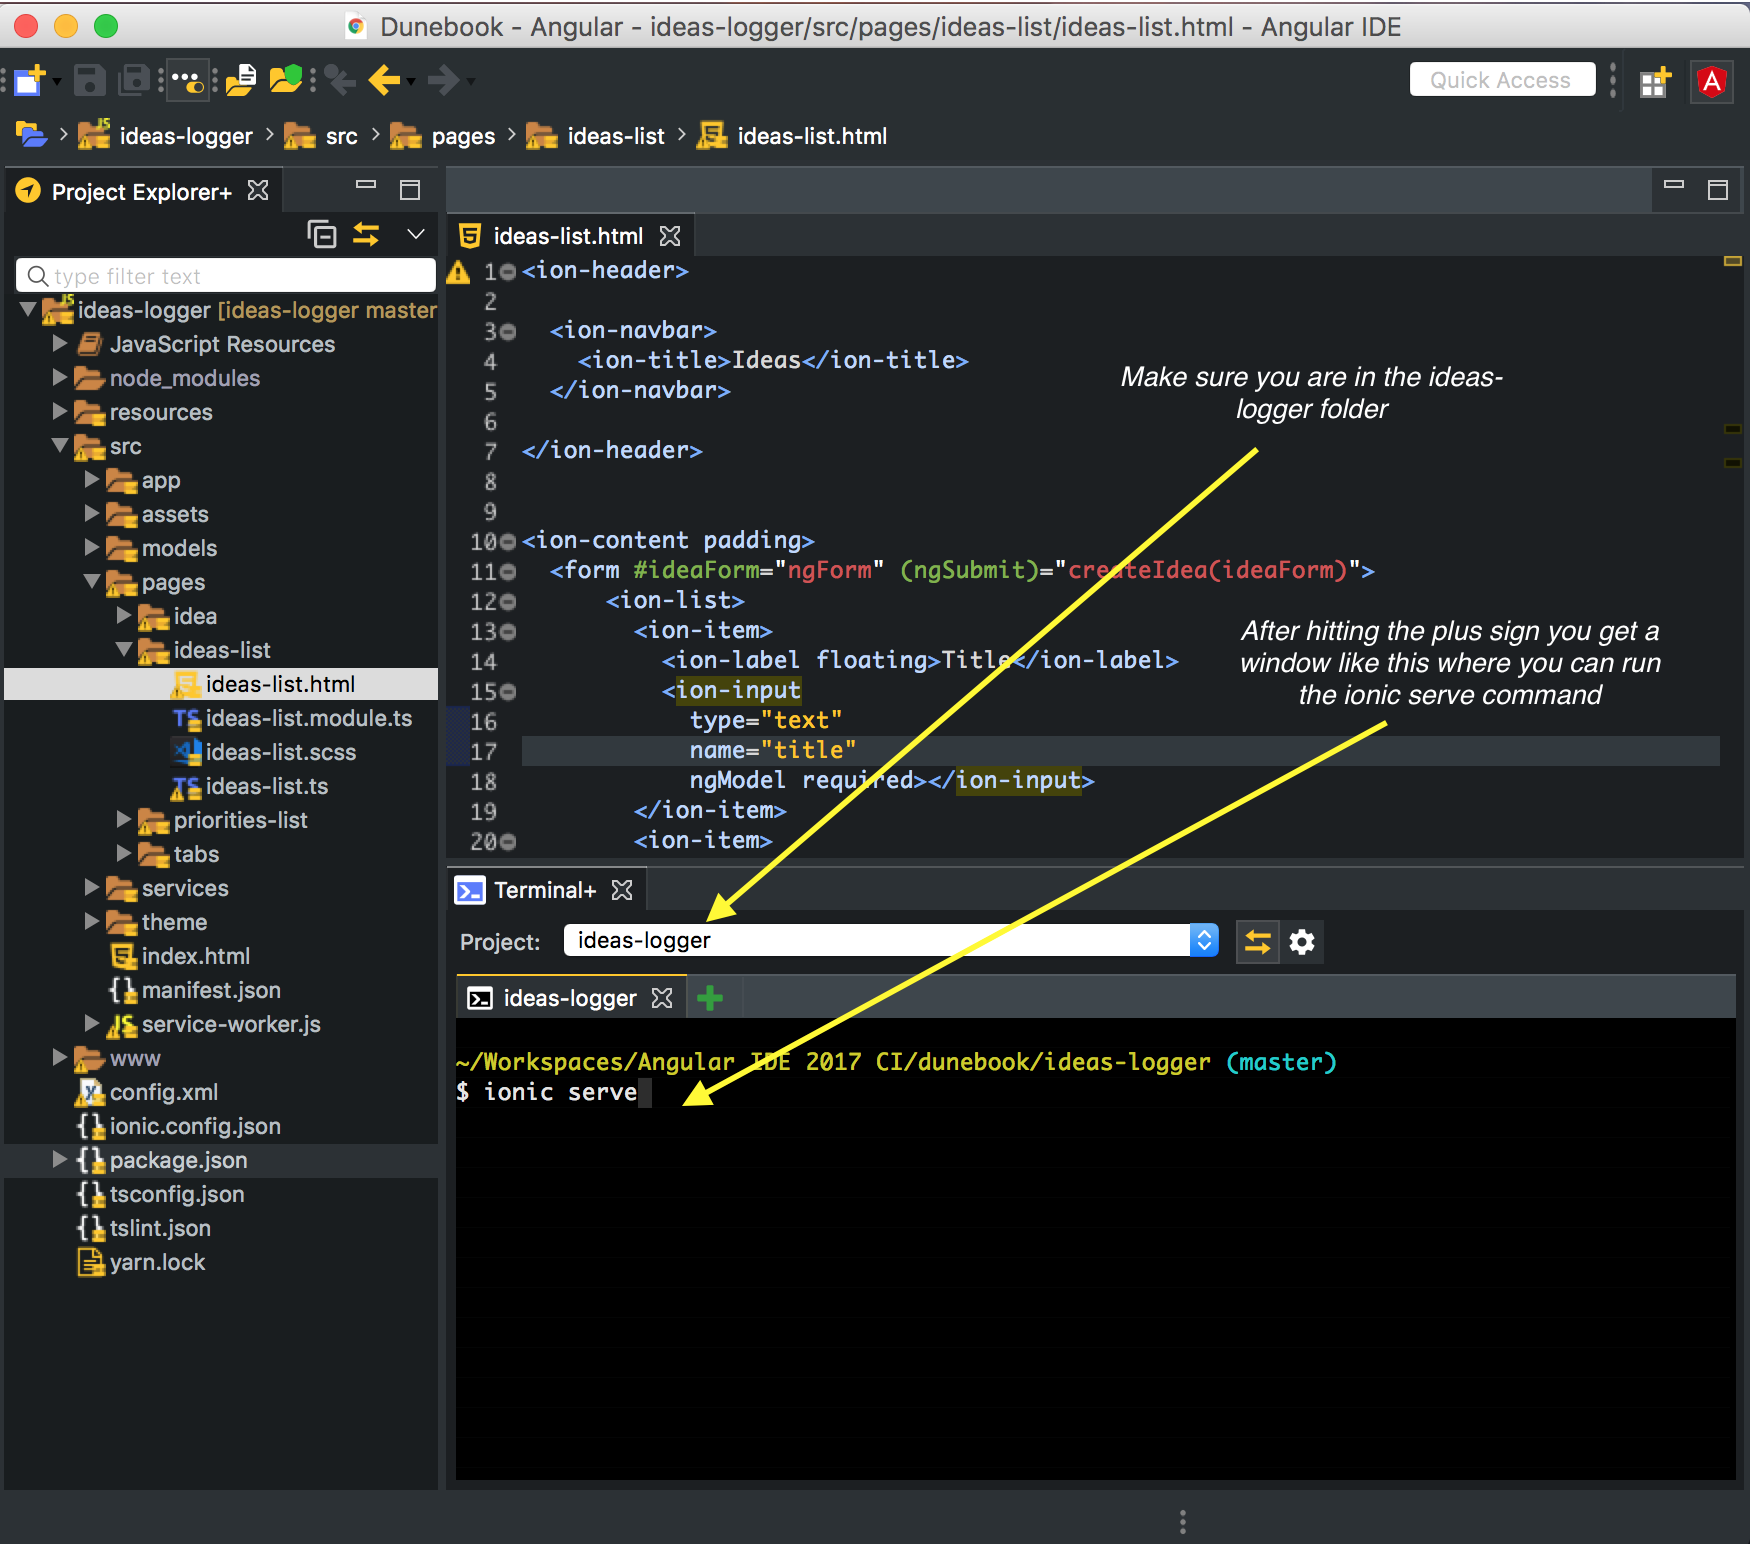
Now let’s see the app running by typing ionic serve to run the application. You can run your app from the terminal in Angular IDE (the deep black section).

Screenshot showing how to launch the terminal in Angular IDE
ionic serve is one of the many commands offered by the Ionic CLI(command line interface), and it will compile your application to JavaScript, CSS, and HTML, and then it will spin up a little development server running at the address localhost:8100 which will host your application. The ionic serve is expected to automatically open the application in your default browser, where you will see the blank starter project that the Ionic CLI created.
Screenshot showing how to launch the terminal in Angular IDE
The browser is a great place to test your app before trying it out in the simulator provided by the Ionic Framework. The ionic serve will watch your files for changes and recompile then reload the page instantly every time you hit save. It’s fast, easy to debug and a very great tool for development.

Screenshot showing the browser and terminal view after running the ionic serve in Angular IDE’s terminal
In Chrome, which I recommend using, by the way, you can open up your developer tool, where you have the device mode, to toggle between a mobile and browser view. Clicking on it will switch to a mobile view. You can even switch in between different devices to see how the app will look like on these devices. Take note that it’s not a 100% emulation of your application, features like push notification and camera are not available, well because it’s on a browser. But it gives you a pretty good head start to build all the muscle you need for your ionic mobile application. This is what it looks like in my browser:
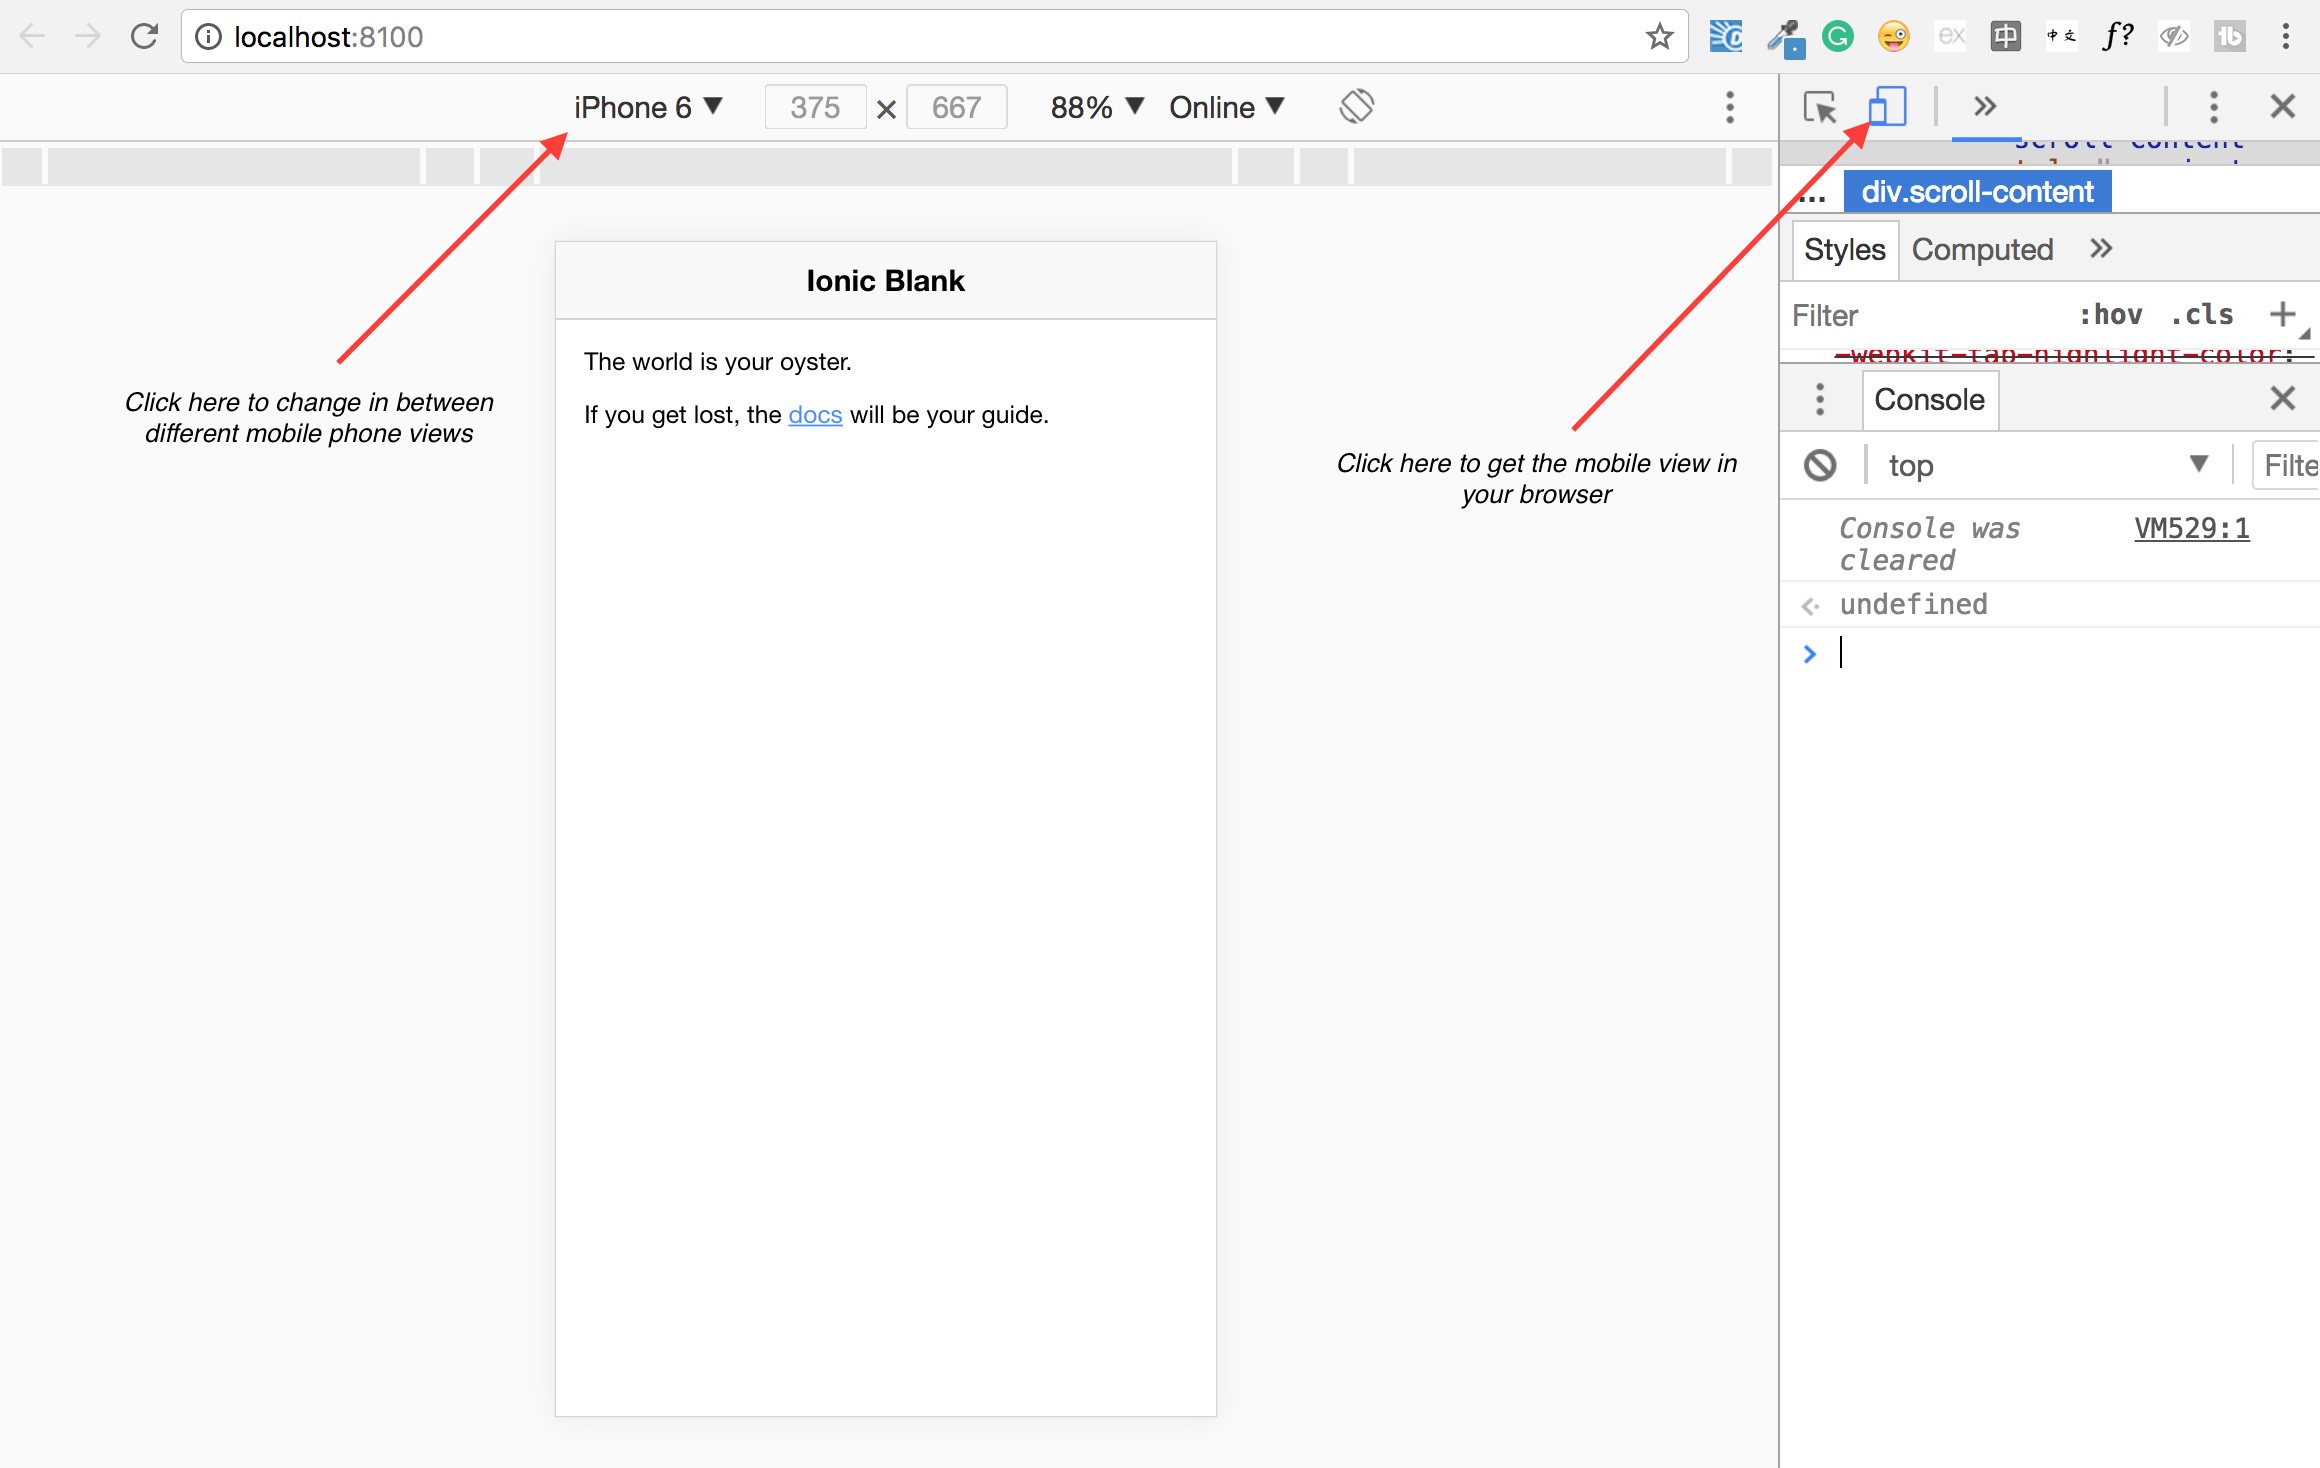
This Screenshot shows the app in a Chrome Browser. After running ionic serve from the terminal in Angular IDE.
Now let’s get to the development of our application first by making some changes to the application. Navigate to the src folder, where we will be doing most of the development of our application. Find the pages folder and there you will find the home folder, when you find the home folder, delete it. This will make the pages folder to be empty.
Immediately after deleting the home folder from the pages folder, you should get the following errors in the terminal:
[00:19:44] typescript: src/app/app.component.ts, line: 6
Cannot find module '../pages/home/home'.

L6: import { HomePage } from '../pages/home/home';
L7: @Component({

[00:19:44] typescript: src/app/app.module.ts, line: 8
Cannot find module '../pages/home/home'.

L7: import { MyApp } from './app.component';
L8: import { HomePage } from '../pages/home/home';
That’s because we need to delete every reference to the Home component in our application. So go ahead and remove the references from app.component.ts and app.module.ts files, we don’t need to remove the reference to the rootPage from app.html, because we will still use it.
Now let’s go ahead and create all the pages (more like Angular components) that we will need. Take note that, in ionic not every component is a page but every page is a component.
STEP 4 – CREATING PAGES FROM ANGULAR IDE TERMINAL
In the terminal of your Angular IDE, type the following command to create these pages.
- ionic generate page ideas-list
- ionic generate page priorities-list
- ionic generate page tabs (this, will be our new root page, for our Ideas and Priorities tab)
Next, let’s go ahead and register the newly created pages in the app.module.ts, this will enable angular to recognize their existence and compile them on the next compilation cycle.
If you’ve used the previous versions of Ionic, for example, ionic v2, you will notice a slight difference in the content of the pages/components now generated in ionic, ionic now supports lazy loading by default. You will notice now that every page you create is created with its own module. And what that means is that the amount of time it takes to load each page is now significantly reduced because only what is needed for individual pages are requested on page load. You can read more about Lazy Loading on this short medium post.
So let’s go ahead now and add those modules to the root module, which is, in our app the app.module.ts file. After adding all modules my app.module.ts now looks like this:
import { BrowserModule } from '@angular/platform-browser';
import { ErrorHandler, NgModule } from '@angular/core';
import { IonicApp, IonicErrorHandler, IonicModule } from 'ionic-angular';
import { SplashScreen } from '@ionic-native/splash-screen';
import { StatusBar } from '@ionic-native/status-bar';

import { MyApp } from './app.component';
import { IdeasListPageModule } from '../pages/ideas-list/ideas-list.module';
import { PrioritiesListPageModule } from '../pages/priorities-list/priorities-list.module';
import { TabsPageModule } from '../pages/tabs/tabs.module';
import { TabsPage } from '../pages/tabs/tabs';

@NgModule({
  declarations: [
    MyApp
  ],
  imports: [
    BrowserModule,
    IonicModule.forRoot(MyApp),
    TabsPageModule,
    IdeasListPageModule,
    PrioritiesListPageModule,
    IdeaPageModule
  ],
  bootstrap: [IonicApp],
  entryComponents: [
    MyApp,
    TabsPage
  ],
  providers: [
    StatusBar,
    SplashScreen,
    {provide: ErrorHandler, useClass: IonicErrorHandler}
  ]
})
export class AppModule {}
and we need to update the pages/tabs/tabs.ts file now to look like this (not including some code to save space:
import { IdeasListPage } from '../ideas-list/ideas-list';
import { PrioritiesListPage } from '../priorities-list/priorities-list';

@IonicPage()
@Component({
  selector: 'page-tabs',
  templateUrl: 'tabs.html',
})
export class TabsPage {
  ideasPage = IdeasListPage;
  prioritiesPage = PrioritiesListPage;
}
and the pages/tabs/tabs.html file to look like this, find more icon in the Ionic docs:
<ion-tabs>
   <ion-tab [root]="prioritiesPage" tabIcon="bookmark" tabTitle="Priorities List"></ion-tab>
   <ion-tab [root]="ideasPage" tabIcon="list-box" tabTitle="Ideas List"></ion-tab>
</ion-tabs>
Next, we need to update the app/app.component.ts and app/app.html (make the tabs page the new root page), do not delete the content that already exists in app.html:
import { TabsPage } from '../pages/tabs/tabs';

@Component({
  templateUrl: 'app.html'
})
export class MyApp {
  rootPage:any = TabsPage;
}
Remember when I said we don’t need to remove the content of the app/app.html file, now is the time to use it, I’m including it again here in case you deleted it.
<ion-nav [root]="rootPage"></ion-nav>
STEP 5 – DISPLAYING THE APP WITH TABS IN THE BROWSER
So, with all these changes in place, ensure that all edited files are saved and the ionic serve is running in the Angular IDE terminal. If you believe that you did everything right and you are still getting an error, try to restart your server. If all goes well your app should now look like this:
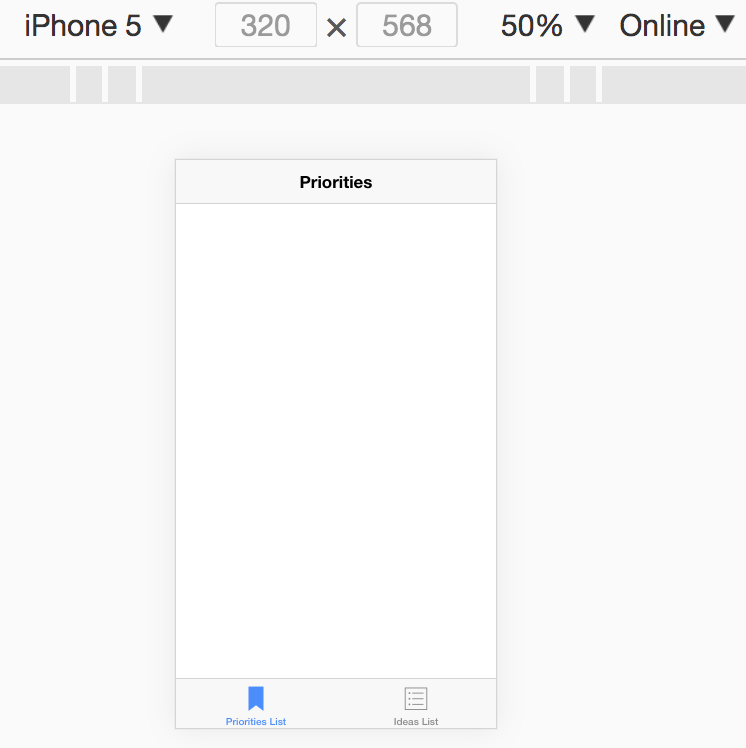
Screenshot, displaying the tabs.
STEP 6 – BUILDING UP CONTENT FOR THE APP
An Idea should have a title and a body. We will start with the ideas list page, the page is a simple page where we will have a form input for Title and Content of every new idea you want to create. So let’s go ahead and create the form that will enable us to create new ideas.
You might be aware that Angular has two approaches when it comes to creating forms, the template-driven approach instructs Angular to create a javascript representation of your form for you, whenever it detects a form element in your HTML code and the Reactive approach where you have full control over the Javascript code and need to create the form on your own programmatically and then tell Ionic/Angular which form and which form elements in your HTML template it has to synchronize with. It will also synchronize with your form object and with the controls you define there. Here in this tutorial, we will work with the template-driven approach. So go into the ideas-list.html which is where we will create the form and type the following code:
<ion-header>
  <ion-navbar>
    <ion-title>Ideas</ion-title>
  </ion-navbar>
</ion-header>

<ion-content padding>
  <form #ideaForm="ngForm" (ngSubmit)="createIdea(ideaForm)">
    <ion-list>
      <ion-item>
    <ion-label floating>Title</ion-label>
      <ion-input type="text" name="title" placeholder="Title for your idea" ngModel></ion-input>
      </ion-item>
      <ion-item>
        <ion-label floating>Content</ion-label>
          <ion-textarea type="text" name="content" placeholder="Describe your idea in the simplest way possible" ngModel></ion-textarea>
      </ion-item>
    </ion-list>
    <button ion-button type="submit" block> Create Idea </button>
  </form>
</ion-content>
We registered the controls (ion-input and ion-textarea), so angular can recognize their existence and be able to interact with them. It is important to have the name attribute set otherwise Angular is not able to assign a name to the control in it’s JavaScript representation of the form. The other thing we did was to make the form submittable. For this to happen, we added a local reference to the form Angular already created and the right place to do this is on the <form> tag. We gave the form tag a name (#ideaForm) and then assigned the ngForm value to the local reference.
Thereafter, we placed the (ngSubmit) event on the <form> tag, which will be listening to the submission of the form. Just like the (click) event we need to execute some function on the (ngSubmit) event, which is going to be the behavior we expect on submission of the form. So let’s give the function a name of createIdea and then pass the form’s local reference as a parameter of the function like so createIdea(ideaForm).
In the ideas-list.ts file, add the following code (highlighted what’s important):
We can test to see if it’s working by logging out the values of the form. Let’s go ahead and try that. The output should be a long NgForm object with whatever value you typed in the form before hitting on the button. If you are anything like me, you would try to find that value in the log.
import { NgForm } from '@angular/forms';

@Component({
  selector: 'page-ideas-list',
  templateUrl: 'ideas-list.html',
})
export class IdeasListPage {
  createIdea(form: NgForm) {
    console.log(form);
  }
}
Let’s move on and actually do some quick validation of the form, making sure that both fields are present before creating an idea. We can do that by disabling the submit button if either of the fields is empty, we will add the HTML5 ‘required’ attribute to each of the input fields and also disable the button if the form is invalid. Add this to the button – [disabled]=“!ideaForm.valid”
The code has been updated to look like this (the required changes are displayed in bold):
<form #ideaForm="ngForm" (ngSubmit)="createIdea(ideaForm)">
  <ion-list>
    <ion-item>
      <ion-label floating>Title</ion-label>
    <ion-input type="text" name="title" required placeholder="Title for your idea" ngModel></ion-input>
    </ion-item>
    <ion-item>
      <ion-label floating>Content</ion-label>
        <ion-textarea type="text" name="content" required placeholder="Describe your idea in the simplest way possible" ngModel>
    </ion-textarea>
   </ion-item>
 </ion-list>
 <button ion-button type="submit" block [disabled]="!ideaForm.valid"> Create Idea </button>
</form>
Another important thing we need to do now is work on Storing the idea we create each time we click on the button to create an idea instead of logging it in the console. So the way to do that is to create a model for our data (idea). And model means how the idea should look like. We already know that an idea has a title and a content. So let’s go ahead and create a ‘services’ and a ‘models’ folder in the src folder of our app. Inside the model folder, we will create a new file and name it ‘idea.model.ts’ and then populate it with the code below.
src/models/idea.model.ts
export class Idea {
  constructor(public title: string, public content: string) {}
}
And then create a service folder, inside the service folder create a file and name it, ‘idea.service.ts’ and fill it up with the code below:
src/services/idea.service.ts
import { Idea } from '../models/idea.model';

export class IdeaService {
  private ideas: Idea[] = [];
  private priorityList: Idea[] = [];

  addIdea(title: string, content: string) {
    this.ideas.push(new Idea(title, content));
  }

  getIdeas() {
    return this.ideas.slice();
  }

  removeIdea(index: number) {
    this.ideas.splice(index, 1);
  }

  addIdeaToPriorityList(idea: Idea) {
    this.priorityList.push(idea);
  }

  removeIdeaFromPriorityList(index: number) {
    this.priorityList.splice(index, 1);
  }

  getPriorityList() {
    // Get a copy of the priority list array.
    return this.priorityList.slice();
  }

  isIdeaAPriority(idea: Idea) {
    return this.priorityList.find((id: Idea) => {
      return id == idea;
    })
  }
}
Now let’s use the service to create our ideas and show it on the ideas-list page. We will be using the service in the ideas-list.ts file inside the ideas-list folder. We will also use the service methods created to add and remove ideas to the priority list. Whatever you do, do not forget to add the IdeaService to the providers array in the root module – app.module.ts
src/pages/ideas-list/idea-list.ts
import { Component, OnInit } from '@angular/core';
import { IonicPage, AlertController } from 'ionic-angular';
import { NgForm } from '@angular/forms';
import { IdeaService } from '../../services/idea.service';
import { Idea } from '../../models/idea.model';

@IonicPage()
@Component({
  selector: 'page-ideas-list',
  templateUrl: 'ideas-list.html',
})
export class IdeasListPage implements OnInit {
  ideas: Idea[];

  constructor(private ideaService: IdeaService, private alertCtrl: AlertController) {}

  ionViewDidLoad() {
    console.log('ionViewDidLoad IdeasListPage');
  }

  ngOnInit() {
    this.getIdeas();
  }

  createIdea(form: NgForm) {
    this.ideaService.addIdea(form.value.title, form.value.content);
    form.reset();
    this.getIdeas();
  }

  addToPriorities(idea: Idea) {
    const alert = this.alertCtrl.create({
      title: 'Add to Priority List',
      subTitle: 'Are you sure?',
      message: 'Are you sure you want to add the Idea to your list of priorities?',
      buttons: [
        {
          text: 'Yes',
          handler: () => {
            this.ideaService.addIdeaToPriorityList(idea);
          }
        },
        {
          text: 'No',
          role: 'cancel',
          handler: () => {
            console.log('Request cancelled');
          }
        }
      ]
    });
    alert.present();
    console.log('add to priority clicked');
  }

  removeFromPriority(index: number) {
    this.ideaService.removeIdeaFromPriorityList(index);
  }

  isAPriority(idea: Idea) {
    return this.ideaService.isIdeaAPriority(idea);
  }

  private getIdeas() {
    this.ideas = this.ideaService.getIdeas();
  }
}
src/pages/ideas-list/ideas-list.html
<ion-header>
  <ion-navbar>
    <ion-title>Ideas</ion-title>
  </ion-navbar>
</ion-header>
<ion-content padding>
  <form #ideaForm="ngForm" (ngSubmit)="createIdea(ideaForm)">
    <ion-list>
    <ion-item>
      <ion-label floating>Title</ion-label>
        <ion-input
        type="text"
        name="title"
        ngModel required></ion-input>
    </ion-item>
    <ion-item>
      <ion-label floating>Content</ion-label>
        <ion-textarea
        type="text"
        name="content"
        ngModel required></ion-textarea>
    </ion-item>
  </ion-list>
  <button
    ion-button
    type="submit"
    block [disabled]="!ideaForm.valid">Create Idea</button>
</form>
<!-- Display, created ideas in a card.-->
<ion-card *ngFor="let idea of ideas; let i = index;">
  <ion-card-header>
     #{{ i + 1 }} - {{ idea.title }}
  </ion-card-header>
  <ion-card-content>
     <p>{{ idea.content }}</p>
  </ion-card-content>
  <ion-row>
    <ion-col>
      <button ion-button clear small (click)="addToPriorities(idea)" *ngIf="!isAPriority(idea)">
        Prioritize
      </button>
      <button ion-button clear small color="danger" (click)="removeFromPriority(i)" *ngIf="isAPriority(idea)">
        UnPrioritize
      </button>
    </ion-col>
  </ion-row>
</ion-card>
</ion-content>
src/pages/priorities-list/priorities-list.ts
import { Component } from '@angular/core';
import { IonicPage } from 'ionic-angular';
import { IdeaService } from '../../services/idea.service';
import { Idea } from '../../models/idea.model';

@IonicPage()
@Component({
  selector: 'page-priorities-list',
  templateUrl: 'priorities-list.html',
})
export class PrioritiesListPage {
  priorityList: Idea[];

  constructor(private ideaService: IdeaService) {
  }

  ionViewWillEnter() {
    this.getPriorityList();
  }

  getPriorityList() {
    this.priorityList = this.ideaService.getPriorityList();
  }

  removeFromPriorityList(index: number) {
    this.ideaService.removeIdeaFromPriorityList(index);
    this.getPriorityList();
  }
}
src/pages/priorities-list/priorities-list.html
<ion-header>
  <ion-navbar>
    <ion-title>Priorities</ion-title>
  </ion-navbar>
</ion-header>
<ion-content padding>
  <ion-list>
    <ion-item-sliding
      *ngFor="let idea of priorityList; let i = index;">
      <ion-item>
        <h2>{{idea.title}}</h2>
        <p>{{idea.content}}</p>
      </ion-item>
      <ion-item-options>
        <button ion-button
          color="danger"
          (click)="removeFromPriorityList(i)">
          <ion-icon name="trash"></ion-icon>
          Delete
        </button>
      </ion-item-options>
    </ion-item-sliding>
  </ion-list>
</ion-content>
Now create an idea and then prioritize it to add it to the priority list and in the priority list you can also use your mouse to slide to the left be able to remove an idea from the priority list:


Here’s the final look at the app, You can view it online here.
You can extend the app further by creating a new page for a single idea, this will enable you to view an idea and it’s title and content individually. You can either choose to show it in a modal or a full page, read more how to use those components in the documentation.
Conclusion
Angular has significant advantages not only for building web applications but also for building mobile applications. A combination of Angular and Ionic gives you a powerful toolset for creating native mobile applications that can run both on Android and iOS. And as you may already know, at least 90% of your Angular code can be reused for creating your mobile application.
If you have any question or get stuck in any of the steps above do not hesitate to drop a comment below or tweet me @mayordwells.
Find the full version of the app on Github here