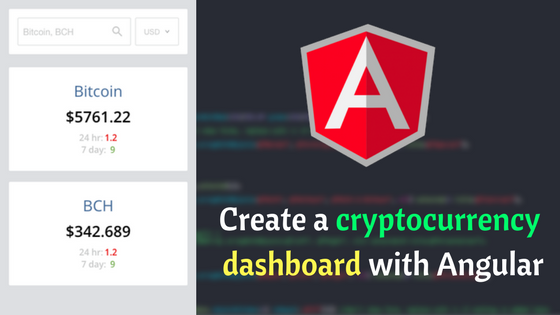
Create a cryptocurrency dashboard with Angular
In this tutorial , we will be creating a cryptocurrency dashboard using Angular 4 and Angular IDE. Cryptocurrency is a digital asset designed to work as a medium of exchange using cryptography to secure the transactions and to control the creation of additional units of the currency. Bitcoin is the most popular digital currency, however there are numerous cryptocurrencies in existence.
On our dashboard, we will display the price, percentage change in 24 hour price, and percentage change in 7 day price of selected cryptocurrencies.
What You will Learn
In this article you will learn about Angular application development using Angular IDE. You will also learn how to use the Subject class from RxJS, a ReactiveX library for javascript.
Prerequisites
In order to follow along with this tutorial, please ensure you have installed Angular IDE.
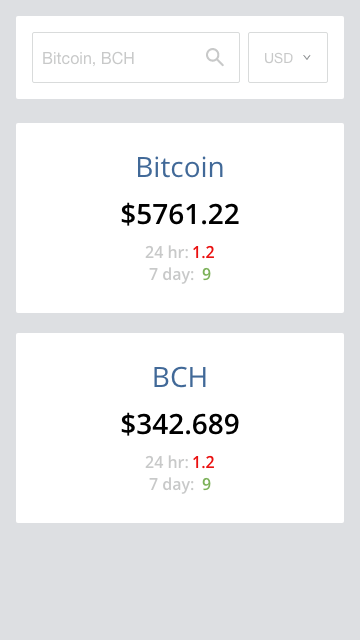
UI Design
Below is a picture of how the cryptocurrency dashboard will look like on mobile.
Step 1 — Create new Angular project
Open Angular IDE, click File in the top menu, then select,New then click.Angular Project

In the new Angular project wizard, type crypto-dashboard as the project name, select node version 6.11.4, and npm version 3.10.10. Then click the finish button.

Angular IDE will take a few minutes to set up the project, you can see the activities output in Terminal+. Once completed we see an output like in the image below

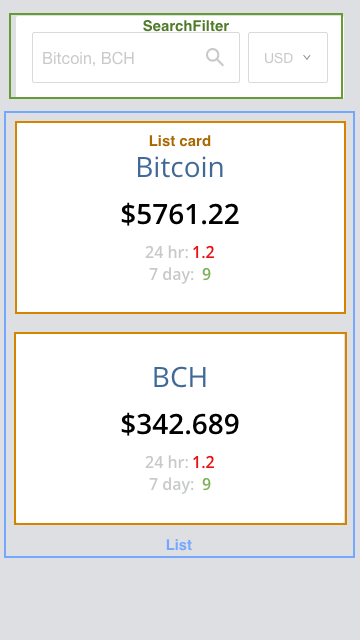
Step 2 — Create application components
Taking a look at our UI design, we can identify two visible components, the search-filter box, and the list card. There is also an invisible component which is the list itself. The components are highlighted in the picture below:
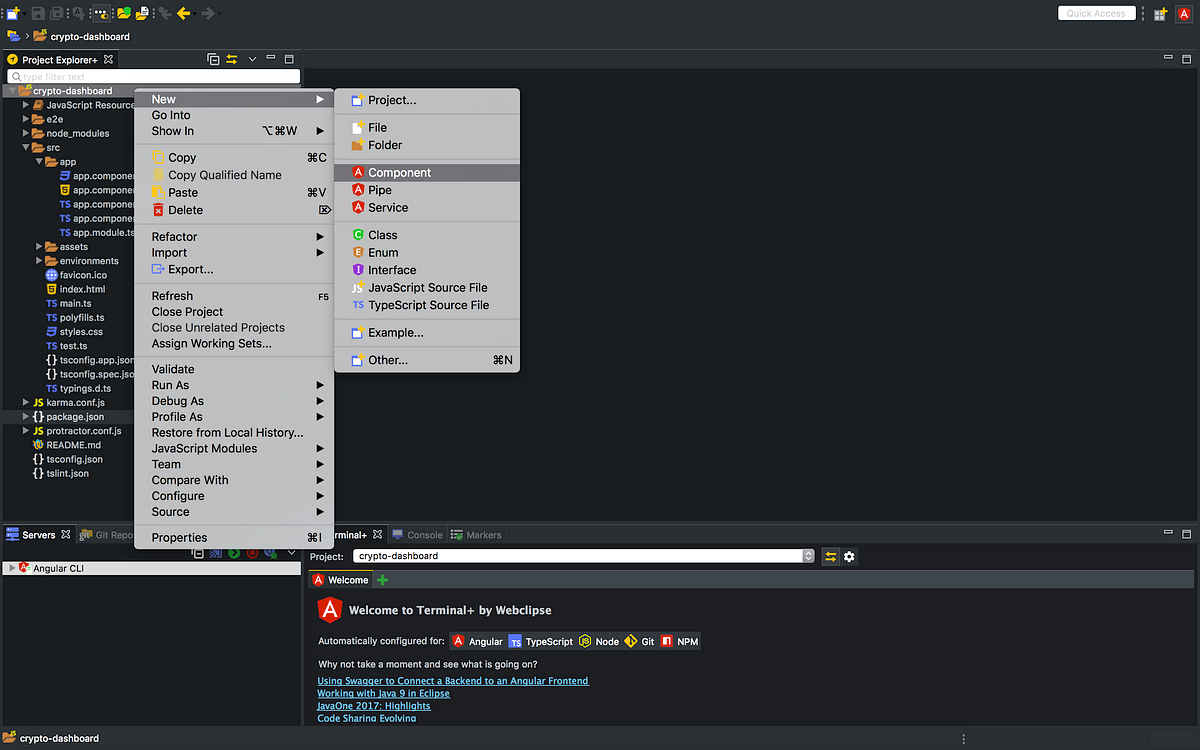
Now, let’s create the components. In the file explorer view, right click on crypto-dashboard, select new, and click.Component
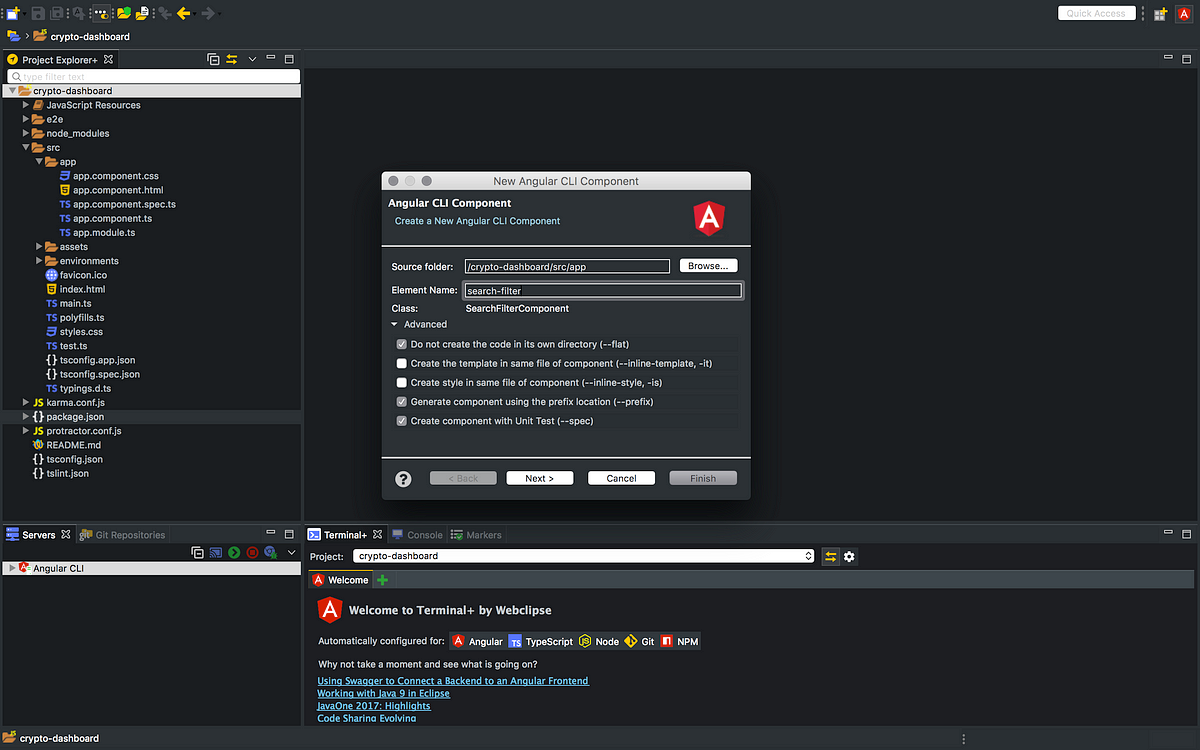
In the New Angular CLI dialog, enter search-filter as element name, and click the finish button. See image below for reference:
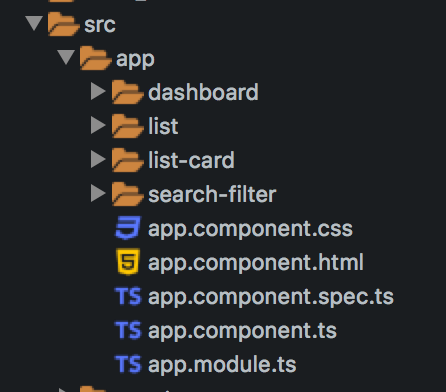
Repeat the steps to create the list-card, and list component. Also create a dashboard component, so we use it to organize our components. Your directory structure, under the src/app folder should be as in the image below:
Create AppService
In this tutorial, we will be using just one Angular Service, named AppService. In Angular, a Service is a broad category encompassing any value, function, or feature that your application needs.
In the file explorer view, right click on crypto-dashboard, select new, and click Service. In the new Angular CLI Service wizard, enter App a the element name, and click finish.

Add Bootstrap CSS and Font Awesome
Let us add bootstrap css and font awesome to our project by updating the contents of src/index.html , add the code snippet below in the head section of the html document
<link rel="stylesheet"
href="https://maxcdn.bootstrapcdn.com/bootstrap/3.3.6/css/bootstrap.css">
<link href='//fonts.googleapis.com/css?family=Open+Sans:400,700'
rel='stylesheet' type='text/css'>
<link rel="stylesheet"
href="//netdna.bootstrapcdn.com/font-awesome/4.3.0/css/font-awesome.css" />
Install angular-2-dropdown-multiselect
AngularX Dropdown Multiselect for Bootstrap CSS is used to create customizable dropdown multiselect in AngularX, TypeScript with bootstrap css. We will be needing multiselect in this project, so let’s install it by typing the command below in Terminal+ and hitting enter
npm install --save angular-2-dropdown-multiselect
In order to make the multiselect component available in our application, we need to update src/app/app.module.ts as follows:
...
import {MultiselectDropdownModule} from 'angular-2-dropdown-multiselect';

@NgModule({
  ...
  imports: [
   ...
   MultiselectDropdownModule,
   ],
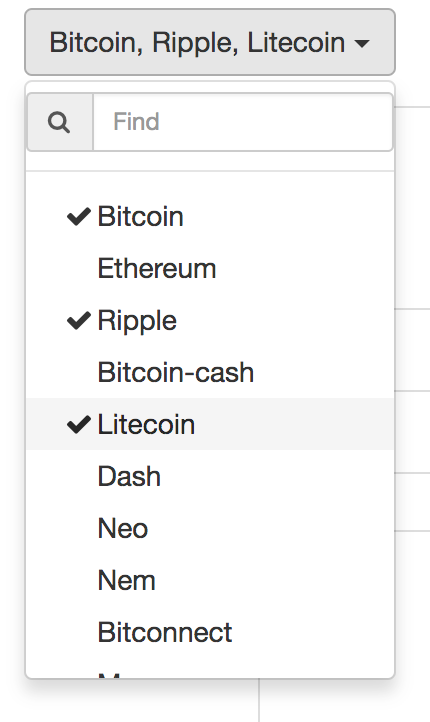
Here is a screenshot of how the multi-select plugin will appear in our final result.
The API
We will be using the api provided by coinmarketcap.com. Using the sample data returned, let us create a type script shape file named coin.ts with the following content
export class Coin {
 id: string;
 name: string;
 symbol: string;
 rank: string;
 price_usd: string;
 price_btc: string;
 '24h_volume_usd': string;
 market_cap_usd: string;
 available_supply: string;
 total_supply: string;
 percent_change_1h: string;
 percent_change_24h: string;
 percent_change_7d: string;
 last_updated: string;
}
App Service
AppService is a general purpose class we will use to fetch data from the api, and pass that data on to components. We also use AppService to filter the data to display based on the options selected in the app. We could split this service into multiple services so as to abide by the single responsibility principle.
The Subject class from RxJs is very important in this code section and it’s important to touch on what they are. Firstly let us talk about RxJs, it is a reactive programming framework for Javascript. Core to understanding how to use RxJs is having a mental model of the Observer Pattern. The observer pattern is a software design pattern in which an object, called the subject, maintains a list of its dependents, called observers, and notifies them automatically of any state changes, usually by calling one of their methods.
First we import {Injectable} from @angular/core, {Subject} from rxjs/Subject, {HttpClient, HttpParams} from @angular/common/http . Next we import the coin shape Coin from ./coin, and we create a constant API_BASE_URL to hold the base url of the api.
Now we export class AppService, making sure we decorate it using @Injectable(), then we define three private variables allCoins: Coin[], filteredCoins: Coin[], and filter: number[]. We also define four subjects
coinsSubject: Which notifies it’s observers of coin data fetched from the APIfilteredCoinsSubject: Which notifies it’s observers the filtered collection of crypto currency data. So if in the multiselect filter, only two crypto coins are selected then, the most recent value emitted by subscribing tofilteredCoinsSubjectwill be an array of length two.apiSubject: notifies it’s observers with a string message based on api actionsfiatSubject:notifies it’s observers about the value of the selected fiat currency when it is updated.
The full code for AppService is below, explanations are in the comments
// Imports
import {Injectable} from '@angular/core';
import {Subject} from 'rxjs/Subject';
import {HttpClient, HttpParams} from '@angular/common/http';
// Import Coin Shape file
import {Coin} from './coin';
const API_BASE_URL = 'https://api.coinmarketcap.com/v1/';

@Injectable()
export class AppService {
  private allCoins: Coin[]; // will hold unmodified data returned by the api
  private filteredCoins: Coin[]; // will hold data filtered from this.allCoins
  private filter: number[]; // will hold the array index of data contained in this.
allCoins that should not be filtered out

// A couple of RxJs Subjects very important for communicating across Angular Components
coinsSubject: Subject<Coin[]>;
filteredCoinsSubject: Subject<Coin[]>;
apiSubject: Subject;
fiatSubject: Subject;
constructor(private http: HttpClient) {
    this.filter = [];
    // we initialize our subjects
    this.coinsSubject = new Subject();
    this.filteredCoinsSubject = new Subject();
    this.apiSubject = new Subject();
    this.fiatSubject = new Subject();
  }
 // this method loads market cap data from the API
 loadMarketCaps(fiat: string) {
    this.fiatSubject.next(fiat);
    const url = API_BASE_URL + 'ticker/';
    let params = new HttpParams();
    params = params.append('limit', '25');
    if (fiat !== 'usd') {
      // TODO: check if fiat is valid
      params = params.append('convert', fiat);
    }
    this.apiSubject.next('loading...');
    this.http
      .get<Coin[]>(url, {params})
      .subscribe(
      data => {
        this.allCoins = data; // store returned data
        this.announceCoins(); // trigger announcements
        this.filterMarketCaps();
      }
      );
  }

filterMarketCaps() {
    this.filteredCoins = [];
    if (this.filter.length === 0) {
      this.allCoins.forEach((coin) => this.filteredCoins.push(coin));
    }
if (this.filter.length > 0) {
      this.filter.forEach((i) => {
        this.filteredCoins.push(this.allCoins[i]);
      });
    }
    this.announceFilteredCoins();
  }
announceCoins() {
    this.coinsSubject.next(this.allCoins);
  }
announceFilteredCoins() {
    this.filteredCoinsSubject.next(this.filteredCoins);
  }
updateFilter(filter: number[]) {
    this.filter = [];
    filter.forEach((elem) => {
      this.filter.push(elem);
    });
    this.filterMarketCaps();
  }
}
App Component
Update the content of src/app/app.component.html with the content below. We display the title in a h2 element, and we set the dashboard component as a child view. If our project needed a router, we would have set it up here in App component.
<div class="container">
 <div class="row">
 <div class="col-sm-6 col-sm-offset-3">
 <h2 class="text-center">{{ title }}</h2>
 <app-dashboard></app-dashboard>
 </div>
 </div>
</div>
Dashboard Component
The dashboard component will serve as a parent component for two components, the search component and the list component. Replace the contents of src/app/dashboard/dashboard.component.html with the code snippet below
<app-search-filter></app-search-filter>
<app-list></app-list>
Since the scope of the service instance is the parent component and its children, we will create an instance of AppService in the dashboard component which will be shared by the search-filter component and the list component. To do this we update src/app/dashboard/dashboard.component.tsby importing AppService, and adding AppSercieto the providers array which enables Angular’s Dependency Injector for AppService.
import {Component} from '@angular/core';
// import AppService
import {AppService} from '../app.service';
@Component({
 selector: 'app-dashboard',
 templateUrl: './dashboard.component.html',
 styleUrls: ['./dashboard.component.css'],
 providers: [AppService] // provider setup
})
export class DashboardComponent {}
SearchFilter Component
The search-filter component is made up of a form containing two elements.
The first is a select element for choosing a fiat currency used in displaying the current worth of each crypto currency. The selected currency will be stored in a model aptly named SelectedCurrency , an onChange event listener will notify the app service to load data from the api.
The second element is is a multiselect dropdown, that will enable us filter our choice of crypto currencies to display.
The code below goes in src/app/search-filter/search-filter.component.html
<div>
<form>
<div class="form-group">
<select id="selectedCurrency" name="selectedCurrency" [(ngModel)]="selectedCurrency"
(change)="selectCurrency($event.target.value)" class="form-control"
id="fiat">
<option value="">Select fiat currency</option>
<option *ngFor="let currency of currencies" value="{{currency}}">{{currency.toUpperCase()}}</option>
</select>
</div>
<div class="form-group">
<ss-multiselect-dropdown id="cryptocurrencies"
name="cryptocurrencies" [texts]="myTexts" [settings]="mySettings"
[options]="cryptoCurrOptions" [(ngModel)]="optionsModel"
(ngModelChange)="filterChange($event)"></ss-multiselect-dropdown>
</div>
</form>
</div>
and the code below goes in src/app/search-filter/search-filter.component.ts
// Imports
import {Component, EventEmitter, Input, OnInit, Output} from '@angular/core';
import {AppService} from '../app.service';
import {IMultiSelectOption, IMultiSelectSettings, IMultiSelectTexts} from 'angular-2-dropdown-multiselect';
@Component({
  selector: 'app-search-filter',
  templateUrl: './search-filter.component.html',
  styleUrls: ['./search-filter.component.css'],
  providers: []
})
export class SearchFilterComponent implements OnInit {
  currencies: string[];
  cryptoCurrOptions: IMultiSelectOption[];
  selectedCurrency: string;
  optionsModel: number[];
// Settings configuration for the multiselect plugin
  mySettings: IMultiSelectSettings = {
    enableSearch: true,
    checkedStyle: 'fontawesome',
    buttonClasses: 'btn btn-default btn-block',
    dynamicTitleMaxItems: 5,
    displayAllSelectedText: true
  };
// Text configuration for the multiselect plugin
  myTexts: IMultiSelectTexts = {
    checkAll: 'Select all',
    uncheckAll: 'Unselect all',
    checked: 'item selected',
    checkedPlural: 'items selected',
    searchPlaceholder: 'Find',
    searchEmptyResult: 'Nothing found...',
    searchNoRenderText: 'Type in search box to see results...',
    defaultTitle: 'Filter cryptos',
    allSelected: 'All selected',
  };
constructor(private appService: AppService) {
    this.currencies = ['usd', 'eur']; // fiat currency options
    this.selectedCurrency = ''; // model to store selected fiat
    // array to hold names of cryptos to be used in filtering
    this.cryptoCurrOptions = [];
   // coinsSubject is a RxJs subject in our service that will notify us when the api has gotten data about crypto coins
   this.appService.coinsSubject.subscribe({
      next: (v) => this.updateCryptoOptions(v),
    });
  }
ngOnInit() {
  }
selectCurrency(newValue) {
    this.appService.loadMarketCaps(newValue);
  }
filterChange(newValue) {
    // BUG method should not be triggered by filter select
    this.appService.updateFilter(newValue);
  }
// This method creates an array of valid options for the multiselect plugin from an array of crypto coins
updateCryptoOptions(coins) {
    this.cryptoCurrOptions = [];
    coins.forEach((coin, index) => {
      this.cryptoCurrOptions.push({
        id: index,
        name: coin.id.charAt(0).toUpperCase() + coin.id.slice(1)
      });
    });
  }
}
List Component
This component manages the display of a list of cards. One for each crypto coin data returned from the api. The coins model is an array of the data to rendered by each coin. Let us update the contents of src/app/list/list.component.html
<div class="list-cards pb-4">
 <app-list-card *ngFor="let coin of coins" [coin]="coin" [fiat]="fiat"></app-list-card>
</div>
<div *ngIf="!coins">
{{noDataMsg || 'Nothing to display'}}
</div>
The content of src/app/list/list.component.css is
.list-cards {
 display: flex;
 flex-direction: column;
 align-items: center;
}
In src/app/list/list.component.ts , we subscribe to three RxJs subjects in our Service.
filteredCoinsSubject: Which sends updates on the filtered collection of crypto currency data. So if in the multiselect filter, only two crypto coins are selected then, the most recent value emitted by subscribing tofilteredCoinsSubjectwill be an array of length two.apiSubject: emits a string message based on api actionsfiatSubject: emits the value of the selected fiat currency when it is updated.
import {Component, Input, OnInit} from '@angular/core';
import {AppService} from '../app.service';
import {Coin} from '../coin';
@Component({
 selector: 'app-list',
 templateUrl: './list.component.html',
 styleUrls: ['./list.component.css']
})
export class ListComponent implements OnInit {
 coins: Coin[];
 noDataMsg: string;
 fiat: string;
constructor(private appService: AppService) {
 this.noDataMsg = 'Select fiat currency to get started';
 this.appService.filteredCoinsSubject.subscribe({
 next: (v) => this.updateCoins(v),
 });
 this.appService.apiSubject.subscribe({
 next: (msg) => this.noDataMsg = msg,
 });
 this.appService.fiatSubject.subscribe({
 next: (newValue) => this.fiat = newValue,
 });
 }
updateCoins(coins: Coin[]) {
 this.coins = [];
 coins.forEach((coin) => this.coins.push(coin));
 }
 ngOnInit() {
 }
}
ListCard Component
The list-card component, is basically to display the market cap summary of a single cryptocurrency. The content of src/app/list-card/list-card.component.html is below
<div class="card text-center mt-4">
 <div class="card-body">
 <h2 class="card-title">{{ coin.id }}</h2>
 <h4 class="mb-0 pb-1">{{fiat.toUpperCase()}} {{ coin['price_'+fiat] }}</h4>
 </div>
 <ul class="list-group list-group-flush">
 <li class="list-group-item">24 hours: <span [class]="coin.percent_change_24h.charAt(0)==='-' ? 'red' : 'green' ">{{ coin.percent_change_24h
 }}</span></li>
 <li class="list-group-item">7 days: <span [class]="coin.percent_change_24h.charAt(0)==='-' ? 'red' : 'green' ">{{ coin.percent_change_7d }}</span></li>
 </ul>
</div>
and src/app/list-card/list-card.component.ts
import {Component, OnInit, Input} from '@angular/core';
@Component({
 selector: 'app-list-card',
 templateUrl: './list-card.component.html',
 styleUrls: ['./list-card.component.css']
})
export class ListCardComponent {
 @Input() coin;
 @Input() fiat;
}
Run application
Run the application from the server tab of Angular IDE.
Conclusion
I hope you learnt a few things about Angular and Angular IDE. Every article can be made better, so please leave your suggestions and contributions in the comments below. If you have questions about any of the steps, please do ask also in the comments section below.