How to Animate elements using Angularjs

In this tutorial , you will learn how to animate DOM elements using angularjs, which translate into underlying CSS animations but are much simpler to use,
Setting up the project
Let’s take a look at what we need to add to the project for the animation to work. First, we need to install angular-animate, which we will do by leveraging Bower. We will also use Bootstrap, just to get some good styling of the button. Inside the project folder, run the following command in the shell:
bower install --save angular-animate
bower install --save bootstrap
This will install the appropriate bower component, and it will also update bower.json accordingly. Next, we load the JavaScript file in index.html and also name the controller for our Tutorial’s project:
<!DOCTYPE html>
<html lang="en">
<head>
    <meta charset="utf-8">
    <meta name="viewport" content="width=device-width, user-scalable=no">
    <title>Angular Animation</title>
    <link rel="stylesheet" href="bower_components/bootstrap/dist/css/bootstrap.css">
    <link rel="stylesheet" href="css/main.css">
</head>
<body ng-app="myApp">

<div ng-controller="NgAnimateCtrl">
</div>

<!--(if target dev)><!-->
<script src="bower_components/jquery/dist/jquery.js"></script>
<script src="bower_components/angular/angular.js"></script>
<script src="bower_components/angular-animate/angular-animate.js"></script>
<script src="js/app.js"></script>
<script src="js/controllers.js"></script>
<script src="js/filters.js"></script>
<!--<!(endif)-->
<!--(if target dist)>
<script src="js/fun-with-ng-animate.js"></script>
<!(endif)-->
</body>
</html>
Then, we update controllers.js and we are good to go:
'use strict';
angular.module('myApp.controllers', []).controller('NgAnimateCtrl', function ($scope) {
});
Going forward, let’s explore it with cool examples. In this first example, we will create a simple to-do list with a text input field to add items to the list. Each new item will then be animated upon entering and also upon checking off the item, which will result in the item fading out. For this to work, we first need a text input box. Modify the NgAnimateCtrl div inside index.html, as follows:
<div ng-controller="NgAnimateCtrl">
<input ng-model="inputText" />
<button ng-click="addItem()">add</button>
<div class="item" ng-repeat="item in items | active"><input type="checkbox" ng-model="item.completed" />
<span ng-bind="item.text"></span>
</div>
</div>
Then, we will need a custom active filter, which as the name suggests, filters our items such that only the active (noncompleted) items are shown on the page. For this, we modify filters.js:
'use strict';
angular.module('myApp.filters', [])
    .filter('active', function() {
        return function(items) {
            var filteredItems = [];
            for (var i = 0; i < items.length; i++) {
                if (!items[i].completed) {
                    filteredItems.push(items[i]);
                }
            }
            return filteredItems;
        }
    });
Just so the items look a little nicer, we will add some styling in main.css. Modify the file as follows:
body {
    margin: 20px;
    font-family: sans-serif;
}

.item {
    width: 230px;
    padding: 10px;
    margin: 10px 0;
    background: #cccccc;
    box-shadow: 5px 5px 5px #888888;
    font-weight: bold;
}
Now, we need to modify controllers.js in order to make the to-do list functional:
'use strict';
angular.module('myApp.controllers', ['myApp.filters'])
    .controller('NgAnimateCtrl', ['$scope', function ($scope) {
        $scope.items = [
            { text: "call mum", completed: false },
            { text: "do laundry", completed: false }
        ];
        $scope.inputText = "";
        $scope.addItem = function () {
            $scope.items.push({
                text: $scope.inputText,
                completed: false
            });
            $scope.inputText = "";
        };
    }]);
With these modifications, we have a fully functional to-do list application. Nothing is animated yet though. Let’s change this by defining a CSS-based animation. First, add the following lines to main.css:
.item.ng-enter {
    -webkit-transition: 1.2s linear all;
    transition: 1.2s linear all;
    opacity: 0;
}

.item.ng-enter.ng-enter-active {
    opacity: 1;
}

.item.ng-leave {
    -webkit-transition: 1.2s linear all;
    transition: 1.2s linear all;
    opacity: 1;
}

.item.ng-leave.ng-leave-active {
    opacity: 0;
}
Next, we need to modify the declaration of the app module to actually use the angular-animate module. For this, we modify app.js:
'use strict';
angular.module('myApp', ['myApp.controllers', 'myApp.filters', 'ngAnimate']);
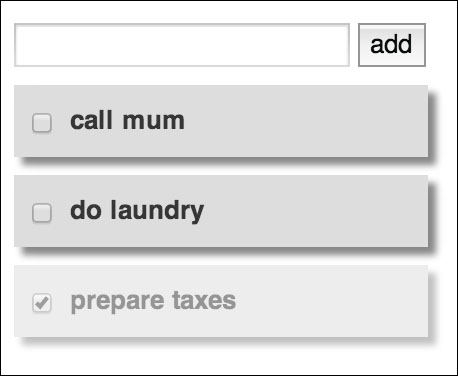
This is all that there is to a simple fade-in / fade-out animation. The following screenshot shows how our application will look during fade-out after you check off the prepare taxes task:
So, what actually happens in the preceding example? Let’s walk through it step by step:
- We load the
angular-animatelibrary. - The
angular-animatelibrary now attaches certain CSS classes, for example, when elements enter or leave, and detaches the classes again when the animation is done. - These classes are prefixed with
ng-, for example,ng-enterfor the initial state of the element andng-enter.ng-enter-activefor the target state of the animation. - All that we needed to do then was to define these classes in CSS, as we have done in
main.cssin the case of our to-do list application. - We have defined pairs of these classes for our specific item class:
.item.ng-enter, which defines the initial state of the element, with the duration of how long the animation is supposed to run, and then the.item.ng-enter.ng-enter-activeclass, which defines the target state of the same animation. The initial state has an opacity of0, making it fully transparent, and the target state has an opacity of1, making it fully visible. During the animation, the specific property transitions between these two values. - We have defined the transition to be linear, which means that the changes in the value(s) are distributed evenly over the duration of time. This is called an easing function, and it is specified in this line:
transition: 1.2s linear all;
- The transition we have used applies to all the eligible properties that can transition. We can omit this, but explicitly specifying this makes it immediately obvious that there are different transitions for different properties. We will see in the next section how to animate different properties differently.
- Note that we have defined the transition time twice, once in prefixed and again in the nonprefixed form. This is because new CSS features first appear in vendor-specific prefixed form before they are generally adopted into the standard. Check http://caniuse.com to find out more about browser support for this feature (and many others): http://caniuse.com/#search=transition.
Let’s try an other easing function instead. We could try ease, but the difference will not be very noticeable in the case of opacity transitions, much more so when changing the size or position. However, distinct steps are very noticeable:
transition: 1.2s steps(5) all;
In this case, the value transition is not even, but instead takes place in the number of specified, distinct steps, which can give an interesting effect as well.
Note
There are different events/hooks used by various directives that you can learn more about in the documentation.
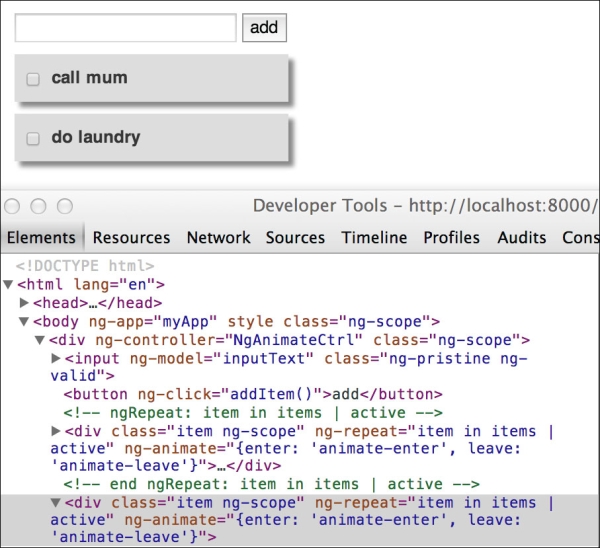
I have claimed that angularjs assigns these classes automatically, but don’t take my word for it; instead let’s see this in action by opening the web inspector. In Chrome, for example, right-click on an element and choose the inspect element. We will find that at this moment, when no animation is active, the classes assigned to the element are item and ng-scope, as shown in the following screenshot:
Now, when we mark an item as completed, we will see that the CSS classes we have defined are automatically assigned to the element for the duration of the animation, as shown in the following screenshot:
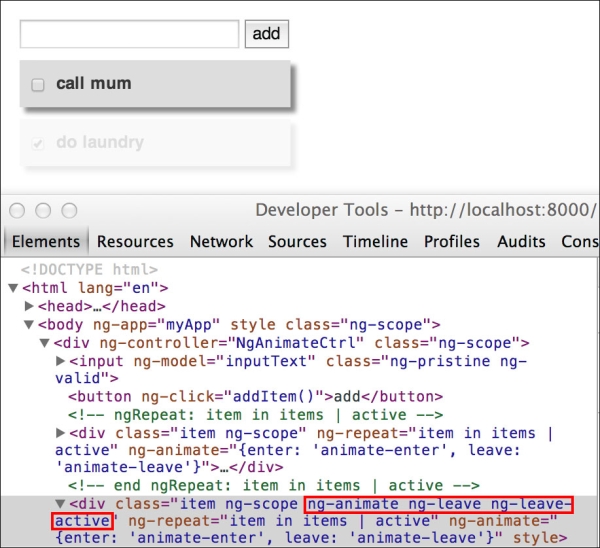
This is what
angular-animate does by adding or removing such CSS classes dynamically to enable the animation in angularjs applications.
Tip
Increase the duration of a transition when you want to inspect what is actually happening under the hood. In this case, I have increased the duration to 20 seconds instead of one second; otherwise, I would not have been able to observe and capture this behavior:
.item.ng-leave {
    -webkit-transition: 20s linear all;
    transition: 20s linear all;
    opacity: 1;
}
Using animate.css
Now that we have created a transition manually, let’s make things a bit simpler for ourselves by making use of the great open source animate.css library, which comes with many interesting animations that we can easily use in our angularjs application. You can find out more about this library and the source code at https://github.com/daneden/animate.css. We install animate.css by running the following in the command line:
bower install --save animate.css
Next, we modify index.html to load animate.css:
<head>
    <meta charset="utf-8">
    <meta name="viewport" content="width=device-width, user-scalable=no">
    <title>Angular Animation</title>
    <link rel="stylesheet" href="bower_components/bootstrap/dist/css/bootstrap.css">
    <link rel="stylesheet" href="bower_components/animate.css/animate.css">
    <link rel="stylesheet/less"  type="text/css" href="css/main.less">
    <script src="bower_components/less/dist/less-1.5.1.js"></script>
</head>
With these modifications in place, we can now edit our main.less file, which will become significantly simpler, despite the fact that we are now also introducing prefixed versions for legacy Mozilla and Microsoft browsers:
body {
  margin: 100px 40px;
  font-family: sans-serif;
}

@enter: 1s;
@leave: 1s;

.item {
  width: 230px;
  padding: 10px;
  margin: 10px 0;
  background: #ddd;
  box-shadow: 5px 5px 5px #888888;
  font-weight: bold;
  position: relative;
}
.item.ng-enter {
  -webkit-animation: lightSpeedIn @enter;
  -moz-animation: lightSpeedIn @enter;
  -ms-animation: lightSpeedIn @enter;
  animation: lightSpeedIn @enter;
}

.item.ng-leave {
  -webkit-animation: lightSpeedOut @leave;
  -moz-animation: lightSpeedOut @leave;
  -ms-animation: lightSpeedOut @leave;
  animation: lightSpeedOut @leave;
}
Note that all we really need to do is call the named animations from animate.css inside the ng-enter and ng-leave classes. This is how the result looks when checking off an item:
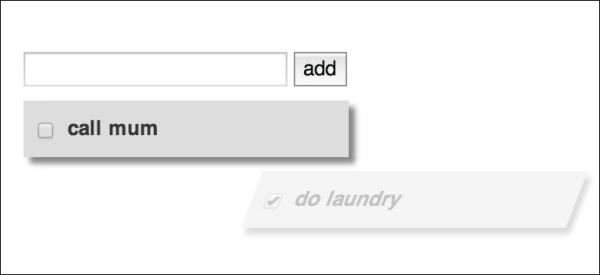
Pretty good, particularly considering that all we had to do was to import a library. There are all kinds of great animations available in
animate.css, and the source code is available too, making it a great way to learn how these animations are actually created with CSS. CSS animations are a mighty feature, and we can only scratch the surface here.
angularjs 1.2 or higher introduced a new feature in its ngAnimate module, that is, a native staggering support to CSS transitions and keyframe animations without much CSS code from our end. The built-in $animate service does all the Grunt work to render animations in a staggering fashion. To get more clarity on this, let’s take a look at the following example.
Let’s modify the addItem() method from controllers.js to add multiple to-dos at the same time with a comma as the separator. We’ll then split the inputText object by a comma to add each to-do separately:
  $scope.addItem = function () {
var arrTodos = $scope.inputText.split(',');
for(var i = 0; i < arrTodos.length; i++) {
      $scope.items.push({
          text: arrTodos[i],
          completed: false
      });
  }
      $scope.inputText = "";
   };
With this change, we want to see how multiple to-do items are animated simultaneously. If you’ve done said modifications, then you’ll see all the to-dos move at the same time in the following screenshot, which looks quite weird:
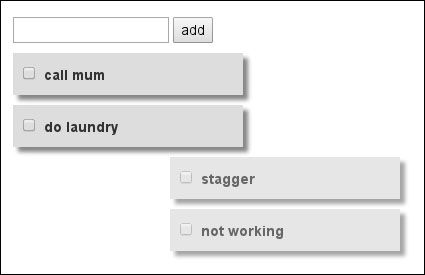
What if we could issue a slight delay in between that would bring a curtain-like effect to the animation? This is what staggering animations do. They allow us to add a delay while animating multiple elements.The stagger effect can be performed by creating a
ng-EVENT-stagger CSS class and attaching it to the base class used for the animation. The style property expected within the stagger class can be a transition-delay or an animation-delay property (or both, depending on your requirement). We’ll extend the example we saw in the earlier section, Using LESS to scale entire animations, by adding staggering classes in main.less, as follows:
  .item.ng-enter-stagger,.item.ng-leave-stagger,.item.ng-move-stagger {-webkit-transition-delay: 0.1s;
      transition-delay: 0.1s;

  -webkit-transition-duration:0;
  transition-duration:0;
   }
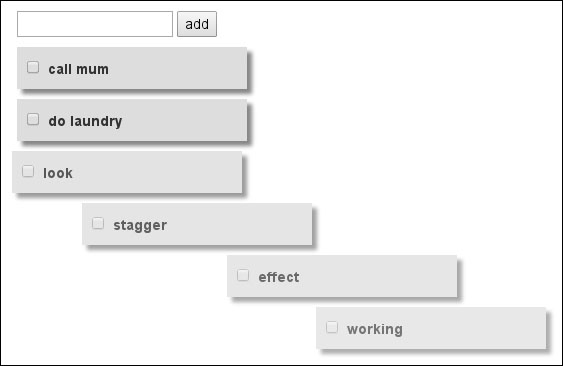
Note that a 100 ms delay will be used between each successive enter/leave/move operation. The last two lines are pretty much required to prevent any kind of CSS inheritance issues, as the chances are that the transition-duration property is being accidentally inherited and, therefore, the stagger may not work as expected. Here is how the stagger animation will look:
Understanding how staggering works
Well, it’s fairly simple, but it is complex under the hood. The ngAnimate service looks for the ng-EVENT-stagger CSS class associated with the element and extracts the animation/transition details to perform the staggering effect. It also takes care of when the animation starts, ends, and how much delay was proposed for a stagger operation so that each animation is spaced out. Note that the service is only there to parse the timing details in order to delay the addition/removal of the ng-* classes accordingly.]
JavaScript-defined animations
We may have to rely on JavaScript sometimes to perform the animation because of browser compatibility issues with CSS animations/transitions. As you know, the moment we introduce ngAnimate as a dependency to our application, the $animate service starts adding/removing the ng-* classes on/off the elements during the course of the animation, but within 0 ms, in case we do not have the CSS animations in place. This gives us a control over how we want to enable the animation, that is, either using CSS or JavaScript.
Let’s create a JavaScript fallback for the example from the Using animate.css section. Add the following to controllers.js:
.animation('.item', function() {
    return {
        enter: function(element, done) {
            element.css({'opacity': 0, 'margin-left': '-230px'});
            element.animate({'opacity': 1, 'margin-left': 0}, 500, done);
        },
        leave: function(element, className, done) {element.animate({'opacity': 0, 'margin-left': -230}, 500, done);
        }
    }
 });
So, what’s happening here?
- First of all, we’ve used the
animationservice (such as controller) in angularjs to enable class-based animation in JavaScript. - The animation name (
.item) should begin with a dot, resembling a CSS class definition. - As we are dealing with
ngRepeat, we have to take care of theenterandleaveevents for this particular example. This is applicable to other directives too, such asngView,ngInclude,ngSwitch, andngIf. For the remaining directives, such asngClass,ngShow,form, andngModel, there are theaddClassandremoveClassevents to consider. - Going ahead with the
enterevent, we mentioned thestartandendstates. Initially, we want an element to be out of the viewport, with a negative margin, and hidden with an opacity of0. Moving towards the destination, we reduced the negative margin to0by animating within the viewport and making it visible. - For the
leaveevent, it is reversed. - Note that the
donecallback is extremely important to be triggered after the animation is over. For CSS animations, angularjs calls it internally. The purpose of thedonecallback is to remove theng-*classes on the element upon the completion of the animation. angularjs may not remove the element (mainly inngRepeat,ngIf, andngSwitch), assuming that the animation is still in progress if we fail to call thedonemethod, and may not detach those classes.
However, there is one problem: when a CSS animation is supported by the browser, both the CSS and JS animations will collapse. To fix this, we have to know whether the browser has support for transitions/animations. For this, we’ll use Modernizr, a feature detection library for HTML5/CSS3.
We’ll install Modernizr using the following in the command line:
bower install --save modernizr
This will install the latest version of Modernizr in the bower_components/ directory and then we’ll have to insert it in index.html:
<head>
    <meta charset="utf-8">
    <meta name="viewport" content="width=device-width, user-scalable=no">
    <title>Angular Animation</title>
    <link rel="stylesheet" href="bower_components/bootstrap/dist/css/bootstrap.css">
    <link rel="stylesheet" href="bower_components/animate.css/animate.css">
    <link rel="stylesheet/less"  type="text/css" href="css/main.less">
    <script src="bower_components/less/dist/less-1.5.1.js"></script>
    <script src="bower_components/modernizr/modernizr.js"></script>
</head>
Next, we’ll slightly update the defined JavaScript animation to seamlessly fall back. Modernizr has a bunch of tests to check browser support for various features. One of them is cssanimations. Let’s add it, as follows:
.animation('.item', function() {
   if (Modernizr.cssanimations) return angular.noop;
    return {
        enter: function(element, done) {
            element.css({'opacity': 0, 'margin-left': '-230px'});
            element.animate({'opacity': 1, 'margin-left': 0}, 500, done);
        },
        leave: function(element, className, done) {
            element.animate({'opacity': 0, 'margin-left': -230}, 500, done);
        }
   }
});
In this case, we do the following steps:
- We first check for the support of
cssanimationsin a browser usingModernizr.cssanimations—it will returntrueif there is support; otherwise, it will returnfalse. - The
animationservice should return an empty object/function if we do not want to overwrite CSS animations. We’ve returnedangular.noopto save some keystrokes: a built-in method in angularjs that performs no operation, which is similar tofunction() { }. - If you use the older version of Internet Explorer, that is, version 8 or 9, then you can catch the JavaScript animation in motion.
Now, our animation will work seamlessly in evergreen browsers that support CSS3 animations as well as old browsers with JS fallback.
Wrapping up
Summary
In this Tutorial, we took a look at the animation functionality in angularjs and how easy it is to simply use CSS transitions/animations in order to make elements dance or fall back to JavaScript animations otherwise. First, we created a simple to-do list application with an animated entry and exit of items using a CSS-based animation. In this application, we also created a custom filter to only show the items that are not marked as completed. We looked at what angular-animate is doing under the hood to facilitate CSS animations. We created motion on the page inside the ng-enter and ng-leave phases. We created more interesting motion paths by making use of the bezier-curve function in CSS. We started using LESS to make our lives easier by introducing variables into CSS and letting us specify values in a central place. We used animate.css as a simple way of importing rather sophisticated animations. We also created a staggering animation to space out multiple elements being animated simultaneously and learned how angularjs manages to do so. Finally, we set up a fallback for CSS transitions/animations in JavaScript. Also, we trained Modernizr to detect the HTML5/CSS3 feature with simple to-use utility functions. In the next Tutorial, we will be covering data-driven charts.