Setting up Authentication in Django

Authentication is a process that confirms a user’s identity. Usually, this is done through a username (or email) and a password.
You enter your username (or email) and password, which allows the system to confirm your identity; Authentication means also verifying user emails for retention or marketing stuff.
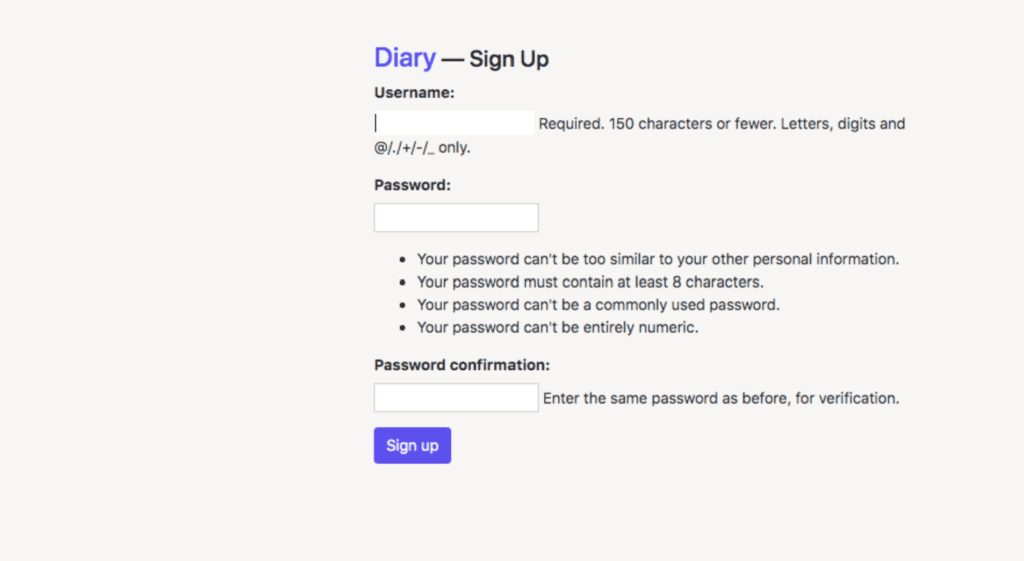
This tutorial is the best place if you’re looking to add authentication in Django from scratch in your application. This is the preview of the app we’ll build:
We’ll start with a fresh Django application. Just use your favorite Python dependencies management tool. In this tutorial, I’ll use Pipenv.
mkdir diary
pipenv install --three
pipenv shell
Let’s install django package and create a new project:
pipenv install django
django-admin startproject diary
manage.py startproject will generate a bunch of files as well as include the Django contrib module which includes the authentication support. By default, the required configuration is already included in the settings.py.
# settings.py

INSTALLED_APPS = [
    'django.contrib.admin',
    'django.contrib.auth', # core of the authentication
    'django.contrib.contenttypes',
    'django.contrib.sessions',
    'django.contrib.messages',
    'django.contrib.staticfiles',
]
Now, run the following commands:
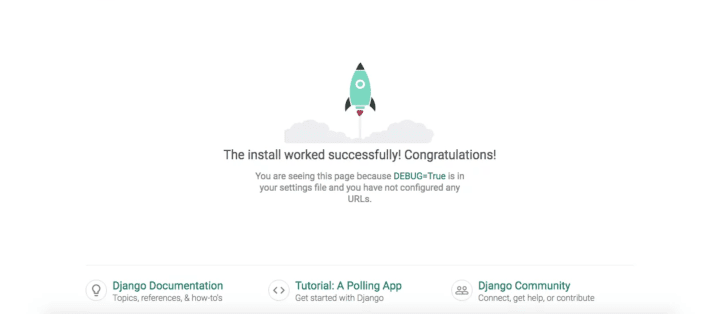
./manage.py migrate
./manage.py runserver
You should see this:
django.contrib.auth provides all you need to add authentication to your app. Let’s see what this module provides by default.
Include the module’s urls inside django_authentication/urls.py:
# django_authentication/urls.py

from django.contrib import admin
from django.urls import path, include

urlpatterns = [
    path('admin/', admin.site.urls),
    path('auth/', include('django.contrib.auth.urls')),
]
The URLs provided by django.contrib.auth.urls are available at http://127.0.0.1:8000/auth/ :
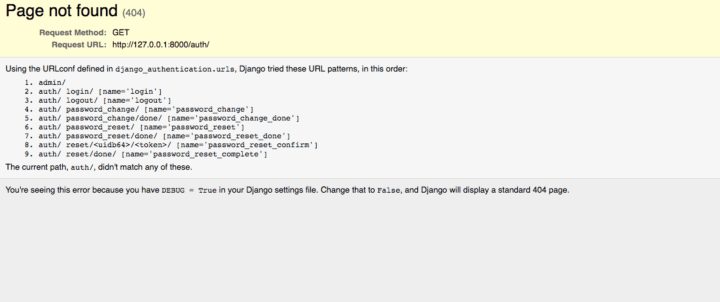
Try accessing http://127.0.0.1:8000/auth/login/ you’ll see the following:
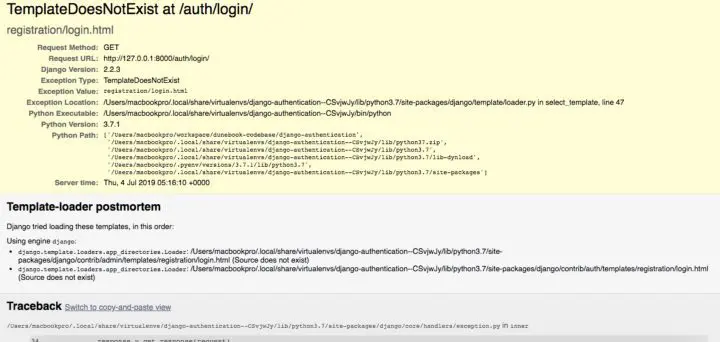
Let’s fix this the right way. We must create the authentication templates. We’ll explore overriding authentication templates by creating replacement templates in a templates directory.
# settings.py

TEMPLATES = [
    {
        # ...
        'DIRS': [os.path.join(BASE_DIR, 'templates')],
        'APP_DIRS': True,
        # ...
    },
]
These settings assume we have a templates directory in the root of our project. Let’s create this directory and add a file called login.html.
mkdir templates
mkdir registration
touch templates/registration/login.html
I’ll not show the whole file content, just the relevant one. You can access the source code at the end of this tutorial.
Another thing is that I do not want to display the default forms without any CSS style. So I’ll be using Bootstrap.
{% extends "base.html" %}

{% block content %}

<form method="POST" action="{%%20url%20'login'%20%}" class="form">
{% csrf_token %}
<div class="form-group">
<label for="password">Username</label>
<input name="username" type="text" class="form-control" id="id_username" placeholder="nioperas06">
</div>
<div class="form-group">
<label for="password">Password</label>
<input name="password" type="password" class="form-control" id="id_password" placeholder="******">
</div>
<div class="form-group form-check remove-form-group-border">
<input type="checkbox" class="form-check-input" id="remember" name="remember">
<label for="remember" class="form-check-label">Remember Me</label>
<p class="float-right">
<a href="{%%20url%20'password_reset'%20%}" class="no-underline text-primary">Forgot your password?</a>
</p>
</div>
<input type="hidden" name="next" value="{{ next }}">
<button type="submit" class="btn btn-lg">Login</button>
<p class="float-right">
<a href="#" class="">Looking to create an account</a>
</p>
</form>

{% endblock %}
Since our app maintains the same general layout across various pages, it’s convenient to define a layout.
touch templates/base.htmlThe content of base.html should be something like below:
<!doctype html>
<html lang="en">
  <head>
    <!-- Required meta tags -->
    <meta charset="utf-8">
    <meta name="viewport" content="width=device-width, initial-scale=1, shrink-to-fit=no">

    <title>Diary</title>
  <body>
    {% block content %}
    {% endblock %}
  </body>
</html>
The login form is ready. Then, we need to create a new user by killing the server with CTRL-C.
./manage.py createsuperuser
Username (leave blank to use 'default'):
Email address: default@gmail.com
Password:
Password (again):
Superuser created successfully.
Now, run your server again and enter the previous credentials.
You’ll be redirected to profile page http://localhost:8000/accounts/profile/. So what if I want to redirect the user to a new shiny page?
# diary/settings.py

LOGIN_REDIRECT_URL = '/'
So, we should create a new page.
# diary/urls.py
# ...
from django.views.generic.base import TemplateView

urlpatterns = [
    # ...
    path('', TemplateView.as_view(template_name='home.html'), name='home'),
    # ...
]
Let’s create a new file called template/home.html. This file is just a HTML file. The best file in this file is when we want to display a portion of the page only if the user is authenticated:
{% if user.is_authenticated %}
    <strong>{{ user.username }}</strong>, focus on your writing!
    <br>
    <a href="{%%20url%20'logout'%20%}" class="btn btn-danger mt-5">Logout here</a>
{% else %}
    <a href="{%%20url%20'login'%20%}" class="btn btn-primary">Login</a>
{% endif %}
You should add another setting into settings.py file:
# diary/settings.py

LOGOUT_REDIRECT_URL = '/'
This is where you’ll be redirecting to the home page after logout. Login and logout are ready. Let’s try to add a signup form too. Create a new app called accounts. An app refers to a submodule of the project.
./manage.py startapp accounts Make sure to add the new app to the INSTALLED_APPS setting in our diary/settings.py file:
# diary/settings.py

INSTALLED_APPS = [
    # ...
    'accounts',
]
Create a new urls file in our accounts app and import a view called SignUp
from django.urls import path

from . import views


urlpatterns = [
    path('signup/', views.SignUp.as_view(), name='signup'),
]
Now for the acounts/views.py file:
# accounts/views.py
from django.contrib.auth.forms import UserCreationForm
from django.urls import reverse_lazy
from django.views import generic


class SignUp(generic.CreateView):
    form_class = UserCreationForm
    success_url = reverse_lazy('login')
    template_name = 'signup.html'
Create a template signup.html within the templates folder. And add this inside:
{% extends 'base.html' %}

{% block title %}Sign Up{% endblock %}

{% block content %}
<div class="container pt-5">
<div class="row justify-content-center">
<div class="col-lg-6 col-md-6 col-sm-8">
<h4 class="pt-2"><a class="brand" href="#">Diary</a> — Sign Up</h4>
<form method="post">                {% csrf_token %}

{{ form.as_p }}

<button class="btn" type="submit">Sign up</button>

</form></div>
</div>
</div>
{% endblock %}
You should have this:

Make sure you look at the whole source code available here.