

In this tutorial, we will be building a Full-stack authentication system in Angular 15. By the end of the tutorial, you will have a functional authentication system for your Angular application that you can use as a starting point for your own projects.
This tutorial is designed for beginner to intermediate-level Angular developers who are looking to implement authentication in their applications.
In order to follow along with this tutorial please ensure that the latest version of Angular CLI is installed on your computer.
You also need a Google account to be able to sign in to Firebase Console, where you will be creating the app which we will work with, in this tutorial.
The tutorial covers the following subjects::
- Sign in with Google
- Sign in with username/password
- Sign up with email/password
- Recover forget password
- Send email verification to a newly created user
- Protect or secure inner pages routes using
CanActivateguard - Restrict access to non-authenticated users
Getting Started
Before we start, make sure Node JS is installed on your local development workstation.
In case you don’t have the Angular CLI globally installed in your development machine, open up your terminal and type:
npm install -g @angular/cliOpen your terminal on your desktop and type this command to create a new Angular project:
ng new my-auth-appOnce the project has been downloaded, enter the project directory.
cd my-auth-appInstall the Bootstrap CSS Framework.
npm install bootstrapIn the angular.json file, replace the following code in “styles” with the following code:
"styles": [
            "node_modules/bootstrap/dist/css/bootstrap.min.css",
            "src/styles.scss"
          ]
Working with Firebase
Once the project is created, the next thing to do is create an app in Firebase, so navigate to the Firebase Console and then click on Add Project to create a new project.
Give it a name, I’ll call my myAuthapp, then click on Create Project afterward.
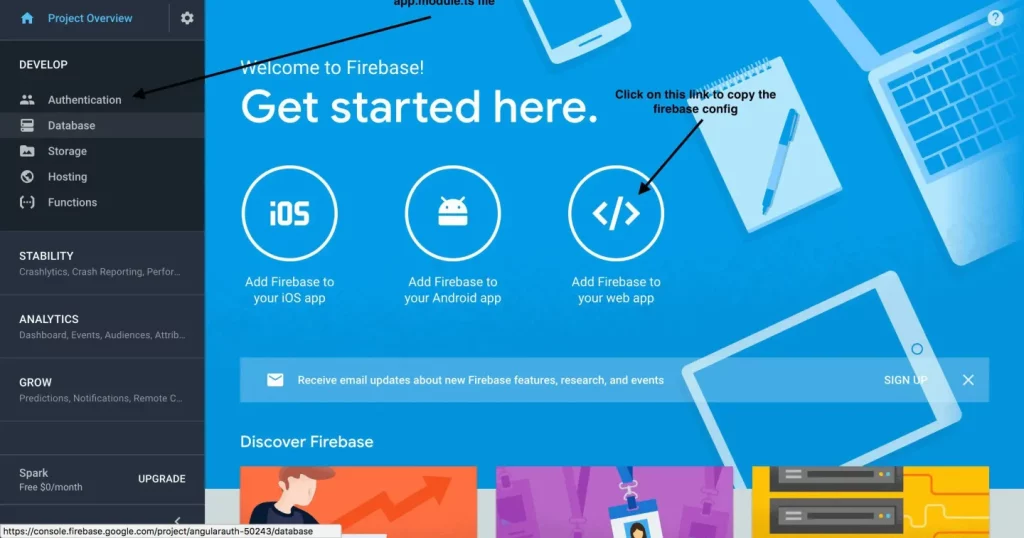
Now after the project has been created, you will be redirected to the project’s overview page, there you are meant to choose the option – Add Firebase to your web app.
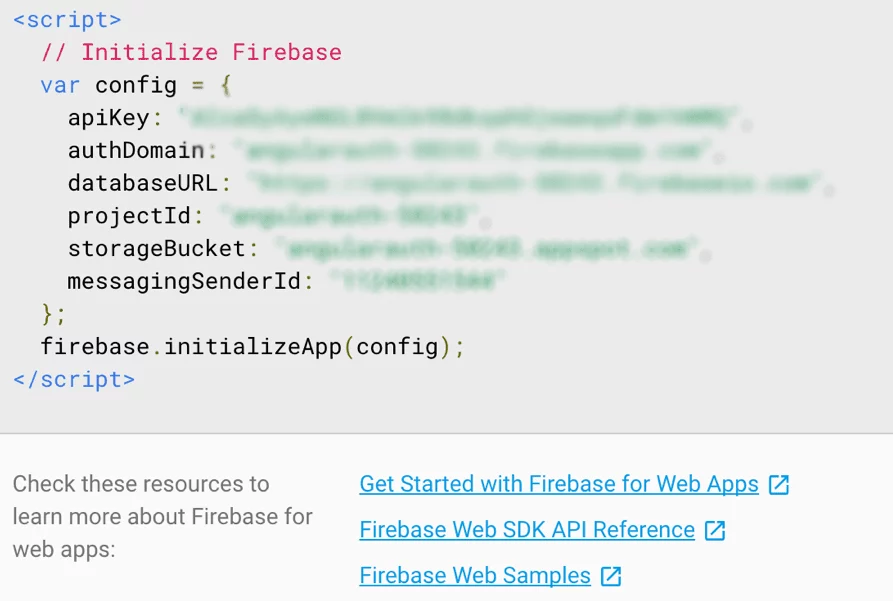
On clicking that, you will get a pop-up with all the info such as the API key that you need to be able to interact with your newly created Firebase app from the Angular application.
Next, we will set up the Authentication methods, by clicking on the Authentication link described in the screenshot below.
Once there, enable Sign-in for Email/Password and Google and then save. To enable other providers you need an API key and API secret. Which can be easily generated by visiting the developers’ section of each of the providers.
Tip: Make sure Sending emails option is also enabled so we can quickly send verification emails using Firebase when the user signs up.
Next, click on the Database on the sidebar at Firebase and then click on TRY FIRESTORE. Then click ENABLE.
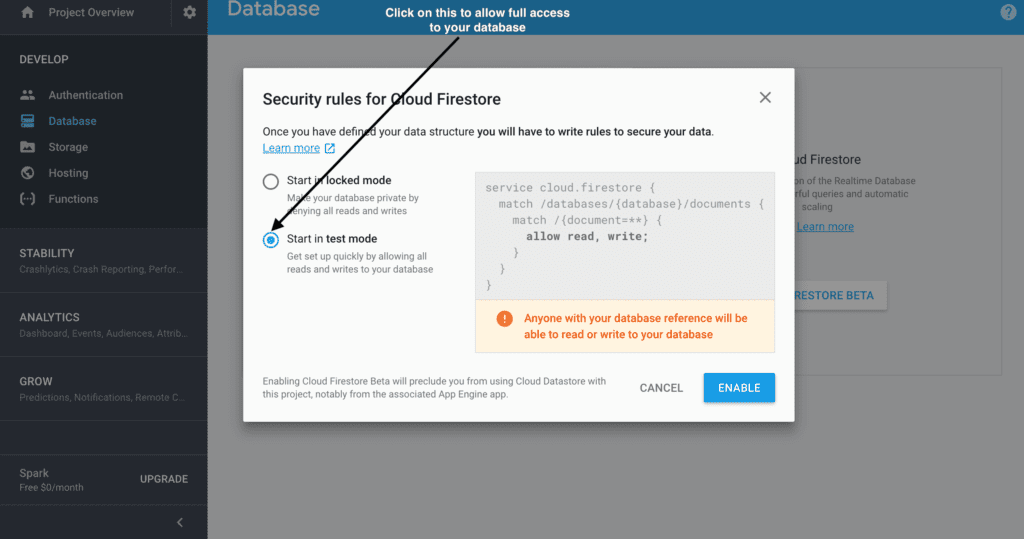
Upon creation of the Database, check the Rules tab and make sure the content is similar to this:
service cloud.firestore {
  match /databases/{database}/documents {
    match /{document=**} {
      allow read, write;
    }
  }
}
Set Up Firebase Packages
I’m going to assume that you’ve already created a Firebase project.
Install the Firebase packages inside your Angular application.
npm install firebase @angular/fireMake sure to include your firebase settings in the environment.ts file. the environment.ts is removed from the Angular 15 CLI. Therefore, we have to manually create an environment directory and an environment.ts file.
export const environment = {
  production: false,
  firebase: {
    apiKey: "xxxxxxxx-xxxxxxxx",
    authDomain: "xxxxxxxxxxxxxxxxxxxxxxxx",
    databaseURL: "xxxxxxxxxxxxxxxxxxxxxxxx",
    projectId: "xxxxxxxx",
    storageBucket: "xxxxxxxx",
    messagingSenderId: "xxxxxx",
    appId: "xxxxx",
    measurementId: "xxxxxxxxxxxxxxxx"
  }
};
Import and register firebase modules in app.module.ts.
import { AngularFireModule } from '@angular/fire/compat';
import { AngularFireAuthModule } from '@angular/fire/compat/auth';
import { AngularFireStorageModule } from '@angular/fire/compat/storage';
import { AngularFirestoreModule } from '@angular/fire/compat/firestore';
import { AngularFireDatabaseModule } from '@angular/fire/compat/database';
import { environment } from '../environments/environment';
import { NgModule } from '@angular/core';
import { BrowserModule } from '@angular/platform-browser';
import { AppComponent } from './app.component';
import { RouterModule } from '@angular/router';
import { AppRoutingModule } from './app-routing.module';
@NgModule({
  imports: [
    AngularFireModule.initializeApp(environment.firebase),
    AngularFireAuthModule,
    AngularFirestoreModule,
    AngularFireStorageModule,
    AngularFireDatabaseModule,
    BrowserModule,
    RouterModule,
    AppRoutingModule,
  ],
  declarations: [AppComponent],
  bootstrap: [AppComponent]
})
export class AppModule {}
Generate Angular Components
To create a full Angular 15 Firebase Authentication solution, we must create angular components.
ng g c components/dashboard
ng g c components/sign-in
ng g c components/sign-up
ng g c components/forgot-password
ng g c components/verify-email
Create Angular Routes
The following code should be added to the app-routing.module.ts file that is created in the src/app/ directory.
import { NgModule } from '@angular/core';
import { Routes, RouterModule } from '@angular/router';
import { SignInComponent } from './components/sign-in/sign-in.component';
import { SignUpComponent } from './components/sign-up/sign-up.component';
import { DashboardComponent } from './components/dashboard/dashboard.component';
import { ForgotPasswordComponent } from './components/forgot-password/forgot-password.component';
import { VerifyEmailComponent } from './components/verify-email/verify-email.component';
const routes: Routes = [
  { path: '', redirectTo: '/sign-in', pathMatch: 'full' },
  { path: 'sign-in', component: SignInComponent },
  { path: 'register-user', component: SignUpComponent },
  { path: 'dashboard', component: DashboardComponent },
  { path: 'forgot-password', component: ForgotPasswordComponent },
  { path: 'verify-email-address', component: VerifyEmailComponent },
];
@NgModule({
  imports: [RouterModule.forRoot(routes)],
  exports: [RouterModule],
})
export class AppRoutingModule {}
To enable routes within views, add the following code to the app.component.html file.
<router-outlet></router-outlet>Create Firebase Authentication Service
Generate the user interface and auth service files with Angular to create a Firebase authentication system.
ng g i shared/services/user
ng g s shared/services/auth
Go to shared/services/user.ts. This user interface class is a User object schema.
export interface User {
   uid: string;
   email: string;
   displayName: string;
   photoURL: string;
   emailVerified: boolean;
}
Create Auth Service
The core logic of the authentication system is contained in this file. I’ll conceal social login by using Firebase’s Google auth provider. logging in with a username and password, registering with an email address and password, resetting the password, checking the email, and using the canActivate auth guard technique.
Change the code in the shared/services/auth-service.ts file in the app.
import { Injectable, NgZone } from '@angular/core';
import { User } from '../services/user';
import * as auth from 'firebase/auth';
import { AngularFireAuth } from '@angular/fire/compat/auth';
import {
  AngularFirestore,
  AngularFirestoreDocument,
} from '@angular/fire/compat/firestore';
import { Router } from '@angular/router';
@Injectable({
  providedIn: 'root',
})
export class AuthService {
  userData: any; // Save logged in user data
  constructor(
    public afs: AngularFirestore, // Inject Firestore service
    public afAuth: AngularFireAuth, // Inject Firebase auth service
    public router: Router,
    public ngZone: NgZone // NgZone service to remove outside scope warning
  ) {
    /* When logged in, localstorage is used to save user data, and when logged out, null is set up. */
    this.afAuth.authState.subscribe((user) => {
      if (user) {
        this.userData = user;
        localStorage.setItem('user', JSON.stringify(this.userData));
        JSON.parse(localStorage.getItem('user')!);
      } else {
        localStorage.setItem('user', 'null');
        JSON.parse(localStorage.getItem('user')!);
      }
    });
  }
  // Sign in with email/password
  SignIn(email: string, password: string) {
    return this.afAuth
      .signInWithEmailAndPassword(email, password)
      .then((result) => {
        this.ngZone.run(() => {
          this.router.navigate(['dashboard']);
        });
        this.SetUserData(result.user);
      })
      .catch((error) => {
        window.alert(error.message);
      });
  }
  // Sign up with email/password
  SignUp(email: string, password: string) {
    return this.afAuth
      .createUserWithEmailAndPassword(email, password)
      .then((result) => {
        /* After a new user signs up, call the SendVerificaitonMail() function and get a promise */
        this.SendVerificationMail();
        this.SetUserData(result.user);
      })
      .catch((error) => {
        window.alert(error.message);
      });
  }
  // Send email verfificaiton when new user sign up
  SendVerificationMail() {
    return this.afAuth.currentUser
      .then((u: any) => u.sendEmailVerification())
      .then(() => {
        this.router.navigate(['verify-email-address']);
      });
  }
  // Reset Forggot password
  ForgotPassword(passwordResetEmail: string) {
    return this.afAuth
      .sendPasswordResetEmail(passwordResetEmail)
      .then(() => {
        window.alert('Password reset email sent, check your inbox.');
      })
      .catch((error) => {
        window.alert(error);
      });
  }
  // when the user is logged in and the email is confirmed, it returns true.
  get isLoggedIn(): boolean {
    const user = JSON.parse(localStorage.getItem('user')!);
    return user !== null && user.emailVerified !== false ? true : false;
  }
  // Sign in with Google
  GoogleAuth() {
    return this.AuthLogin(new auth.GoogleAuthProvider()).then((res: any) => {
      if (res) {
        this.router.navigate(['dashboard']);
      }
    });
  }
  // Auth logic to run auth providers
  AuthLogin(provider: any) {
    return this.afAuth
      .signInWithPopup(provider)
      .then((result) => {
        this.ngZone.run(() => {
          this.router.navigate(['dashboard']);
        });
        this.SetUserData(result.user);
      })
      .catch((error) => {
        window.alert(error);
      });
  }
  /* Setting up user data in the Firestore database using AngularFirestore and the AngularFirestoreDocument service for login with username and password, signup with username and password, and sign in using a social authentication provider. */
  SetUserData(user: any) {
    const userRef: AngularFirestoreDocument<any> = this.afs.doc(
      `users/${user.uid}`
    );
    const userData: User = {
      uid: user.uid,
      email: user.email,
      displayName: user.displayName,
      photoURL: user.photoURL,
      emailVerified: user.emailVerified,
    };
    return userRef.set(userData, {
      merge: true,
    });
  }
  // Sign out
  SignOut() {
    return this.afAuth.signOut().then(() => {
      localStorage.removeItem('user');
      this.router.navigate(['sign-in']);
    });
  }
}
Import the authentication service after that, and then add the AuthService class to the providers: AuthService array in the app.module.ts file. As a result, the entire application will be accessible via our authentication service.
// Auth service
import { AuthService } from "./shared/services/auth.service";
@NgModule({
  declarations: [...],
  imports: [...],
  providers: [AuthService],
  bootstrap: [...]
})
Create Angular Login with Firebase API
The AuthService class, which will let us create Firebase login authentication in Angular, should now be used. We’ll concentrate on:
- Sign-in with Username and Password
- Sign-in with Gmail or Google auth
Before injecting AuthService into the function Object(), we must first import AuthService into sign-in/sign-in.component.ts.
import { Component, OnInit } from '@angular/core';
import { AuthService } from "../../shared/services/auth.service";
@Component({
  selector: 'app-sign-in',
  templateUrl: './sign-in.component.html',
  styleUrls: ['./sign-in.component.css']
})
export class SignInComponent implements OnInit {
  constructor(
    public authService: AuthService
  ) { }
  ngOnInit() { }
}
In the sign-in/sign-in.component.html file, paste the following code.
<div>
  <div style="display: flex; flex-direction: column;">
    <div class="authBlock">
      <h3 style="font-size: 30px;">Sign In</h3>
      <div style="display: flex; flex-direction: column; gap: 20px;">
        <input type="text" class="formControl" placeholder="Username" #userName required style="width: 240px; height: 20px;">
        <input type="password" class="formControl" placeholder="Password" #userPassword required style="width: 240px; height: 20px;">
      </div>
      <!-- Calling SignIn Api from AuthService -->
      <div style="margin-top: 10px;">
        <input type="button" style="padding: 10px 50px; background-color: crimson; color: white; border: none; font-size: 20px;" value="Log in" (click)="authService.SignIn(userName.value, userPassword.value)">
      </div>

      <div style="margin-top: 10px; margin-bottom: 10px;">
        <span class="or"><span class="orInner">Or</span></span>
      </div>
      <!-- Calling GoogleAuth Api from AuthService -->
      <div class="formGroups">
        <button type="button" style="padding: 10px 50px; background-color: crimson; color: white; border: none; font-size: 20px;" (click)="authService.GoogleAuth()">
          <i class="fab fa-google-plus-g"></i>
          Log in with Google
        </button>
      </div>
      <div class="forgotPassword" style="margin-top: 10px;">
        <span style="cursor: pointer; " routerLink="/forgot-password">Forgot Password?</span>
      </div>
    </div>
    <div class="redirectToLogin" style="margin-top: 10px;">
      <span>Don't have an account?<span routerLink="/register-user" style="cursor: pointer;"> Sign Up</span></span>
    </div>
  </div>
</div>

User Registration with Angular Firebase
Angular and Firebase will now be configured for the user. In sign-up/sign-up.component.ts, add the code.
import { Component, OnInit } from '@angular/core';
import { AuthService } from "../../shared/services/auth.service";
@Component({
  selector: 'app-sign-up',
  templateUrl: './sign-up.component.html',
  styleUrls: ['./sign-up.component.css']
})
export class SignUpComponent implements OnInit {
  constructor(
    public authService: AuthService
  ) { }
  ngOnInit() { }
}
Add the code to sign-up/sign-up.component.html.
<div>
  <div style="display: flex; flex-direction: column;">
    <div class="authBlock">
      <h3 style="font-size: 30px;">Sign Up</h3>
      <div style="display: flex; flex-direction: column; gap: 20px;">
        <input
          type="email"
          class="formControl"
          placeholder="Email Address"
          #userEmail
          required
          style="width: 240px; height: 20px;"
        />
        <input
          type="password"
          class="formControl"
          placeholder="Password"
          #userPwd
          required
          style="width: 240px; height: 20px;"
        />
      </div>
      <!-- Calling SignIn Api from AuthService -->
      <div style="margin-top: 10px;">
        <input type="button" style="padding: 10px 50px; background-color: crimson; color: white; border: none; font-size: 20px;" value="Log in" (click)="authService.SignUp(userEmail.value, userPwd.value)">
      </div>

      <div style="margin-top: 10px; margin-bottom: 10px;">
        <span class="or"><span class="orInner">Or</span></span>
      </div>
      <!-- Calling GoogleAuth Api from AuthService -->
      <div class="formGroups">
        <button type="button" style="padding: 10px 50px; background-color: crimson; color: white; border: none; font-size: 20px;" (click)="authService.GoogleAuth()">
          <i class="fab fa-google-plus-g"></i>
          Log in with Google
        </button>
      </div>

    </div>
    <div class="redirectToLogin" style="margin-top: 10px;">
      <span class="redirect" routerLink="/sign-in" style="cursor: pointer;">Log in</span>
    </div>
  </div>
</div>

Angular Forgot Password with Firebase
We’ll build a forgotten password functionality using Firebase and Angular.
To forgot-password.component.ts add the code.
import { Component, OnInit } from '@angular/core';
import { AuthService } from "../../shared/services/auth.service";
@Component({
  selector: 'app-forgot-password',
  templateUrl: './forgot-password.component.html',
  styleUrls: ['./forgot-password.component.css']
})
export class ForgotPasswordComponent implements OnInit {
  constructor(
    public authService: AuthService
  ) { }
  ngOnInit() {
  }
}
Add the code to forgot-password.component.html.
<div>
  <div>
    <div>
      <h3 style="color: crimson; font-size: 30px;">Reset Password</h3>
      <p>Please enter your email address to request a password reset.</p>
      <div>
        <input type="email" style="width: 240px; height: 20px;" placeholder="Email Address" #passwordResetEmail required>
      </div>
      <!-- Calling ForgotPassword from AuthService Api -->
      <div style="margin-top: 10px">
        <input type="submit" style="padding: 10px 50px; background-color: crimson; color: white; border: none; font-size: 20px;" value="Reset Password" (click)="authService.ForgotPassword(passwordResetEmail.value)">
      </div>
    </div>
    <div style="margin-top: 10px;">
      <span style="cursor: pointer;" routerLink="/sign-in">Log In</span>
    </div>
  </div>
</div>
Send Verification Email
By adding code to the verify-email/verify-email.component.ts file, we can quickly send verification emails using Firebase.
import { Component, OnInit } from '@angular/core';
import { AuthService } from "../../shared/services/auth.service";
@Component({
  selector: 'app-verify-email',
  templateUrl: './verify-email.component.html',
  styleUrls: ['./verify-email.component.css']
})
export class VerifyEmailComponent implements OnInit {
  constructor(
    public authService: AuthService
  ) { }
  ngOnInit() {
  }
Include the code in verify-email.component.html in src/app/components/verify-email.
<div>
  <div>
    <div>
      <h3 style="color: crimson; font-size: 30px;">Thank You for Registering</h3>
      <div *ngIf="authService.userData as user">
        <p>We have sent a confirmation email to <strong>{{user.email}}</strong>.</p>
        <p>Please check your email and click on the link to verfiy your email address.</p>
      </div>

      <!-- Calling SendVerificationMail() method using authService Api -->
      <div>
        <button type="button" style="padding: 10px 50px; background-color: crimson; color: white; border: none; font-size: 20px;" (click)="authService.SendVerificationMail()">
          Resend Verification Email
        </button>
      </div>
    </div>
    <div style="margin-top: 10px;">
      <span style="cursor: pointer;" routerLink="/sign-in"> Sign in</span>
    </div>
  </div>
</div>

Use Route Guards to Protect Angular Routes
Route guards safeguard routes in Angular. I’ll now demonstrate how to simply secure routes from unauthorized access using the canActivate() route guard method.
Look in the auth.service.ts file for the isLoggedIn() method. The boolean result of this function is set to true when the user is logged in. Users are unable to access the requested pages since the function returns false if the user cannot be found.
// Returns true when user is logged in and email is verified
get isLoggedIn(): boolean {
  const user = JSON.parse(localStorage.getItem('user')!);
  return (user !== null && user.emailVerified !== false) ? true : false;
}
Making route guard files will be necessary in order to protect the inner pages.
To create route guards, run the command.
ng generate guard shared/guard/authFill in the code at auth.guard.ts.
import { Injectable } from '@angular/core';
import { CanActivate, ActivatedRouteSnapshot, RouterStateSnapshot, Router } from '@angular/router';
import { AuthService } from "../../shared/services/auth.service";
import { Observable } from 'rxjs';
@Injectable({
  providedIn: 'root'
})
export class AuthGuard implements CanActivate {

  constructor(
    public authService: AuthService,
    public router: Router
  ){ }
  canActivate(
    next: ActivatedRouteSnapshot,
    state: RouterStateSnapshot): Observable<boolean> | Promise<boolean> | boolean {
    if(this.authService.isLoggedIn !== true) {
      this.router.navigate(['sign-in'])
    }
    return true;
  }
}
After securing the application routes, the user must now authenticate in order to access the app’s internal pages.
The route guard should then be imported into the angular routing file by opening app-routing.module.ts.
import { NgModule } from '@angular/core';
import { Routes, RouterModule } from '@angular/router';
import { SignInComponent } from './components/sign-in/sign-in.component';
import { SignUpComponent } from './components/sign-up/sign-up.component';
import { DashboardComponent } from './components/dashboard/dashboard.component';
import { ForgotPasswordComponent } from './components/forgot-password/forgot-password.component';
import { VerifyEmailComponent } from './components/verify-email/verify-email.component';
// route guard
import { AuthGuard } from './shared/guard/auth.guard';
const routes: Routes = [
  { path: '', redirectTo: '/sign-in', pathMatch: 'full' },
  { path: 'sign-in', component: SignInComponent },
  { path: 'register-user', component: SignUpComponent },
  { path: 'dashboard', component: DashboardComponent, canActivate: [AuthGuard] },
  { path: 'forgot-password', component: ForgotPasswordComponent },
  { path: 'verify-email-address', component: VerifyEmailComponent },
];
@NgModule({
  imports: [RouterModule.forRoot(routes)],
  exports: [RouterModule],
})
export class AppRoutingModule {}
Manage Firebase User Authentication State with LocalStorage
We’ve previously created the code to handle user authentication status using the LocalStorage API in the auth service class. In a minute, we’ll show you how to leverage Local Storage in Angular with Firebase to manage user data that is currently logged in.
Save the user’s current status in local storage. When a user is logged in, the user details will still be present even if we reload the page. Delete the user information from local storage as well when we log out of the program.
Open the dashboard.component.html file and paste the code into it.
<!-- Top navigation -->
<nav>
  <a>
    <h1 style="color: crimson; font-size: 30px">Logo</h1>
  </a>
</nav>
<!-- Sidebar navigation -->
<div>
  <div>
    <nav>
      <div>
        <ul style="list-style: none; display: flex; gap: 30px">
          <li>
            <a style="text-decoration: underline"> Profile </a>
          </li>
          <!-- Calling SignOut() Api from AuthService -->
          <li>
            <a (click)="authService.SignOut()" style="cursor: pointer">
              Log out
            </a>
          </li>
        </ul>
      </div>
    </nav>
    <!-- Main content -->
    <main role="main">
      <div>
        <div>
          <h1 style="color: crimson">Profile</h1>
        </div>
        <!-- Show user data when logged in -->
        <div *ngIf="authService.userData as user">
          <div>
            <div class="media">
              <img src="{{(user.photoURL)%20?%20user.photoURL%20:%20'/auth/src/assets/5907.jpg'}}"
                alt="{{user.displayName}}">
              <div style="color: black">
                <h1>
                  Hello:
                  <strong>{{
                    user.displayName ? user.displayName : "User"
                  }}</strong>
                </h1>
                <p>
                  User ID: <strong>{{ user.uid }}</strong>
                </p>
                <p>
                  Email: <strong>{{ user.email }}</strong>
                </p>
                <p>
                  Email Verified: <strong>{{ user.emailVerified }}</strong>
                </p>
              </div>
            </div>
          </div>
        </div>
      </div>
    </main>
  </div>
</div>
Add the auth service class in the dashboard.component.ts file.
import { Component, OnInit } from '@angular/core';
import { AuthService } from '../../shared/services/auth.service';
@Component({
  selector: 'app-dashboard',
  templateUrl: './dashboard.component.html',
  styleUrls: ['./dashboard.component.css'],
})
export class DashboardComponent implements OnInit {
  constructor(public authService: AuthService) {}
  ngOnInit(): void {}
}
In the browser, open the Angular authentication project.
ng serve --openConclusion:
In this article, we have covered how to build a full authentication system in Angular 15 using Firebase. We have covered how to connect Angular to Firebase, how to implement sign-up, sign-in, and sign-out functionality, and how to use the AngularFire library to interact with Firebase. By following this guide, you should now have a good understanding of how to build an authentication system in Angular and how to use Firebase as a backend.
You can download CodeSource from GitHub.
Takeaways:
- Setting up an Angular project and connecting it to Firebase is a straightforward process.
- The AngularFire library makes it easy