Building an AI Chatbot with Vue, Node, and OpenAI

In this article, we will be setting up a new Vue.js and Node.js project to create an AI chatbot using OpenAI’s ChatGPT API.
The tutorial will guide you through creating a frontend using Vue.js, and a backend using Node.js and the OpenAI API.
We will be using the OpenAI ChatGPT API, which allows developers to interact with an AI model to generate human-like text responses based on given prompts.
Video Tutorial of this guide:
By the end of this tutorial, you will have a working chatbot that can answer questions and engage in conversation with users.
To begin, we will set up a new Vue.js and Node.js project by following these steps:
Install Vue CLI globally by running the following command:
npm install -g @vue/cliCreate a new Vue project by running:
vue create aichatChoose the default settings & navigate to the project directory:
cd aichatInstall the necessary dependencies for the frontend:
npm install axiosCreate a new Node.js project in a separate folder:
mkdir chatgpt-backend
cd chatgpt-backend
npm init -y
Install the necessary dependencies for the backend:
npm install express cors body-parser dotenv openaiSet up the Node.js backend
Create a new file named index.js in the chatgpt-backend folder and add the following code:
const express = require('express');
const cors = require('cors');
const bodyParser = require('body-parser');
const chatGptController = require('./chatGpt.controller');

const app = express();
app.use(cors());
app.use(bodyParser.json());

app.post('/chatbot', chatGptController.askToChatGpt);

const PORT = process.env.PORT || 3000;
app.listen(PORT, () => {
  console.log(`Server is running on port ${PORT}`);
});
This code sets up a basic Express server that listens on port 3000, with CORS and body-parser middleware enabled. It imports the chatGptController module, which we will create in the next step, and sets up a POST route at /chatbot that will handle chatbot requests.
Create a new file named chatGpt.controller.js in the chatgpt-backend folder and add the following code:
const { Configuration, OpenAIApi } = require("openai");
require("dotenv").config();

const askToChatGpt = async function (req, res) {
  /**
   * 1. Create/configure OpenAI Instance
   */
  const openAIInstance = await _createOpenAIInstance();

  /**
   * 2. Let's talk to chatGPT
   */
  await openAIInstance
    .createCompletion({
      model: "text-davinci-003",
      prompt: req.body.message,
      temperature: 0,
      max_tokens: 500,
    })
    .then((response) => {
      const repliedMessage = response.data.choices[0].text;
      res.send({ from: "chatGpt", data: repliedMessage });
    })
    .catch((error) => {
      // Report error
      console.log("Error ", error);
    });
};

const _createOpenAIInstance = async () => {
  const conf = await new Configuration({
    apiKey: process.env.CHATGPT_TOKEN,
  });
  return await new OpenAIApi(conf);
};

module.exports = {
  askToChatGpt,
};
This code defines the askToChatGpt function, which will handle incoming chat requests. It first creates an OpenAI instance using the API key stored in the environment variable CHATGPT_TOKEN.
Then, it sends a request to the ChatGPT API with the user’s message as the prompt. The AI model, temperature, and maximum token count are specified in the request.
The function then extracts the AI-generated response and sends it back to the frontend.
Create a .env file in the chatgpt-backend folder with the following content:
CHATGPT_TOKEN=your_chatgpt_tokenReplace your_chatgpt_token with your actual ChatGPT token.
Set up the Vue frontend
Create a new file named ChatBox.vue in the src/components folder and add the following code:
<template>
        <div class="chatbox-container">
    <div class="container">
      <h1>Ai Chat Bot</h1>
    <div class="messageBox mt-8">
      <template v-for="(message, index) in messages" :key="index">
        <div :class="message.from == 'user' ? 'messageFromUser' : 'messageFromChatGpt'">
          <div :class="message.from == 'user' ? 'userMessageWrapper' : 'chatGptMessageWrapper'">
            <div :class="message.from == 'user' ? 'userMessageContent' : 'chatGptMessageContent'">{{ message.data }}</div>
          </div>
        </div>
      </template>
    </div>
    <div class="inputContainer">
      <input
        v-model="currentMessage"
        type="text"
        class="messageInput"
        placeholder="Ask me anything..."
      />
      <button
        @click="sendMessage(currentMessage)"
        class="askButton"
      >
        Ask
      </button>
    </div>
  </div>
  </div>
</template>
This code defines the basic structure of the chat interface, including a message box for displaying messages and an input field for entering user messages.
Modify the src/App.vue file to import and use the ChatBox component:
<template>
  <div class="container mx-auto">
    <ChatBox />
  </div>
</template>

<script>
import ChatBox from './components/ChatBox.vue';

export default {
  name: 'App',
  components: {
    ChatBox,
  },
};
</script>
Update the ChatBox.vue component to use the CSS classes. you can check the Source code for the complete styling of the app.
<style scoped>
@import url('https://fonts.googleapis.com/css2?family=Roboto:wght@400;500&display=swap');

.chatbox-container {
  position: fixed;
  bottom: 24px;
  right: 24px;
  z-index: 1000;
}

.container {
  width: 360px;
  height: 600px;
  background-color: white;
  border-radius: 8px;
  box-shadow: 0 0 20px rgba(0, 0, 0, 0.1);
  display: flex;
  flex-direction: column;
  overflow: hidden;
  font-family: 'Roboto', sans-serif;
}
</style>
Add the scripts to Chatbox.vue to communicate with the backend server:
<script>
import axios from 'axios';

export default {
  name: 'ChatBox',
  data() {
    return {
      currentMessage: '',
      messages: [],
    };
  },
  methods: {
    async sendMessage(message) {
      this.messages.push({
        from: 'user',
        data: message,
      });
      await axios
        .post('http://localhost:3000/chatbot', {
          message: message,
        })
       .then((response) => {
  this.messages.push({
    from: 'chatGpt',
    data: response.data.data, // Access the 'data' property of the response object
  });
});

    },
  },
};
</script>
This script adds the sendMessage method, which sends user messages to the backend server and appends the AI-generated response to the chat interface.
It uses the axios library to make an HTTP POST request to the /chatbot endpoint of the backend server, passing the user’s message as a parameter.
It then processes the response and adds the AI-generated message to the messages array.
In the chatgpt-backend folder, run the following command to start the backend server:
node index.jsIn the AiChatBot folder, run the following command to start the frontend server:
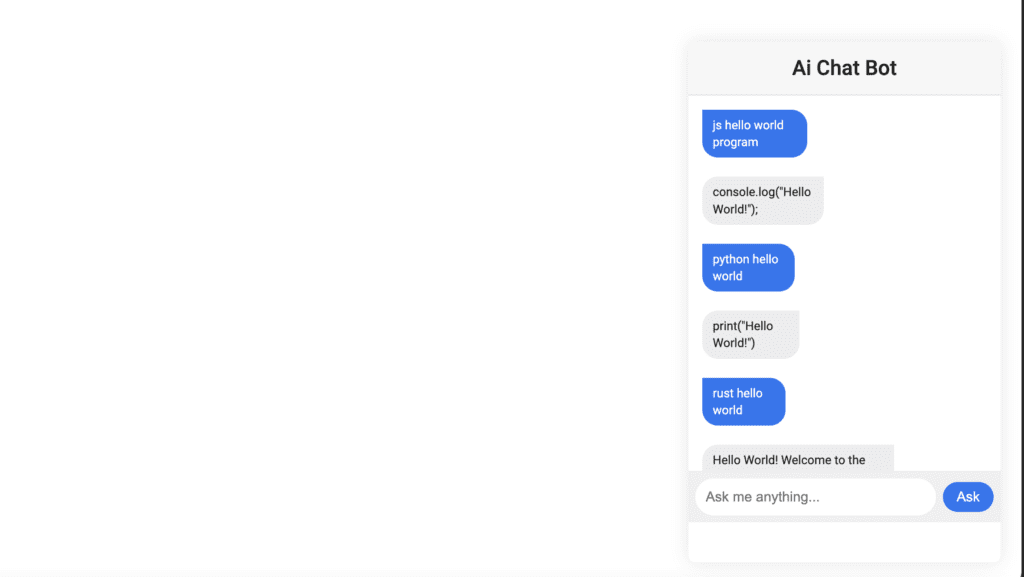
npm run serveOpen your browser and visit http://localhost:8080. You should see the facebook style Chat interface. type a question into the input box and press the “Ask” button to get a response from Ai Bot.
Conclusion
And there you have it! You now have a fully functioning AI chatbot built with Vue.js and Node.js, powered by the OpenAI ChatGPT API.
Users can ask the chatbot various questions, and it will respond with human-like text generated by the ChatGPT model.
With some additional customization and styling, you can integrate this chatbot into your website or application to provide a seamless and engaging user experience.
You can access Source code from here.