How to setup GoLang Authentication with JWT

In this tutorial, you are going to learn about Golang Authentication JWT token. Authentication is the process of recognizing the user’s identity.
That means based on users’ credentials, one will be able to perform certain types of action.
For example, you have a blog application where anonymous users can visit and see the blogs, but the moment the user wants to do activities like, comment, or create a blog you want him to be logged in.
This process is called authentication.
It is the most important thing for any web application. Without proper authentication, malicious users can be entered and destroy the system as well.
GoLang Authentication with JWT
To complete this tutorial in the most effective way all you need to have is a configured computer, a text editor, a tool for API testing, and a basic understanding of Golang and JWT tokens.
In this tutorial, we will use Visual Studio Code as a text editor and Postman for API testing.
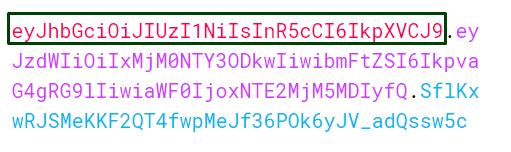
The first part is the header
The header has consisted of two major parts. Basically, it is a JSON object which is converted base64 in the end and then supplied to your JWT token’s first part.
This part contains two major keys. One is the algorithm that is used to encrypt your jwt signature and the token type that you are creating.
You may use N number of algorithms but in our project, we will use the most common and secure algorithm named hs256. An example of header is look like this:
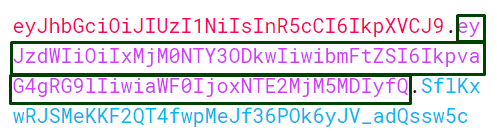
The second part is the payload
The payload in jwt consists of the data that you want to be present in your jwt.
This is basically used to identify a particular user uniquely.
In here, you may keep some identification based on the roles of a particular user to whom you are issuing the token that he has access.
Like based on names, emails, or any set of fields that you want to be used. An example of payload is look like this:
The third part is a signature:
The third part which is significant is the key part of the token.
You may decrypt the previous two parts of the token which are header and payload but the signature holds the security part and it can not be decrypted even by the token holder.
The signature is being generated by encrypting your header and payload put together with bias dot separation and encrypted with the private key that you have in your server.
So the most important part is to secure your private key in a way that no one can easily access. An example of signature is look like this:

Through this signature, you can validate a user is authenticated or not. We will implement this practically in the further sections of our tutorials.
Create Database Model
In this section, we will create a database model to store user’s information.
We will create separate files for this action. In one file, there will be a connection code and another will be the actual structure of the code.
We are using MySQL database to store data you use your preferred one.
package database

import (
        "../models"
        "gorm.io/driver/mysql"
        "gorm.io/gorm"
)
var DB *gorm.DB

func Connect() {
        connection, err := gorm.Open(mysql.Open("root:rootroot@/yt_go_auth"), &gorm.Config{})

        if err != nil {
                panic("could not connect to the database")
        }

        DB = connection

        connection.AutoMigrate(&models.User{})
}
In our database package, we import our required packages and then connect our Database.
There will be an error message shown if any unwanted situation occurred.
After connecting the database successfully we will create our database model. Follow the below code example for creating model:
package models

type User struct {
        Id       uint   `json:"id"`
        Name     string `json:"name"`
        Email    string `json:"email" gorm:"unique"`
        Password []byte `json:"-"`
}
You may add as many fields as you want and create a complex database model but here we want to keep things as simple as possible and take only these fields.
Register System.
We will implement a registration system first. We create a file named authController and here we will implement our auth-related code.
Such as login functionality, register functionality, logout functionality, etc.
package controllers

import (
        "../database"
        "../models"
        "github.com/dgrijalva/jwt-go"
        "github.com/gofiber/fiber"
        "golang.org/x/crypto/bcrypt"
        "strconv"
        "time"
)

const SecretKey = "ThisIsMySecretKey"

func Register(c *fiber.Ctx) error {
        var data map[string]string

        if err := c.BodyParser(&data); err != nil {
                return err
        }

        password, _ := bcrypt.GenerateFromPassword([]byte(data["password"]), 12)

        user := models.User{
                Name:     data["name"],
                Email:    data["email"],
                Password: password,
        }

        database.DB.Create(&user)

        return c.JSON(user)
}
Here, first, we import all our required fields for registration and login. Because in the next section we will implement login functionality.
We also use bcrypt to make user’s password encrypted and by doing this even the admin of the system will also not be able to see the password. It is a good sign of security measure.
Finally, we create a new user based on our database model and user’s credentials.
Login System
This is the most important part of our tutorials. Here, we will implement login functionality by using Jwt. We have discussed the concept of jwt in detail in the earlier part of our tutorial.
We are implementing this in the same file where we have implemented the register system. You have to put the following code just after the register’s code.
func Login(c *fiber.Ctx) error {
        var data map[string]string

        if err := c.BodyParser(&data); err != nil {
                return err
        }

        var user models.User

        database.DB.Where("email = ?", data["email"]).First(&user)

        if user.Id == 0 {
                c.Status(fiber.StatusNotFound)
                return c.JSON(fiber.Map{
                        "message": "Invalid Credentials",
                })
        }

        if err := bcrypt.CompareHashAndPassword(user.Password, []byte(data["password"])); err != nil {
                c.Status(fiber.StatusBadRequest)
                return c.JSON(fiber.Map{
                        "message": "Invalid Credentials",
                })
        }

        claims := jwt.NewWithClaims(jwt.SigningMethodHS256, jwt.StandardClaims{
          Issuer:    strconv.Itoa(int(user.Id)),
                ExpiresAt: time.Now().Add(time.Hour * 1).Unix(),
        })

        token, err := claims.SignedString([]byte(SecretKey))

        if err != nil {
                c.Status(fiber.StatusInternalServerError)
                return c.JSON(fiber.Map{
                        "message": "could not login",
                })
        }

        return c.JSON(fiber.Map{
                "message": "Login Successfully",
        })
}

}
We have done some validation first. We have done some tricky parts here in the error messages. We have written a common message that is "Invalid Credentials" instead of writing "Invalid User" or “Invalid password”. It may help in securing a little.
Because the malicious user will get confused about what he did wrong or right. After that, we generate our jwt token.
We have discussed before that to generate a jwt token 3 things will be needed, one is a header, the other one is the payload, and finally signature.
The signature is the most important part and you have to keep it in a very secure way. Here, for better understanding, we wrote our secret key in the code file but it is not recommended.
After creating all these, if everything seems correct we send a success message and if not, we send an error message.
Test the code
Now it’s time to test our code. But before doing this we need to do two more things. We need to create a server and a basic routing. Follow the code below:
package main

import (
        "./database"
        "./routes"
        "github.com/gofiber/fiber"
        "github.com/gofiber/fiber/middleware/cors"
)

func main() {
        database.Connect()

        app := fiber.New()

        app.Use(cors.New(cors.Config{
                AllowCredentials: true,
        }))

        routes.Setup(app)

        app.Listen(":8000")
}
In main package, we implemented all required files and finally run our code in port 8000.
package router

import (
        "../controllers"
        "github.com/gofiber/fiber"
)

func Setup(app *fiber.App) {

        app.Post("/api/register", controllers.Register)
        app.Post("/api/login", controllers.Login)
}
We have created two routers one is for registering and another one is for login. Now, we have to visit /api/login with port 8000 to get the login functionality visible. Let’s see the output in postman.
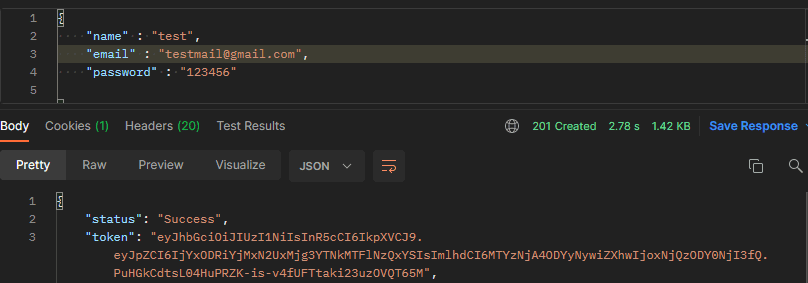
Here we write email, name, and password and it generates a token for us with a success message.
Conclusion:
This is all about GoLang Authentication with JWT token.
We have used jwt token to complete this, which is very popular and secure at this moment. You have to practice more to get the best outcome from this tutorial.
Now, after learning the basics from this tutorial you may experiment with some other interesting kinds of stuff with Golang authentication with JWT.