Sending Emails With Vue and Nodemailer

In this article, you will learn how to Send Emails With Vue and Nodemailer.
We will see how to send email templates using Nodemailer as our transporter service, and Handlebars, as our email templating engine.
Sending emails over the internet has become one of the most significant features every web application would love to integrate.
Sending Emails With Vue and Nodemailer
We will build a simple application where users create an account. When the user registers a welcome email will be sent to the user.
Let’s write some code.
We will start by setting up the backend for our application. Let’s create a new directory for our application and initialize a new node js application. open up your terminal and type the following:
cd desktop
mkdir vue-mailer && cd vue-mailer
npm init -y
code .
The mkdir command is used for creating a new directory, while the cd command is used to move into a directory.
We use the npm init -y to initialize a new nodejs application. This command will create a package.json file for our application. This is where we will keep track of all our project dependencies.
The code . command will open up that folder in VS code which is our text editor.
Installing the necessary packages
Now we need to install the necessary dependencies for our backend application. Here are the dependencies we will need for our application:
body-parser: is a piece of express middleware that reads a form’s input and stores it as a javascript object accessible through req.body.nodemon: will watch our files for any changes and then restarts the server when any change occurs.expressThis will be used to build our nodejs server.cors: is a mechanism that uses additional HTTP headers to tell browsers to give a web application running at one origin, access to selected resources from a different origin.dotenv: will store all of our environment variables. This is where we will store our email variables.morgan: This is a package that will log all our application routes.nodemailer-express-handlebars: This package will help us to set up our email templates.mongoose: An object modeling tool used to asynchronous query MongoDB.
The first thing we need to do is to install nodemon globally so that it can be accessed anywhere on our local machine. To install that open ur terminal and type this command:
npm i nodemon -gAfter installing nodemon globally, we need to install other dependencies for our application:
npm i express mongoose morgan dotenv body-parser cors nodemailer nodemailer-express-handlebars --saveThis command will install all these packages and add them among our dependencies in the package.js file. It also creates a node-modules folder which is where all the packages are been stored. Remember not to add this package while you are pushing your project to git. To avoid this we need to create a .gitignore file. To do this, open your terminal and run this command:
touch .gitignoreThis command will create a .gitignore file. Open the file and type node_modules in it.
Creating the Express Server
we need to create our main file, to do that we will create an index.js file:
mkdir server && cd server
touch index.js
We need to create a simple server for our application, this is where our backend application will run:
const express = require('express');
const cors = require('cors');
const bodyParser = require('body-parser');
const morgan = require('morgan');

const app = express();
app.use(morgan('dev'));
app.use(cors());
app.use(bodyParser.json())

app.get('/', (req, res) => {
    res.json({
        message: 'Vue Mailer Application ?? '
    });
});

const port = process.env.PORT || 4000;
app.listen(port, () => {
    console.log(`listening on ${port}`);
});
What we basically did was to bring in some of our project dependencies and configured the packages. What we have to do now is to add a command in our scripts object in our package.json file to run our backend application:
"scripts": {
    "start": "nodemon server"
  },
To run the backend application we can now run npm start.After running the command we can access our application on localhost:4000

I’m using the JSON view awesome Chrome extension to display my output.
Now that we have our application, we can set up our mongoose models for user registration and contact.
To do that we will create a new directory API for our modules.
Note that the directory should be created in the server directory, meaning that you have to move into the server directory.
mkdir api && cd api
mkdir User && cd User
touch controller.js && touch routes.js && touch model.js
cd ..
touch routeHandler.js
What we are doing here is to basically creating an api directory and then move into that directory. Inside the directory we create a directories for our User module and inside the directory we created our controller, routes and model files.
What we have to do now is to write a simple script that will configure our mongodb database. In the api directory, create a config directory and create a db.js file inside it. This is where we will write our config for our database:
const mongoose = require("mongoose");
module.exports = function (app) {
    mongoose.connect('mongodb://localhost:27017/vue-mailer', {
        useUnifiedTopology: true,
        useNewUrlParser: true,
        useFindAndModify: false
    }).then(res => console.log("conneceted")).catch(err => console.log(err))
    mongoose.Promise = global.Promise;
    process.on("SIGINT", cleanup);
    process.on("SIGTERM", cleanup);
    process.on("SIGHUP", cleanup);
    if (app) {
        app.set("mongoose", mongoose);
    }
};
function cleanup() {
    mongoose.connection.close(function () {
        process.exit(0);
    });
}
Here we create a mongoose connection to our mongodb server.This will create a new db vue-mailer. Once the database is connected it will display connected in the console.
Now we need to register this config in our main file(index.js) file:
require("./config/db")(app);Note that you have to declare this after you have declared the instance of express.
Let’s start with the User model. Let’s create the user schema by adding this into the User/model.js file:
const mongoose = require("mongoose");
const userSchema = mongoose.Schema({
    name: {
        type: String,
        required: [true, "Please Include your name"]
    },
    email: {
        type: String,
        required: [true, "Please Include your email"]
    },
    phone: {
        type: String,
        required: [true, "Please Include your phone number"]
    }
});
const User = mongoose.model("User", userSchema);
module.exports = User;
What we have to do now is to create our mailer config. let’s create a mailer.js file inside our config directory and setup our nodemailer transporter.
Note if you are using Gmail you have to enable less security. To do this click on this link. This will enable the ability to send mails in 3rd party applications.
const nodemailer = require('nodemailer');
const hbs = require("nodemailer-express-handlebars")

let transporter = nodemailer.createTransport({
    service: 'gmail',
    secure: false,
    auth: {
        user: process.env.GMAIL_EMAIL,
        pass: process.env.GMAIL_PASSWORD
    },
    tls: {
        rejectUnauthorized: false
    }
});
Here transporter is the object that will enable us send mails.The service i will be using is the gmail service. The auth object is where we will add our gmail email and password. For security reasons, we will store this data in our environment variable.To do this, create a .env file and add the following:
GMAIL_EMAIL=youremail
GMAIL_PASSWORD=yourpassword
Replace youremail and yourpassword with your email and password respectively. And DON’T forget to add .env to the .gitignore file to prevent commiting it on git.
Next up we need to configure express handlebars for templating.
Let’s start by creating a views directory, after doing that create 3 more directories inside of it which are layouts ,partials and templates :
mkdir views && cd views
mkdir layouts && mkdir partials && mkdir templates
Inside the layout directory, create a main.handlebars file and add the following code:
<!DOCTYPE html>
<html>
<head>
    <meta charset="utf-8">
    <title>Vue Mailer</title>
</head>
<body>
    {{{body}}}
</body>
</html>
This will be the default wrapper for our template meaning that all templates will be mounted here. We won’t be adding any file in our partials directory for now.
All our email templates will be defined in the templates directory.
Next up lets configure express handlebars to use this directory for templating:
const handlebarOptions = {
    viewEngine: {
        extName: '.handlebars',
        partialsDir: 'server/views/patials',
        layoutsDir: 'server/views/layouts',
        defaultLayout: '',
    },
    viewPath: 'server/views/templates',
    extName: '.handlebars',
};
transporter.use('compile', hbs(handlebarOptions));
Here we define our extension name. The fun part about handlebars is you could actually change you extension name to anything of your choice.
The viewEngine object is basically a config pointing to the directories that we created.
With this now we can start creating our Email templates.This email templates will be basic HTML.
Its a good practice to write your email templates in HTML tables for good responsiveness.
ets head over to the template directory and create a new welcome.handlebars file and add the following codes:
<table width="100%" border="0" align="center" cellpadding="0" cellspacing="0">
<!-- START HEADER/BANNER -->
<tbody>
<tr>
<td align="center">
<table class="col-600" width="600" border="0" align="center" cellpadding="0" cellspacing="0">
<tbody>
<tr>
<td align="center" valign="top"
background="https://designmodo.com/demo/emailtemplate/images/header-background.jpg"
bgcolor="#66809b" style="background-size:cover; background-position:top;height="
400""="">
<table class="col-600" width="600" height="400" border="0" align="center"
cellpadding="0" cellspacing="0">
<tbody>
<tr>
<td height="40"></td>
</tr>
<tr>
<td align="center" style="line-height: 0px;">
<img style="display:block; line-height:0px; font-size:0px; border:0px;"
src="https://designmodo.com/demo/emailtemplate/images/logo.png"
width="109" height="103" alt="logo">
</td>
</tr>
<tr>
<td align="center"
style="font-family: 'Raleway', sans-serif; font-size:37px; color:#ffffff; line-height:24px; font-weight: bold; letter-spacing: 7px;">
Vue <span
style="font-family: 'Raleway', sans-serif; font-size:37px; color:#ffffff; line-height:39px; font-weight: 300; letter-spacing: 7px;">Mailer</span>
</td>
</tr>
<tr>
<td align="center"
style="font-family: 'Lato', sans-serif; font-size:15px; color:#ffffff; line-height:24px; font-weight: 300; padding:0 50px;">
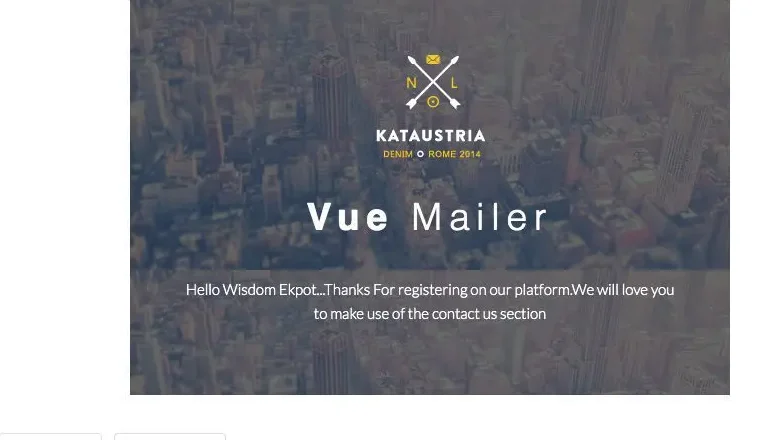
Hello {{user}}..Thanks For registering on our platform.We will love you
to make use of the contact us section
</td>
</tr>
<tr>
<td height="50"></td>
</tr>
</tbody>
</table>
</td>
</tr>
</tbody>
</table>
</td>
</tr>
<!-- END HEADER/BANNER -->
</tbody>
</table>This is a basic HTML template, We will dynamically pass in the users name into the template using {{user}},and also pass in the users email we will be sending the mail to.This data is gotten from our transporters context.
We now need to create a function that will send the mail once a user registers.To do that lets add this to our mailer.js file:
exports.welcomeMail = (email, name) => transporter.sendMail({
    from: 'Vue Mailer',
    to: email,
    subject: "Account Creation",
    template: "welcome",
    context: {
        user: name
    }
});
Now that we have our welcome email template, lets implement the registration controller.we will make sure that the registration was successful before the mail is been sent.
let add this code to our User/controller.js file:
let User = require("./model");
let mailer = require("../../config/mailer");
exports.registerNewUser = async (req, res) => {
    try {
        let user = new User({
            name: req.body.name,
            email: req.body.email,
            phone: req.body.phone
        })
        let addedUser = await user.save();
       if (addedUser) {
            mailer.welcomeMail(req.body.email, req.body.name)
        }

        res.status(200).json({
            msg: "Welcome Onboard",
            data: addedUser
        })
    } catch (err) {
        console.log(err)
        res.status(500).json({
            error: err
        })
    }
}
Let me explain what is happening here.
- We start by bringing in our user model and our mailer module.
- We create a function
registerNewUserand create a new instance of User; - We use the
save()method to save the inputted data into our MongoDB - Now if the save method was successful, we call the
mailer.welcomeMailmethod and pass the user’s name as a parameter. - After that, we send a response if it’s successful, but if it isn’t the catch block will throw the error.
Next up we need to create our route that will handle this controller function.To do that, lets add this to our User/routes.js file:
const router = require("express").Router();
const userController = require("./controller");

router.post("/", userController.registerNewUser);

module.exports = router;
What will likely do now is to register our root routes.This is a good approach for handling routes in Expressjs. To do that add this to your api/routeHandler.js file:
const userRoute = require("./User/routes")
module.exports = app => {
    app.use("/user", userRoute);
}
Now we need to register our routeHandler.js file in our index.js file:
require('./api/routerHandler')(app)Testing Our Backend
Now that we have completed our backend, Let’s test the endpoint using Postman.
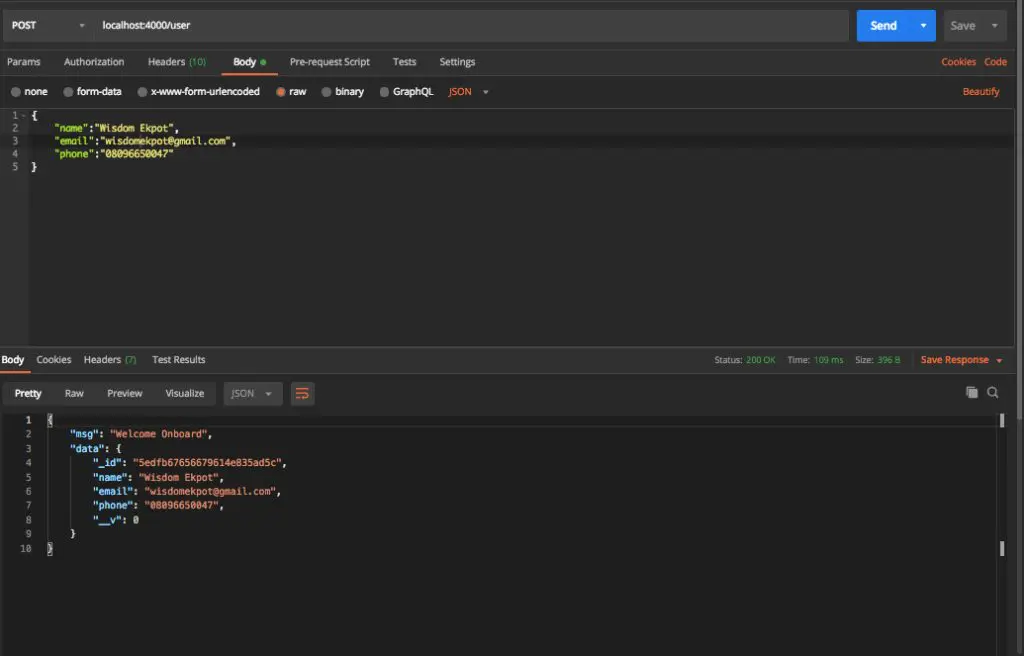
Remember to set the data type to JSON, and also set the request type to POST.
After doing this, send the request and open up your email application. You will get a mail like this:
That’s basically the functionality of our backend. Next up we need to create our Vuejs application.
Setting up the Front-End
We will use Vue inline for this application as it is very simple.Let’s create a client folder, this is where we will be setting up our frontend application:
mkdir client and cd client
touch index.html && touch index.js
What we basically did here was to create a Client folder and move it into that folder. We went ahead to create an index.html file and an index.js.The index.js file is where we will be writing all our Vuejs codes.
Let’s set up a simple HTML boilerplate and the link our index.js file to it. We will also be using axios to make our requests so we will add the axios CDN into our html file.
<!DOCTYPE html>
<html lang="en">
<head>
    <meta charset="UTF-8">
    <meta name="viewport" content="width=device-width, initial-scale=1.0">
    <link rel="stylesheet" href="https://stackpath.bootstrapcdn.com/bootstrap/4.5.0/css/bootstrap.min.css"
        integrity="sha384-9aIt2nRpC12Uk9gS9baDl411NQApFmC26EwAOH8WgZl5MYYxFfc+NcPb1dKGj7Sk" crossorigin="anonymous">
All of our Vuejs code will be written inside the div with the id of app.
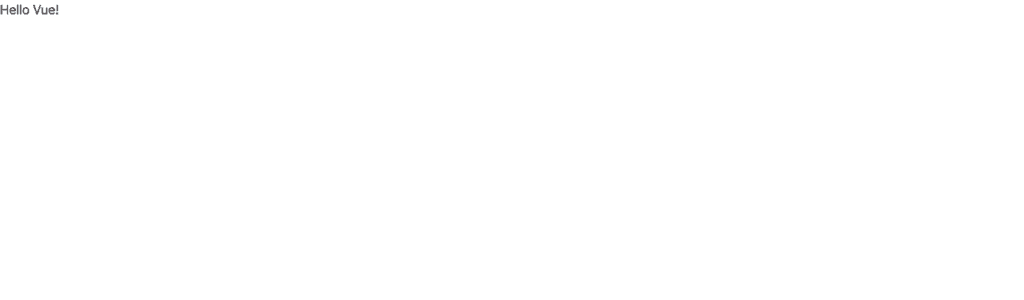
var app = new Vue({
    el: '#app',
    data: {
        message: 'Hello Vue!'
    }
})
We will use live-server to run our frontend application. If you don’t have live-server installed on your local machine then open up your terminal and run:
npm i live-server -gAfter installing it you can run your front end application by running :
live-server --port=4040This will open up our application on port 4040.
You will have this on your browser:
Now that we have our front end running, we need to create our registration form. We added the bootstrap CDN, so we will be using Bootstrap for our UI. lets modify our div with the id of app with this:
<div id="app">
        <section>
            <div class="container">
                <div class="row">
                    <div class="col-md-4 offset-md-4 mt-5">
                        <div class="card p-2">
                            <form>
                                <div class="form-group">
                                    <label for="name">Name</label>
                                    <input type="text" class="form-control" id="name">
                                </div>
                                <div class="form-group">
                                    <label for="email">Email address</label>
                                    <input type="email" class="form-control" id="email">
                                </div>
                                <div class="form-group">
                                    <label for="phone">Phone</label>
                                    <input type="text" class="form-control" id="phone">
                                </div>
                                <button class="btn btn-primary" type="submit">
                                    <span class="spinner-border spinner-border-sm" role="status"
                                        aria-hidden="true"></span>
                                    Submit
                                </button>

                            </form>
                        </div>
                    </div>
                </div>
            </div>
        </section>
    </div>
Next up we need to setup our vue application by setting up our state for the form and also write a method to register the users. Lets modify our index.js file to this:
var app = new Vue({
    el: '#app',
    data: {
        user: {
            name: "",
            email: "",
            phone: ""
        },
        loader: false
    },
    methods: {
        async registerUser() {
            this.loader = true
            try {
                debugger
                let response = await axios.post('http://localhost:4000/user', this.user);
                console.log(response)
                alert("Registration Was successful");
                this.loader = false;
            } catch (err) {
                alert("Something Went Wrong");
                this.loader = false
            }
        }
    },
})
We now need to bind our data to the input fields.To do that lets modify our form:
<form @submit.prevent="registerUser">
                                <div class="form-group">
                                    <label for="name">Name</label>
                                    <input v-model="user.name" type="text" class="form-control" id="name">
                                </div>
                                <div class="form-group">
                                    <label for="email">Email address</label>
                                    <input v-model="user.email" type="email" class="form-control" id="email">
                                </div>
                                <div class="form-group">
                                    <label for="phone">Phone</label>
                                    <input v-model="user.phone" type="text" class="form-control" id="phone">
                                </div>
                                <button class="btn btn-primary" type="submit">
                                    <span v-if="loader" class="spinner-border spinner-border-sm" role="status"
                                        aria-hidden="true"></span>
                                    Submit
                                </button>

                            </form>
Note that we add a conditional to the spinner so that it initialises when we try to register:
<span v-if="loading" class="spinner-border spinner-border-sm" role="status"aria-hidden="true"></span>Conclusion
In this article, you have learned how to Send Emails With Vue and Nodemailer.
You can also add better features to your application by adding a contact section Where users can send emails to the admin.
This would help me understand Nodemailer better. For source code, click here.