Build an Invoice Generator app with Vue and Firebase

In this tutorial, you will learn how to Build an Invoice Generator with Vue and Firebase
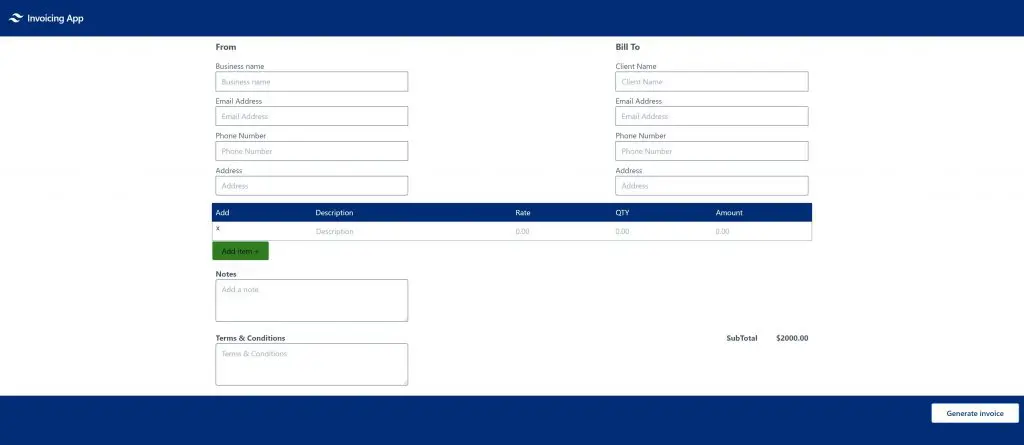
Below is the app we are going to build:
What is Firebase?
Firebase is a mobile backend-as-a-service that provides powerful features for building mobile apps. Firebase has three core services: a real-time database, user authentication, and hosting. You can use these services to create apps without writing any server code
We will start by creating a Firebase project in our firebase console.
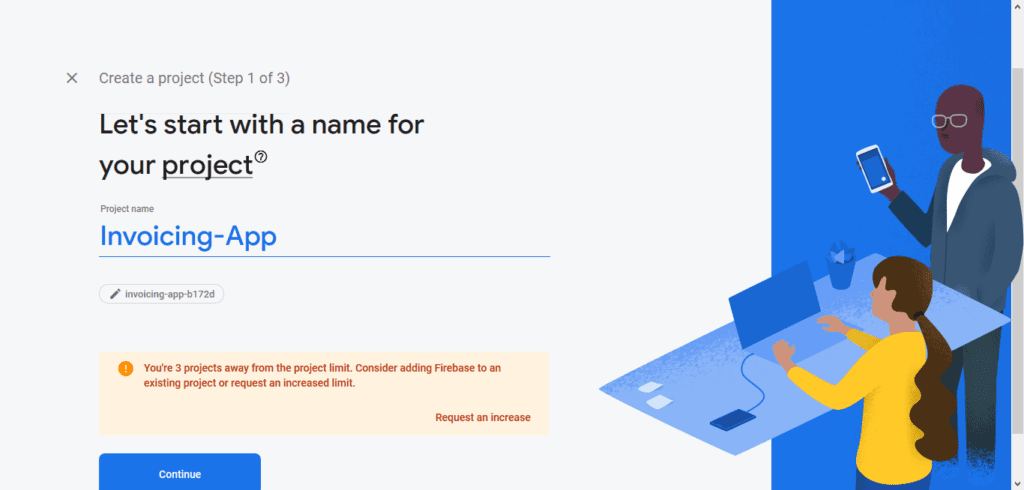
Open your Firebase console and click on add a project just as shown below:

Add a project name just as shown below:
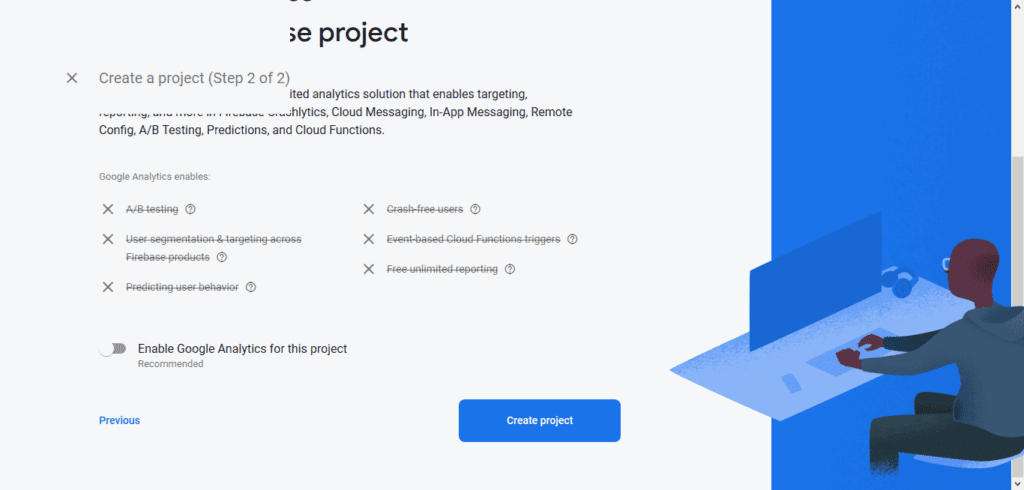
Click continue to navigate the to next page and also disable google analytics because we won’t be using it for this project just as shown below:
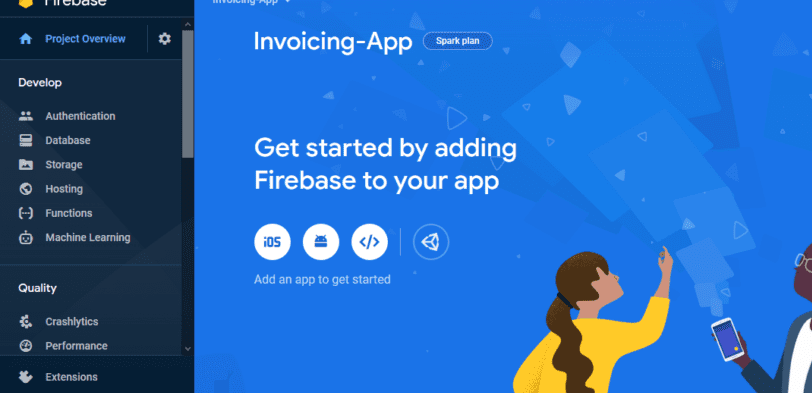
Then click create project and your project we be ready to use.
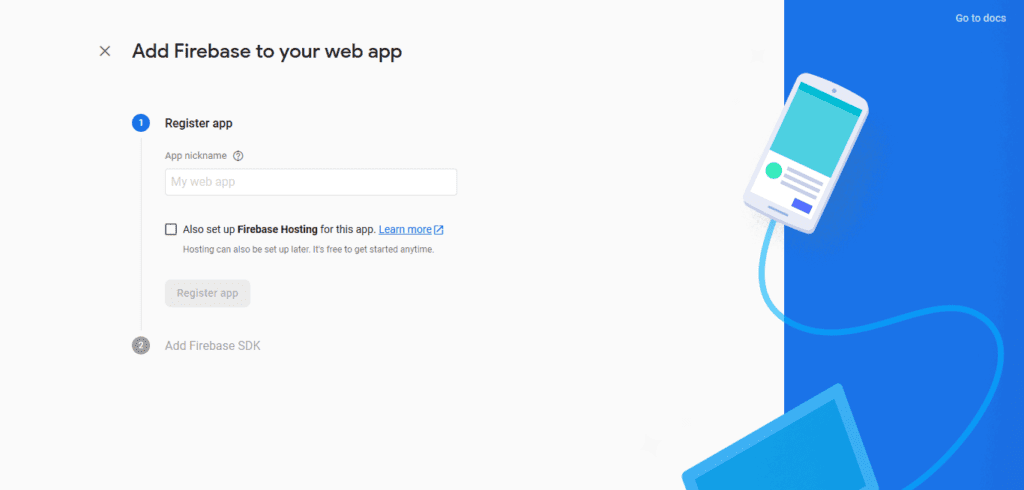
After the above procedures, the app will open a page like the picture below, click on the </> icon on the page to add an app.
When we click on the icon the page will navigate to where we are going to add the name of the app we want to create just as shown below.
After we have added an app name, we are going to click on the register app button and after that, we click on the continue to console button and our app will be added.
That is all we need to do on the Firebase website for now.
Let’s move on to creating a Vue project.
Creating a Vuejs project
Open your terminal and run the following commands
vue create invoice-appOnce the app starts running you will be asked to select a default project or manually set up the project based on what you want, select default.
Adding Tailwindcss to the project
Once the app is done running, enter the project by running the below commands
cd invoice-app
npm install tailwindcss
If the dependencies have been added, go to src/assets/css/tailwind.css and add the code below.
@tailwind base;
@tailwind components;
@tailwind utilities;
Create a config file for tailwindcss.
npx tailwindcss initCreate a PostCSS config file and add the code below. postcss.config.js
module.exports = {
  plugins: [require("tailwindcss"), require("autoprefixer")]
};
After all the above setups, import tailwind in our main.js file.
import '@/assets/css/tailwind.css'Then run the command below to serve our app.
npm run serveWe have been able to create a Vuejs project and we have added the Tailwind css dependencies to the Vuejs project, now we are going to start building our invoice app.
Building an Invoice Generator app with Vue
Now we are going to design the invoice page and we will start by creating a Navigation.vue file inside our components folder and also delete the HomePage.vue file. Inside the navigation.vue file <template></template> write the code below
<nav class="flex items-center justify-between flex-wrap bg-500 p-6 ">
<div class="flex items-center flex-shrink-0 text-white mr-6">
<span class="font-semibold text-xl tracking-tight">Invoicing App
</span>
</div>
</nav>
In the above code, we used html nav element and tailwind style guild to design our navigation bar.
Create a home.vue file and write the code below
<div class="container-fluid">
   <Navigation />
</div>

import Navigation from "../components/Navigation.vue";

 components: {
    Navigation
  },
Inside home.vue file template, import navigation component, and below it create a div just like the code below.
<div class="container-fluid">
  <Navigation />
  <div class="lg:container lg:mx-auto container-block">
  </div>
</div>
Inside the empty div, we are going to create an address form. Write the code below.
<div class="flex flex-wrap">
        <div class="w-2/6 p-2 text-gray-700">
          <h5 class="text-lg font-bold mb-4">From</h5>
          <div class="mb-2">
            <label class="mb-2" for="address">
              Business name
            </label>
            <input
              class="border border-gray-600 w-full py-2 px-3"
              id="B_name"
              type="text"
              placeholder="Business name"
              v-model="businessName"
            />
          </div>
          <div class="mb-2">
            <label class="mb-2" for="address">
              Email Address
            </label>
            <input
              class="border border-gray-600 w-full py-2 px-3"
              id="B_name"
              type="email"
              placeholder="Email Address"
              v-model="businessEmail"
            />
          </div>
          <div class="mb-2">
            <label class="mb-2" for="address">
              Phone Number
            </label>
            <input
              class="border border-gray-600 w-full py-2 px-3"
              id="B_name"
              type="number"
              placeholder="Phone Number"
              v-model="businessPhone"
            />
          </div>
          <div class="mb-2">
            <label class="mb-2" for="address">
              Address
            </label>
            <input
              class="border border-gray-600 rounded-b w-full py-2 px-3"
              id="B_name"
              type="text"
              placeholder="Address"
              v-model="businessAddress"
            />
          </div>
        </div>
        <div class="w-2/6 flex-none p-2">
          <div class="text-gray-700 text-center p-2"></div>
        </div>
        <div class="w-2/6 p-2 text-gray-700">
          <h5 class="text-lg font-bold mb-4">Bill To</h5>
          <div class="mb-2">
            <label class="mb-2" for="address">
              Client Name
            </label>
            <input
              class="border border-gray-600 w-full py-2 px-3"
              id="B_name"
              type="text"
              placeholder="Client Name"
              v-model="clientName"
            />
          </div>
          <div class="mb-2">
            <label class="mb-2" for="address">
              Email Address
            </label>
            <input
              class="border border-gray-600 w-full py-2 px-3"
              id="B_name"
              type="email"
              placeholder="Email Address"
              v-model="clientEmail"
            />
          </div>
          <div class="mb-2">
            <label class="mb-2" for="address">
              Phone Number
            </label>
            <input
              class="border border-gray-600 w-full py-2 px-3"
              id="B_name"
              type="number"
              placeholder="Phone Number"
              v-model="clientPhone"
            />
          </div>
          <div class="mb-2">
            <label class="mb-2" for="address">
              Address
            </label>
            <input
              class="border border-gray-600 rounded-b w-full py-2 px-3"
              id="B_name"
              type="text"
              placeholder="Address"
              v-model="clientAddress"
            />
          </div>
        </div>
      </div>
The above code is a simple form that takes both the business and client address and we use v-model to get the input values.
Next is to create an item form where both the client and the business owners can fill in the list of item that was bought, the price tag, the number of items, and the amount in total.
Below the div that has the address form create another div just like the code below.
      <div
        v-for="(item, index) in items"
        :key="index"
        class="flex flex-wrap border-b border-gray-500 border-l border-r"
      >
        <div class="w-1/6 pl-2 pr-2">
          <p>x</p>
        </div>
        <div class="w-2/6 pl-2 pr-2">
          <input
            class="border-gray-600 w-full py-2"
            id="B_name"
            type="text"
            placeholder="Description"
            v-model="item.description"
          />
        </div>
        <div class="w-1/6 pl-2 pr-2">
          <input
            class="border-gray-600 w-full py-2"
            id="B_name"
            type="number"
            placeholder="0.00"
            v-model="item.rate"
          />
        </div>
        <div class="w-1/6 pl-2 pr-2">
          <input
            class="border-gray-600 w-full py-2"
            id="B_name"
            type="number"
            placeholder="0.00"
            v-model="item.qty"
          />
        </div>
        <div class="w-1/6 pl-2 pr-2">
          <input
            class="border-gray-600 w-full py-2"
            id="B_name"
            type="number"
            placeholder="0.00"
            v-model="item.amount"
          />
        </div>
      </div>
If we notice in the above code we used v-for directive. Why? it is because we want to allow users to add more fields if there is more item to write and to achieve that we created an empty array and passed some object to the array then we loop through the array and passed those objects inside the v-model. We also have a button that adds another field for the user to
Now let’s create a button that we generate an invoice after the user is done and clicks the generate button.
<div class="bg-btn-500 text-right pb-4 pt-4">
      <button
        class="bg-white mr-4 text-btn-blue font-semibold py-2 px-8 border border-blue-500 rounded shadow"
        @click="sendInvoice"
      >
        Generate invoice
      </button>
    </div>
Connecting with Firebase Database
We want when a user clicks the generate button it takes the value and stores it in our project database. To start out we are going to first import Firebase to our invoice app project, to do that create a firebase.js file inside our src folder src/firebase.js and write the below code inside.
import firebase from "firebase";
import "firebase/firestore";

const firebaseConfig = {
    apiKey: "",
    authDomain: "your-app.firebaseapp.com",
    databaseURL: "https://your-app.firebaseio.com",
    projectId: "your-app",
    storageBucket: "your-app.appspot.com",
    messagingSenderId: "your_senderId",
    appId: "your_appId"
  };
firebase.initializeApp(firebaseConfig);
After importing Firebase to our project we are going to import that file inside home.vue component just like the code below.
import { fire } from "../firebase";Now that we have imported Firebase to the project we can now implement the generateInvoice() method we created. But first, let’s get the values from the inputs and pass it generateInvoice() method. Let’s declare those values we bind to v-model inside data(). Write the code below.
data() {
    return {
      amount: null,
      businessName: "",
      businessEmail: "",
      businessPhone: "",
      businessAddress: "",
      clientName: "",
      clientEmail: "",
      clientPhone: "",
      clientAddress: "",
      items: [
        {
          description: "",
          rate: "",
          qty: "",
          amount: ""
        }
      ],
      condition: "",
      note: ""
    };
  },
After that, let’s implement the generateInvoice() method. Inside the methods write the code below
generateInvoice()) {
      const createInvoice = {
        businessName: this.businessName,
        businessEmail: this.businessEmail,
        businessPhone: this.businessPhone,
        businessAddress: this.businessAddress,
        clientName: this.clientName,
        clientEmail: this.clientEmail,
        clientPhone: this.clientPhone,
        clientAddress: this.clientAddress,
        items: this.items,
        condition: this.condition,
        note: this.note
      };
      fire
        .database()
        .ref("createInvoice")
        .push(createInvoice);
      this.businessName = "";
      this.businessEmail = "";
      this.businessPhone = "";
      this.businessAddress = "";
      this.clientName = "";
      this.clientEmail = "";
      this.clientPhone = "";
      this.clientAddress = "";
      this.items = [
        {
          description: "",
          rate: "",
          qty: "",
          amount: ""
        }
      ];
      this.condition = "";
      this.note = "";
Inside the generateInvoice() method we started by creating an object that hold the values of the inputs, then we write to the firebase database and pass the object we created inside the .ref method, and we pushed the object to the firebase database to be stored and we now set our inputs to be empty.
If we check our Firebase project we can see the invoice data being stored but remember to allow our Firebase project rules to read and write if not we can not store our data.
Conclusion
I am so glad we finally made it to the end and we were able to learn how to Build an Invoice Generator app with Vue and Firebase. If find it helpful don’t forget to share.