Creating Django REST API Documentation with Swagger UI

In this article, we will create a Django REST API Documentation with Swagger UI for managing student records in a school and document the API we create.
An Application Programming Interface (API) is a method by which two computers can communicate with each other. Web APIs are the type of APIs used on the internet.
APIs allow developers to separate concerns in software either as functional components or in a service-oriented manner.
Django is a Python framework that allows for building web applications in a fast and efficient way. A lot of times, the developer or team who utilizes an API is different from the developer or team who built it.
Hence the need to provide a means of communicating API functionalities in a precise and clear manner to other developers. Django REST framework provides the capability to build RESTful (Representational State Transfer) kind of APIs with the Django framework.
Swagger UI allows us to build our documentation in the form of HTML pages so it can be viewed and read with ease. In this article, we shall go over creating an API for managing student records in a school and document the API we create.
Creating our Django Project
Let us start the project we are going to document by creating installing Django and setting up an app. We shall start by creating a directory (folder) for our project and navigate into the new directory. let’s call the directory school-api
mkdir school-api && cd school-apiLet us create a virtual environment with virtualenv to isolate our project from any other project on our computer. We shall name the new virtual environment env.
virtualenv envWe shall activate the virtual environment as follows
source env/bin/activate Should we need to deactivate the virtual environment, we shall simply use the deactivate command, deactivate.
Now, as we have activated our virtual environment, let’s proceed to install necessary packages and software including the Django package, and the django-rest-framework , the package that allows us to use the Django REST framework.
pip install Django django-rest-frameworknow, we shall create our Django project
django-admin startproject schoolServiceLet’s change directory into the new project directory
cd schoolServicethen, we’d go to to create an app to host our APIs
django-admin startapp apiNow, we will add the rest_framework and api app to the list of INSTALLED_APP in the settings.py file in the project directory, the schoolService folder.
# schoolService/settings.py
INSTALLED_APPS = [
    'django.contrib.admin',
    'django.contrib.auth',
    'django.contrib.contenttypes',
    'django.contrib.sessions',
    'django.contrib.messages',
    'django.contrib.staticfiles',
    'rest_framework',
    'api',
]
Making a Model and Serializer
We need to create our model and serialize it. Let us include the following code in the models.py file of the apiapp.
# api/models.py
from django.db import models


class Student(models.Model):
    first_name = models.CharField(max_length=255)
    last_name = models.CharField(max_length=255)
    grade = models.CharField(max_length=255)
    age = models.IntegerField()

    def __str__(self):
        return self.first_name
Let us create a migration file now to update the database with the new model.
python manage.py makemigrationsthen let’s apply the migration file we created
python manage.py migrateNow, let’s include the following code in a newly created serializers.py file
# api/serializers.py
from rest_framework import serializers
from .models import Student


class StudentSerializer(serializers.ModelSerializer):
    class Meta:
        model = Student
        fields = ('first_name', 'last_name', 'grade', 'age')
Views and URLs
Now, we will implement the class-based generic API views and create endpoints for the views. In the views.py of the api app, let’s add the following:
# api/views.py
from rest_framework import generics
from .models import Student
from .serializers import StudentSerializer


class StudentList(generics.ListCreateAPIView):
    queryset = Student.objects.all()
    serializer_class = StudentSerializer

class StudentDetail(generics.RetrieveUpdateDestroyAPIView):
    queryset = Student.objects.all()
    serializer_class = StudentSerializer
Then, we’d add the endpoints. Firstly, let’s update the urls.py file of the project directory app as follows:
# schoolService/urls.py
from django.contrib import admin
from django.urls import path, include

urlpatterns = [
    path('api', include('api.urls')),
    path('admin/', admin.site.urls),
]
Also, let’s create a urls.py file inside the api app directory and the following code:
# api/urls.py
from django.urls import path
from rest_framework.urlpatterns import format_suffix_patterns
from api import views


urlpatterns = [
    path('', views.StudentList.as_view()),
    path('<int:pk>/', views.StudentDetail.as_view()),
]
We can now start the Django inbuilt server to be able to view the api on our browser at http://127.0.0.1:8000/api/:
python manage.py runserverWe can add entries into our database with the form and we’d get something like in the following image:

Generating the Schema
Now, we will work on two documentation concepts which are schema and documentation. A schema outlines all the endpoints in an API with their corresponding URLs and HTTP actions in a machine-readable format. The documentation however is how the schema is interpreted for human understanding and use. Django REST framework from version 3.9 now supports OpenAPI schema generation which will allow us to be able to use SwaggerLet’s install pyyaml first, so we can render our schema.
pip install pyyamlWe shall import the get_schema_view() view function to generate our OpenAPI schema and then implement it in the urlspatterns of the urls.py file in the schoolService directory.
# schoolService/urls.py
from rest_framework.schemas import get_schema_view
urlpatterns = [
# ... previously added endpoints
path('openapi/', get_schema_view(
title="School Service",
description="API developers hpoing to use our service"
), name='openapi-schema'),
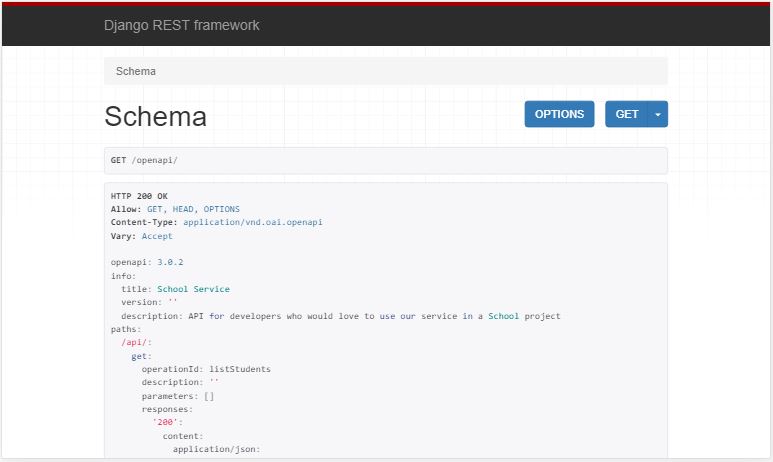
]In the above code, we specified the openapi/ path for our schema. So, go to http://http://127.0.0.1:8000/openapi/, we shall see the auto-generated schema for our API.
Generating the Documentation
Now, let’s install Swagger UI:
pip install django-rest-swaggerthen add 'rest_framework_swagger' to INSTALLED_APPS in the settings.py file.
Now, let’s create an HTML file in a new templates folder inside the api app. We can name the file as documentation.html. Then, we will add the following code:
<!-- api/templates/documentation.html -->

<!DOCTYPE html>
<html>
  <head>
    <title>School Service Documentation</title>
    <meta charset="utf-8"/>
    <meta name="viewport" content="width=device-width, initial-scale=1">
    <link rel="stylesheet" type="text/css" href="//unpkg.com/swagger-ui-dist@3/swagger-ui.css" />
  </head>
  <body>
    <div id="swagger-ui"></div>
    //unpkg.com/swagger-ui-dist@3/swagger-ui-bundle.js
    <script>
    const ui = SwaggerUIBundle({
        url: "{% url schema_url %}",
        dom_id: '#swagger-ui',
        presets: [
          SwaggerUIBundle.presets.apis,
          SwaggerUIBundle.SwaggerUIStandalonePreset
        ],
        layout: "BaseLayout"
      })
    </script>
  </body>
</html>
We need to point a URL route to the template. Let’s add the path inside the urlpatterns in the urls.py file of schoolService after importing the TemplateView.
from django.views.generic import TemplateView
urlpatterns = [
# ... previously defined routes
path('docs/', TemplateView.as_view(
template_name='documentation.html',
extra_context={'schema_url':'openapi-schema'}
), name='swagger-ui'),
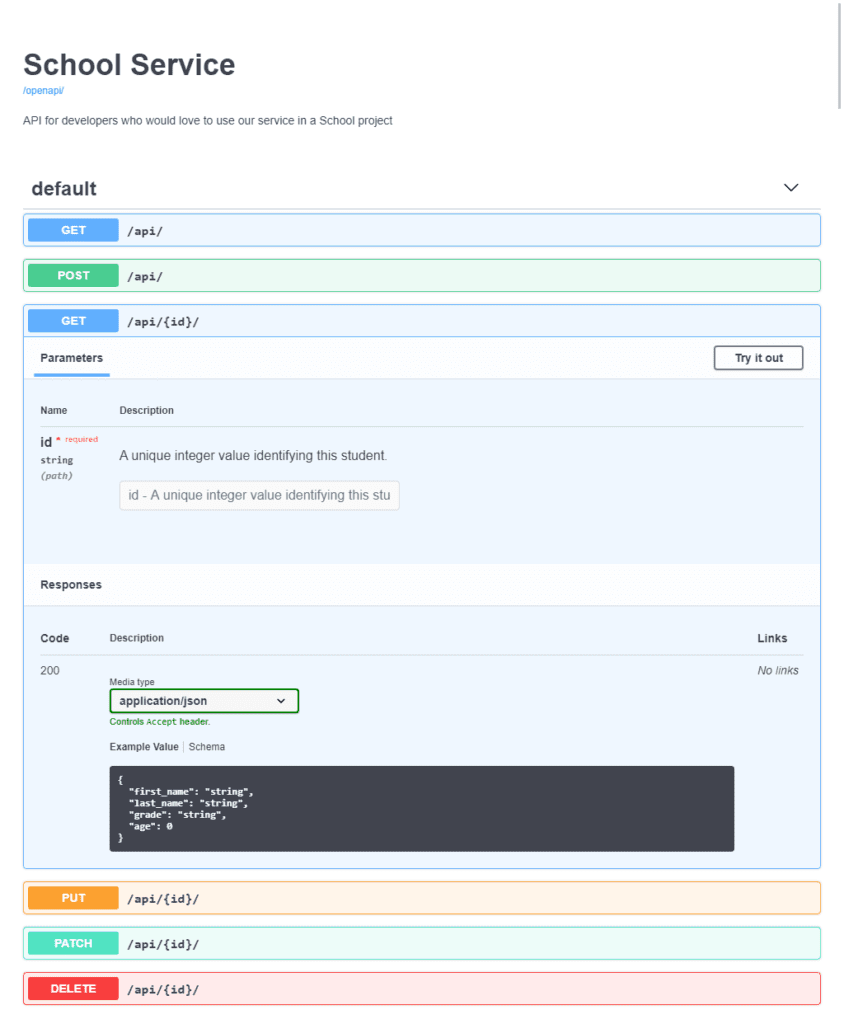
]Let us go to http://127.0.0.1:8000/docs/ to view our documentation generated with Swagger UI.
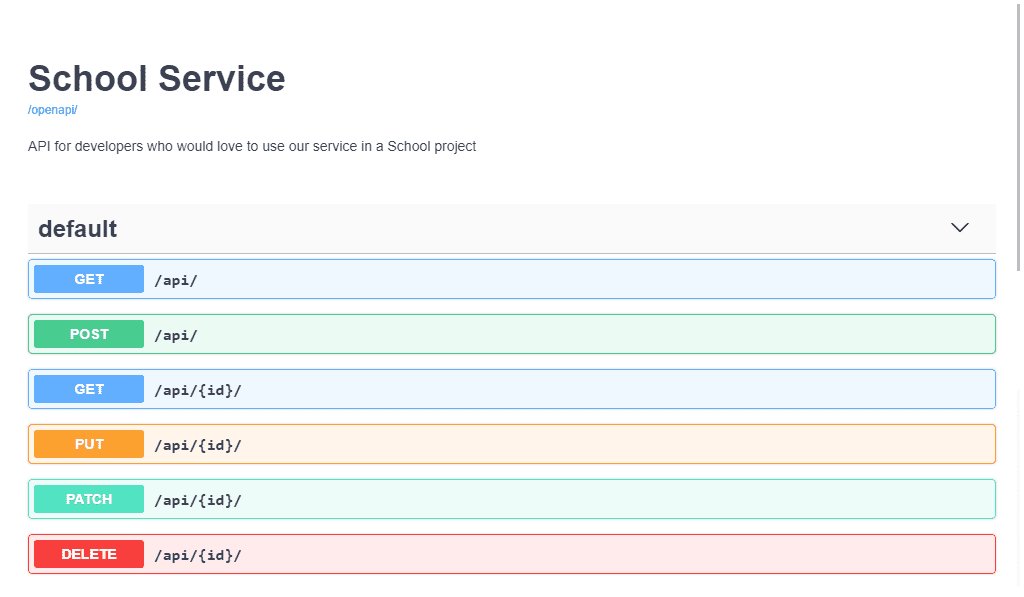
We can click to expand each of the accordions for the HTTP verbs to view it.
Conclusion
Congratulations! We just made our first API Documentation in Django! You can download the Swagger Editor for advanced customization of the documentation.
You can access the source code for this tutorial on GitHub.