Building the CRUD REST API With NestJS

In this article, you will learn about NestJS and REST API, why NestJS is essential, and how to build a NestJS CRUD REST API.
It is said that performance is one of the key features of any good framework, and NestJS is a big hit among many developers when it comes to performance.
When building your next REST API, NestJS should be your top choice.
What is a REST API?
A REST API, also known as a RESTful API, is an application programming interface (API or web API) that conforms to the constraints of the REST architectural style and allows for interaction with RESTful web services.
REST stands for Representational State Transfer and was created by computer scientist Roy Fielding. There is a difference between an API and a REST API.
The main objective of an API is to standardize data exchange between web services. Depending on the type of API, the choice of the protocol may vary.
On the other hand, a REST API is an architectural style for building web services that interact via the HTTP protocol.
A well-designed REST API is similar to a website running in a web browser with built-in HTTP functionality.
What is NestJs?
Nest is known to be a framework for building efficient, scalable, Node.js server-side applications.
It uses progressive JavaScript(Implemented as additional markup to HTML – Hypertext Makeup Language), in combination with three principles with fully supported typescript.
These three principles are the OOP elements (Object Oriented Programming), the FP (Functional programming), and the FRP (Functional Reactive Programming).
The architecture of Nest was inspired by Angular.
As a matter of fact, it also provides an idiosyncratic application that allows other developers and their teams to create tremendous testable, scalable, loosely coupled, and easy-to-maintain applications.
Why NestJs is important
NestJS is the fastest-growing framework for Node.js, there it’s important cannot to be overstretched. Nest provides camaraderie with a wide range of other libraries, like Fastify which allows for easy use of the myriad third-party plugins.
it has also brought scalable Node.Js servers to a new level. it supports databases like PostgreSQL, MongoDB, and MySQL.
The importance of NestJS is as follows;
- It Is easy to use, learn, and master
- Easy unit-testing applications
- Created for Monoliths and Microservices
- Active codebase development and maintenance.
- NestJs also help other developers to take their next steps by defining proper app architecture.
Building the REST API
We will be building a Contact form CRUD API.
Pre-requisites
Getting Started
Before we start, let’s briefly define some terms:
- Controllers: Controllers handle incoming requests and responses.
- Modules: A module is a class annotated with a
@Module()decorator. The@Module()decorator provides metadata that Nest makes use of to organize the application structure. - Service: A service is responsible for data storage and retrieval.
Let’s get started with installing Nest CLI on our computer. Run this command:
#bash
npm i -g @nestjs/cli
Next, we scaffold a Nest project with this command.
#bash
nest new contact-form-backend

//when it's done installing, run this command
cd contact-form-backend
The app folder structure will look like this:
├── README.md
├── nest-cli.json
├── package.json
├── src
│   ├── app.controller.spec.ts
│   ├── app.controller.ts
│   ├── app.module.ts
│   ├── app.service.ts
│   └── main.ts
├── test
│   ├── app.e2e-spec.ts
│   └── jest-e2e.json
├── tsconfig.build.json
├── tsconfig.json
└── yarn.lock
Let’s go ahead to install some packages. We will be using MongoDB as our database and mongoose as ORM. Run this command to install these packages:
#bash
npm install --save @nestjs/mongoose mongoose
Now go ahead and launch the Nest app development server with this command:
#bash
npm run start
You should get something like this on your terminal:
➜  contact-form-backend git:(master) ✗ npm run start

> [email protected] start
> nest start

[Nest] 21754  - 14/07/2022, 14:06:11     LOG [NestFactory] Starting Nest application...
[Nest] 21754  - 14/07/2022, 14:06:11     LOG [InstanceLoader] AppModule dependencies initialized +309ms
[Nest] 21754  - 14/07/2022, 14:06:11     LOG [RoutesResolver] AppController {/}: +19ms
[Nest] 21754  - 14/07/2022, 14:06:11     LOG [RouterExplorer] Mapped {/, GET} route +4ms
[Nest] 21754  - 14/07/2022, 14:06:11     LOG [NestApplication] Nest application successfully started +4ms
Navigate to http://localhost:3000 on your browser and you should be presented with this screen:

We’ve been able to set up the project, now let’s go ahead to configure our MongoDB database in the next section.
Configuring the Database
In this section, we will configure and integrate MongoDB as a database to our application. Run this command to start the Mongodb service on your terminal:
sudo mongodOn your code editor, navigate to ./src/app.module.ts and add update the content to the code snippet below:
// src/app.module.ts

import { Module } from '@nestjs/common';
import { AppController } from './app.controller';
import { AppService } from './app.service';
import { MongooseModule } from '@nestjs/mongoose';

@Module({
  imports: [
    MongooseModule.forRoot('mongodb://localhost/nest-blog', { useNewUrlParser: true })  ],
  controllers: [AppController],
  providers: [AppService],
})
export class AppModule { }
This sets up our database connection using Mongoose. In the next step, we’ll be creating a Typescript interface, a data transfer object (DTO), and a database schema using Mongoose.
Creating Database Schema, DTO, and Interface
Let’s start by understanding a few terms;
- database schema: A schema is a structure that represents the logical view of our database.
- Interfaces: an interface in typescript is used for type checking.
- data transfer object: DTO is an object that is used to encapsulate data, and send it from one subsystem of an application to another. It defines how data will be sent over the network.
Let’s go ahead and create our database schema. Create a directory called contact and create a schemas directory within.
mkdir contact/schemasCreate a schema.ts file in the schemas folder and add the following lines of code:
// contact/schema/schema.ts
import * as mongoose from 'mongoose';
export const ContactSchema = new mongoose.Schema({
    first_name: String,
    last_name: String,
    email: String,
    phone: String,
    message: String,
})
Here, we have used Mongoose to define the type of data that we will store in the database. We set our fields to only accept string values.
Let’s go ahead to create our interface. Create a interfaces folder under the contact directory and these lines of code:
// contact/interfaces/contact.interface.ts
import { Document } from 'mongoose';
export interface IContact extends Document {
    readonly first_name: string;
    readonly last_name: string;
    readonly email: string;
    readonly phone: string;
    readonly message: string
}
Here, we have successfully defined the types of data for a IContact type as string values.
Let’s go ahead to create our dto object. Just like with interfaces and schemas, create a folder called dto and a create-contact.dto.ts. Add these lines of code:
// contact/dto/create-contact.dto.ts
export class CreateContactDTO {
    readonly first_name: string;
    readonly last_name: string;
    readonly email: string;
    readonly phone: string;
    readonly message: string
}
We’ve marked each of the individual properties in the CreateContactDTO class to have a data type of string and as readonly.
We’ve been able to successfully create the interface, schema for the database, and data transfer object for our Nest application.
In the next step, we will be generating a module, controller, and service for our contact app.
Generating Module, Controller, and Service
Let’s start by generating the contact module. Remember in Nest, a module is a class annotated with a @Module() decorator. The @Module() decorator provides metadata that Nest makes use of to organize the application structure.
Run this command to generate a module
nest generate module contactThis creates a contact folder and contact.module.ts file within. It also updates the app.module.ts to include ContactModule. Your contact.module.ts file should look like this:
//src/contact/contact/contact.module.ts

import { Module } from '@nestjs/common';

@Module({})
export class ContactModule {}
In Nest, a module takes in an object with properties such as controllers and providers. We haven’t created those yet. Let’s go ahead to create our service (or provider).
Run this command on your terminal:
nest generate service contactThis will create a src/contact/contact/contact.service.ts, it will generate tests in src/contact/contact/contact.service.spec.ts and update contact.module.ts with import to the { ContactService }.
Navigate to contact.service.ts and add the following lines of code:
//src/contact/contact.service.ts

import { Injectable } from '@nestjs/common';
import { Model } from 'mongoose';
import { InjectModel } from '@nestjs/mongoose';
import { IContact } from '../interfaces/contact.interface';
import { CreateContactDTO } from '../dto/create-contact.dto';
@Injectable()
export class ContactService {
    constructor(@InjectModel('Contact') private readonly contactModel: Model<IContact>) { }
    async getContacts(): Promise<IContact[]> {
        const contacts = await this.contactModel.find().exec();
        return contacts;
    }
    async getContact(contactId): Promise<IContact> {
        const contact = await this.contactModel.findById(contactId).exec();
        return contact;
    }
    async addContact(createContactDTO: CreateContactDTO): Promise<IContact> {
        const newContact = await new this.contactModel(createContactDTO);
        return newContact.save();
    }
    async editContact(contactId, createContactDTO: CreateContactDTO): Promise<IContact> {
        const editedContact = await this.contactModel
            .findByIdAndUpdate(contactId, createContactDTO, { new: true });
        return editedContact;
    }
    async deleteContact(contactId): Promise<any> {
        const deletedContact = await this.contactModel
            .findByIdAndRemove(contactId);
        return deletedContact;
    }
}
If you go through this code snippet you will recognize that this service handles all the logic within our application.
It is also responsible for interacting with the database and returning the appropriate responses back to the controller. We also created these methods:
Next, you created the following methods:
getContacts(): to fetch all contacts from the database.getContact(id): to retrieve a single contact from the database.addContact(): to add a new contact.editContact(id): to update a single contact.deleteContact(id): to delete a particular contact.
Awesome!
Now we’ve created a service to handle our application logic, let’s create routes that will handle HTTP calls from our client.
Controllers handle incoming requests and responses. Run this command on your terminal to generate the controller.
nest generate controller contactThis command will create a src/contact/contact/contact.controller.spec.ts, a src/contact/contact/contact.controller.ts file and will update the contact.model.ts to import the { ContactController }.
Just like how Services are decorated with @Injectibles, Controllers are decorated with @Controller metadata. Navigate to contact.controller.ts and add the following lines of code:
// src/contact/contact/contact.controller.ts

import { Controller, Get, Res, HttpStatus, Param, NotFoundException, Post, Body, Query, Put, Delete } from '@nestjs/common';
import { ContactService } from './contact.service';
import { CreateContactDTO } from '../dto/create-contact.dto';
import { ValidateObjectId } from '../shared/pipes/validate-object-id.pipes';

@Controller('contact')
export class ContactController {
    constructor(private contactService: ContactService) { }
    @Get('contacts')
    async getContacts(@Res() res) {
        const contacts = await this.contactService.getContacts();
        return res.status(HttpStatus.OK).json(contacts);
    }
    @Get('contacts/:contactId')
    async getContact(@Res() res, @Param('contactId', new ValidateObjectId()) contactId) {
        const contact = await this.contactService.getContact(contactId);
        if (!contact) throw new NotFoundException('Contact does not exist!');
        return res.status(HttpStatus.OK).json(contact);
    }
    @Post('/new')
    async addContact(@Res() res, @Body() createContactDTO: CreateContactDTO) {
        const newContact = await this.contactService.addContact(createContactDTO);
        return res.status(HttpStatus.OK).json({
            message: "Contact has been created successfully!",
            contact: newContact
        })
    }
    @Put('/edit')
    async editContact(
        @Res() res,
        @Query('contactId', new ValidateObjectId()) contactId,
        @Body() createContactDTO: CreateContactDTO
    ) {
        const editedContact = await this.contactService.editContact(contactId, createContactDTO);
        if (!editedContact) throw new NotFoundException('Contact does not exist');
        return res.status(HttpStatus.OK).json({
            message: 'Contact has been successfully updated',
            post: editedContact
        })
    }
    @Delete('/delete')
    async deleteContact(@Res() res, @Query('contactId', new ValidateObjectId()) contactId) {
        const deletedContact = await this.contactService.deleteContact(contactId);
        if (!deletedContact) throw new NotFoundException('Contact does not exist')
        return res.status(HttpStatus.OK).json({
            message: 'Contact has been deleted',
            contact: deletedContact
        })
    }
}
We did a few things here, but we will focus on the methods we created in this file.
getContacts(): This method will carry out the functionality of receiving an HTTP GET request from the client to fetch all contacts from the database and then return the appropriate response.
The route for this is /contact/contacts.
getContact(): This takes acontactIdas a parameter and fetches a single post from the database.- In addition to the
contactIDparameter passed to this method, you realized the addition of an extra method namedValidateObjectId(). - This method implements the PipeTransform interface from Nest.js.
- Its purpose is to validate and ensure that the
contactIdparameter can be found in the database. - We will define this method in the next section.
- The route for this is
contact/contacts/:contactId.
addContact(): This method will handle a POST HTTP request to create a new contact to the database. The route for this is /contact/new.editContact(): This method accepts a query parameter ofcontactIdand will carry out the functionality of updating a single contact.- We also made use of the ValidateObjectId method to provide proper validation for the contact that we want to edit.
deletePost(): This method will accept a query parameter ofcontactIdand will delete a particular contact from the database.
If you’ve gotten to this point you’re awesome!
We’ve been importing this shared/pipes/validate-object-id.pipes.ts file, let’s go ahead to create it and learn why it’s needed in our Nestjs application.
Create a shared/pipes/validate-object-id.pipes.ts within the contact directory and add these lines of code:
// src/contact/shared/pipes/validate-object-id.pipes.ts
import { PipeTransform, Injectable, ArgumentMetadata, BadRequestException } from '@nestjs/common';
import * as mongoose from 'mongoose';
@Injectable()
export class ValidateObjectId implements PipeTransform<string> {
    async transform(value: string, metadata: ArgumentMetadata) {
        const isValid = mongoose.Types.ObjectId.isValid(value);
        if (!isValid) throw new BadRequestException('Invalid ID');
        return value
    }
}
The ValidateObjectId() class implements PipeTransform method from the @nestjs/common module. It has a single method named transform() that takes in the contactId as value in this case. With this method, any HTTP request from the client with a contactId that can’t be found in the database will be regarded as invalid.
Also, make sure your contact.module.ts looks like this:
//src/contact/contact/contact.module.ts

import { Module } from '@nestjs/common';
import { ContactService } from './contact.service';
import { ContactController } from './contact.controller';
import { MongooseModule } from '@nestjs/mongoose';
import { ContactSchema } from '../schemas/schema';
@Module({
  imports: [
    MongooseModule.forFeature([{ name: 'Contact', schema: ContactSchema }])
  ],
  providers: [ContactService],
  controllers: [ContactController]
})
export class ContactModule { }
In this section, we’ve structured our application with modules. We’ve also handled business logic for our application using services and we generated a controller to handle HTTP requests from the client side.
There’s one more thing we need to add to our application CORS.
We need to enable CORS so the front end will be able to access the backend domain for any cross-origin issues. Update your main.ts to look like this:
// src/main.ts
import { NestFactory } from '@nestjs/core';
import { AppModule } from './app.module';
async function bootstrap() {
  const app = await NestFactory.create(AppModule);
  app.enableCors();
  await app.listen(3000);
}
bootstrap();
Awesome!
That’s it! We have been able to build a CRUD REST API with Nestjs. Let’s go ahead to test our API with Postman.
Testing the API with Postman
Head over to your Postman and let’s test our API endpoints. Make sure your MongoDB and Nest development servers are running
GET http://localhost:3000/contact/contacts
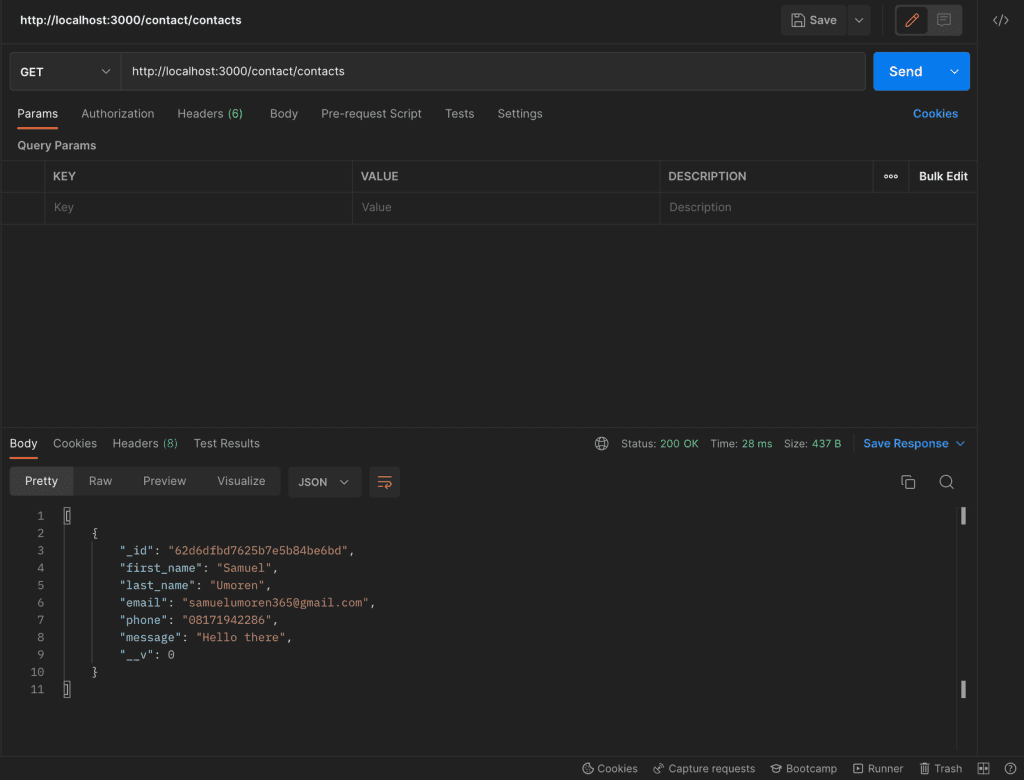
It took 28ms! Blazing speed.
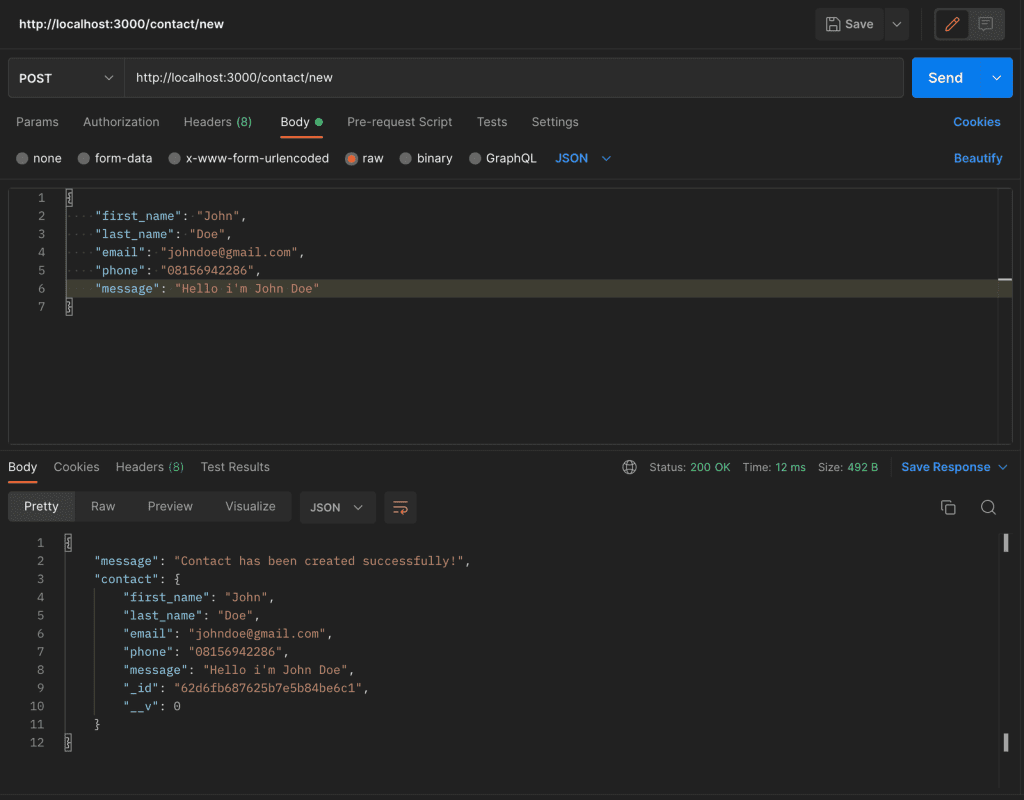
POST http://localhost:3000/contact/new
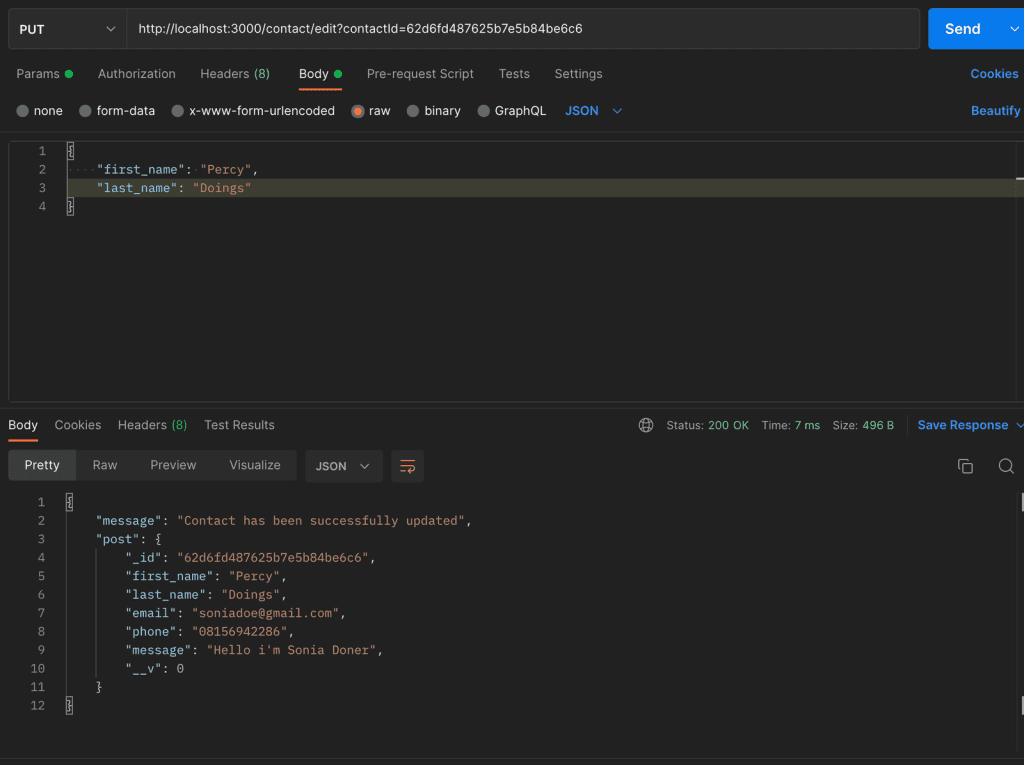
PUT http://localhost:3000/contact/edit?contactId=62d6fd487625b7e5b84be6c6
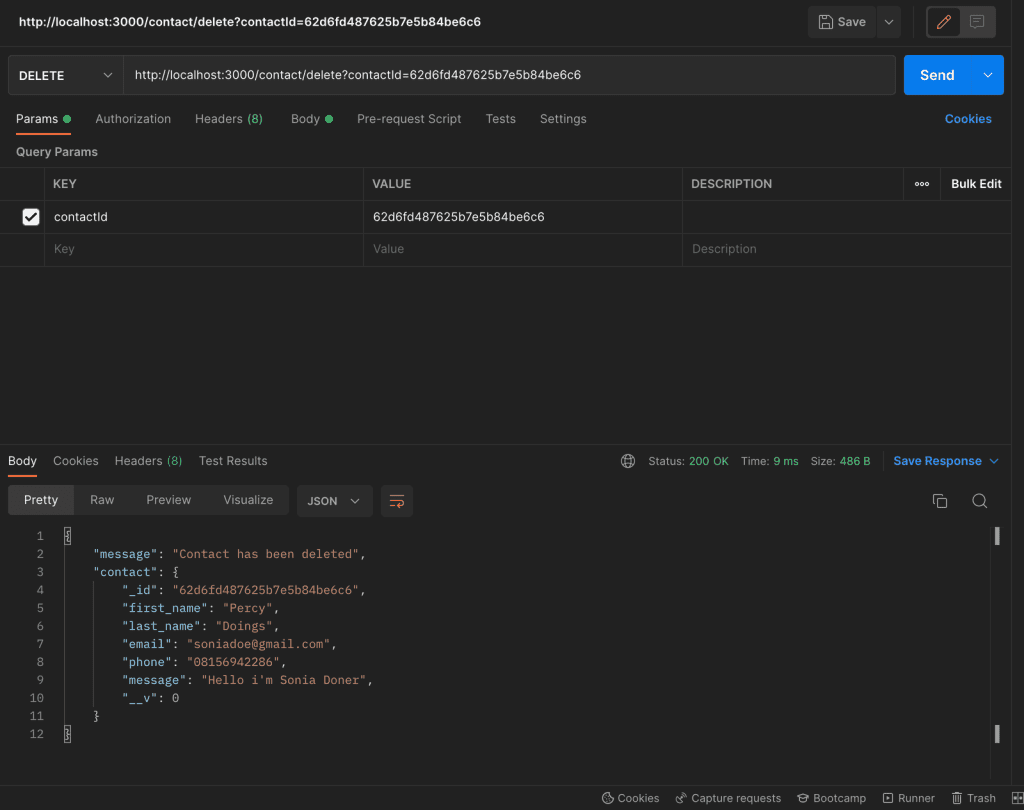
DELETE
Awesome!
You can notice how fast our server is responding to HTTP requests. That’s the promise of Nest.js.
Conclusion
In this tutorial, we learned about NestJS, and why it is important. We then went ahead to build a Nestjs CRUD contact form API and learned about Services, Modules, and Controllers in the process. I hope you’ve learned something from this guide.
Happy Coding!