How to perform CRUD operations in Mongoose by using ExpressJS

In this tutorial, you will learn how to perform CRUD operations in Mongoose by using ExpressJS.
CRUD refers to the four basic functions of a web application, which are Create, Read, Update, and Delete. It is the fundamental operation of a web application.
- The Create function allows the client to create a new record in the database,
- The read function enables the client to retrieve specific data from the database.
- The Update function is used to modify existing data.
- The Delete function is used to remove data from the database.
This operation is widely used in web applications. If you observe any application around you, you will notice that the foundation of these applications is based on the CRUD operation.
These operations can be performed using different technologies, known as stacks.
Some popular stacks are MERN, LAMP, and MEAN. MERN refers to MongoDB, ExpressJS, ReactJS, and NodeJS.
LAMP stands for Linux, Apache, MySQL, and PHP, while MEAN refers to MongoDB, ExpressJS, AngularJS, and NodeJS.
In this tutorial, we will not focus on the frontend part. Instead, our primary concern will be to create data in our MongoDB database, retrieve data from it, modify it, and delete it.
To perform these actions, we will be using ExpressJS, a popular framework for NodeJS.
We are going to create a simple registration system where a user can register by providing their credentials, update their information, see the list of registered users, and delete their account.
By performing these actions, we will be completing the four functions of CRUD.
At the end of this tutorial, you will be able to perform CRUD operations in Mongoose by using ExpressJS ExpressJS.
This tutorial will help you build a strong foundation in your journey of learning backend development.
Prerequisite:
To complete this tutorial in the most effective way you need to keep some things in your mind.
- A configured computer with an internet connection.
- Basic knowledge of JavaScript async/await.
- A text editor – You can choose any text editor on which you may write JavaScript code such as sublime text, nodepad++, etc. In this tutorial, we will use visual studio code.
- Installed NodeJS on your computer. We are using Node version v14.17.4. You may use this version or higher. But it is recommended not to use the node version under 10.0.0 while completing this tutorial.
- Postman and MongoDB compass are installed on your computer. We will test our backend endpoints with the postman and monitor our database through MongoDB compass.
- Nice to have little knowledge about NodeJS, and Mongoose if you don’t, no need to worry we will cover these later in this tutorial.
CRUD operations in Mongoose
In this tutorial, we are going to cover the following things to perform CRUD operations in Mongoose by using ExpressJS
- Environment Setup for Backend
- Create Node Server
- Connect MongoDB Database
- Create Registration model
- Create Post Route
- Create Get Route
- Create Update Route
- Create Delete Route
Environment Setup for Backend
Setting up the environment is the most important part of any application development because without a proper environment you can not implement any functionality.
For example, a perfect environment for studying in school is to have a classroom that is well furnished.
If the classroom’s environment is polluted or there is no chair or board then students can not learn properly there.
Similarly, there should have some rules that should be followed for developing any application.
For the backend, we need to install some important packages, and to do so we need to create a specific folder.
Let’s say we have created a folder named crud-project and inside that folder, we are going to implement our backend functionality. To do so, follow the following steps:
Step 1:
Now, we are ready to implement backend functionality in our server folder. At first, we have to give a command in our terminal and the command is
npm init
or
npm init -y
This command will create a package.json file for us, from where we will be able to manage our installed packages and also control the version of our application.
If you want to create the package manually then you need to give the command npm init and if you want to create the file as a whole then you need to type npm init -y
Step 2:
In this step, we will install our necessary packages like express, and mongoose.
Express is a popular NodeJS framework and the mongoose is the Object Data Modeling library for MongoDB.
We will run the NPM command to install these. See the below example :
npm install express mongoose
or
npm i express mongoose
Here, with the help of this command, we will be able to install both at a single time.
The express will use to write NodeJS code and set up endpoints and Mongoose will be used to create a database model and save data.
After installing these, our package.json file will look like this:
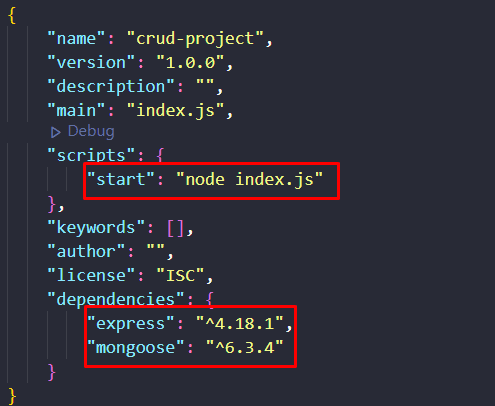
Here, we have set the script as “start”: “node index.js” As a result, we can simply use the npm start command to run our program instead of defining node index.js each time.
you can also see those packages with the version. Our environment has been set up successfully and now we are ready to go to the next part.
Create Node Server
To perform a CRUD operation, our first task is to create a Node server so that we can connect our program to the network.
To perform this action, we need to require the express library first, which we have installed in our previous section.
Later on, we need to define a PORT number, and to create a server we simply write app.listen() See the below code example of doing this:
const express = require('express')
const app = express()

app.use(express.json())

const PORT = 3000
app.listen(PORT, () => {
    console.log(`Server is running on PORT ${PORT}`)
})

// Output:
// Server is running on PORT 3000
Here, you can see that at first, we have required the express on our application, and later on, we have stored it in the app variable.
We have also defined our middleware and finally, we have created a node server by specifying the port number 3000 and when we run our program it says that the server is running on PORT 3000. That means we have successfully created our server and we are ready to go to the next step.
Connect MongoDB Database
In this step, we will configure and connect our database. To connect our application with the MongoDB database we are going to use its library named Mongoose.
It is an Object Data Modeling(ODM) library for MongoDB.
Let me assume that, you have already an Atlassian account and all you need to do is to sign in there and connect your application with the given link.
Follow the below code example:
const mongoose = require('mongoose')

const DB = 'mongodb+srv://<YOUR USERNAME>:<YOUR PASSWORD>@cluster0.zozv5.mongodb.net/myFirstDatabase?retryWrites=true&w=majority'
mongoose.connect(DB, {
    useNewUrlParser: true,
     useUnifiedTopology: true,
}).then(() =>{
    console.log('Database connected..')
})
You can see that we have a required mongoose that is already installed in our program. Later on, we connected our MongoDB database link with our application and stored it in the DB variable.
Here, you need to replace the <YOUR USERNAME> with your own and <YOUR PASSWORD> with your own. Finally, we have connected our database with the help of mongoose.connect() Now if we run our program again, we will be able to see that our database has been connected successfully.
In the next step, we will model our data for registration.
Create Registration model
In this step, we are going to create our registration model. It is the most important part of our application. Because we are going to create a shape of our database model by using a schema model.
With help of this, we will define which data we are going to store in our database and how we are going to store it.
To know more about Database models you may follow this tutorial which is dedicated to Data Modeling We are going to create a folder named Models and inside that folder, we will create a file named userModel.js Here, we will create our schema model for user registration.
Follow the below code example:
const mongoose = require('mongoose')

const userSchema = new mongoose.Schema({
    name : {
        type : String,
        required : true
    },
    email : {
        type : String,
        required : true
    },
    password : {
        type : String,
        required : true,
    }
})

const User = mongoose.model('User',userSchema)

module.exports = User
Here, you can see that we have created a very basic user registration schema model where a user can register himself by providing a name, email, and password and we keep all of them required:true That means if a user leaves one field empty, a Mongo error will appear.
Finally, we have exported this as a User so that we can use this schema model in the other part of our application whenever we need to by simply importing it.
Create Post Route
After completing all the septs, now we are ready to create our first function of the CRUD application which is Create. In this step, we are going to create a new user.
To perform this action, we are going to make a post route in the express and it will create a new user when the user hit the route and give his credentials perfectly.
Follow the below code example:
const User = require('./Models/userModel')

app.post('/signup', async (req,res) => {
    let {name,email,password} = req.body

    try{
        let user = new User({
            name,
            email,
            password
        })
       let createdUser = await user.save()
       res.status(201).json({
        status : 'Success',
        data : {
            createdUser
        }
    })
    }catch(err){
        console.log(err)
    }
})
Here, we have written the functionality for creating a user. We have also specified the route.
Now if a user hits the http://localhost:3000/signup route and provides his credentials then it will simply create a new user and store the data in the database.
To test whether our API is working perfectly or not we are going to try it with Postman. To do so, see the below image:
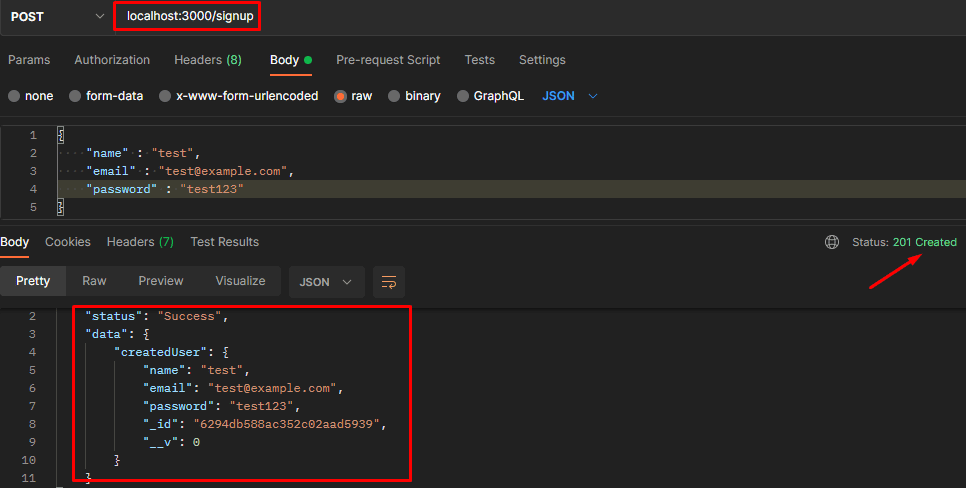
Here, you can see that we are getting a success message with a unique ID when we try to make a post request with the credentials.
We can see that the status code of 201 means something has been created. Now it’s time to check our database to see whether the data has been stored in the database or not.
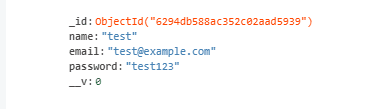
Here, you can see that our data has been stored in our database and you can match the unique Id number. That means we have successfully created our post route and in the next section, we are going to implement the get route.
Create Get Route
The get route functionality will handle the second step of our CRUD operation. That means we will read our data. In other words, we can see the users list from our Database.
To do so, follow the below code example:
app.get('/get-user',  (req,res) =>{
    User.find({}, (err,result)=>{
        if(err){
            res.send(err)
        }
        res.send(result)
    })
})
Here, you can see that we have implemented the functionality to get the user list from our database. Till now, we know that, in our database, we have only one user. Now, let’s try it with our postman and see what result we get:
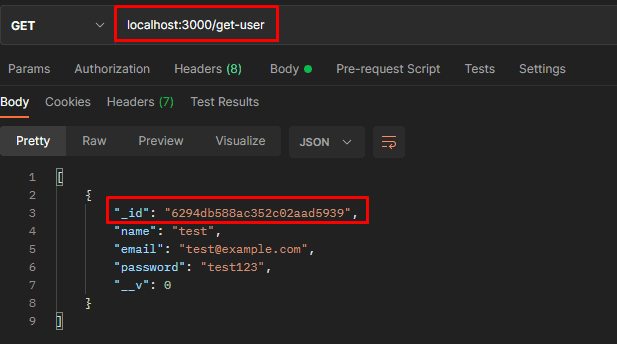
You can see that we are getting exactly the one result in the output and if you remember the unique Id number then you can notice that the number is the same.
That means this data is coming from our database and we have successfully implemented the second function of our CRUD application.
In the next step, we are going to implement the functionality of updating the data.
Create Update Route
To implement the update functionality, we are going to create another route named update-user.
Let’s say, we want to update the user’s name from test to testOne, and to do so, we are going to use the findByIdAndUpdate() method that is provided by MongoDB. See the below code example:
app.patch('/update-user/:id', async (req,res) => {
    const updatedUser = await User.findByIdAndUpdate(req.params.id,req.body,{
        new : true,
        runValidators : true
      })
    try{
        res.status(200).json({
            status : 'Success',
            data : {
              updatedUser
            }
          })
    }catch(err){
        console.log(err)
    }
})
Here, we have written the functionality of updating user data. Now let’s check it with the postman.
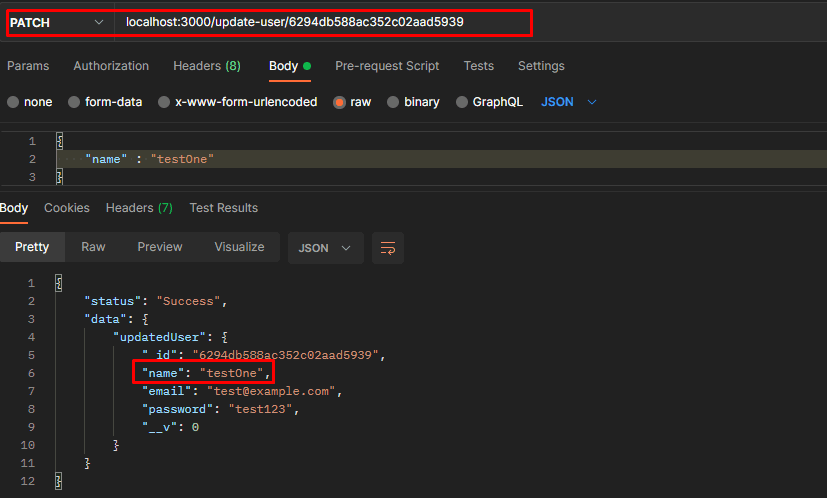
It shows that our data has been updated as we can see that the name has been changed from test to testOne. But we will check our Database also and see whether data has been updated from there or not.

Here, when we go to our MongoDB compass and refresh we are able to see that the data has been updated from here also. In the next step, we are going to implement the delete functionality.
Create Delete Route
To create a delete functionality we are going to create a delete route and we will delete a single user with the help of the unique Id.
MongoDB provides the functionality for deleting all the data but it will not convenient or logical to delete all the data. To delete the single data see the below code example:
app.delete('/delete-user/:id', async (req,res) => {
    const id = req.params.id
    await User.findByIdAndRemove(id).exec()
    res.send('Deleted')
})
Here, we have simply defined the route and delete the use from the database with the help of findByIdAndRemove() Let’s test it with postman:
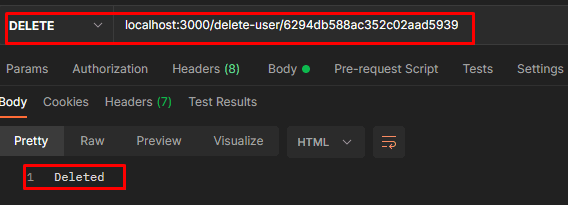
You can see that it says that data has been deleted. But we will not rely on the postman only. We will check it from our database also. To do so, we need to refresh our database.
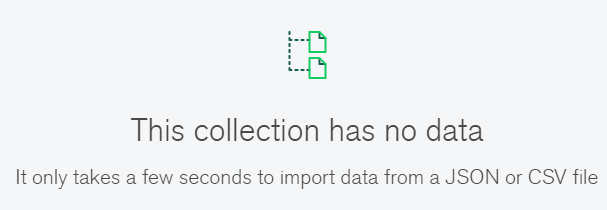
You can see that it says the collection has no data. Because we have created only one user and the user has been deleted as a result the collection is empty.
Conclusion
In this whole tutorial, we have covered the basics of CRUD operations with Mongoose and express. At the end of this tutorial, now you know how to set up the environment for the backend application, basic routing and how to perform CRUD operations in the MongoDB database.
If you notice you can see that now you can create data, read data, update data and also delete data from the database.
This is the base of web development and you can build many large applications also based on this knowledge. You may not believe me! But let’s think about a large e-commerce application.
What is happening there? You create a product, read the product, update the product and finally delete the product. The implementation may be different but the concept is the same and that is CRUD.
You may practice this tutorial code as many times as possible and then try to tweak it.
Let’s say you can create a separate file for each routing, then you can encrypt the password, also try to add some validations, try to implement a role-based access system, and so on.
The main purpose of this tutorial is to introduce you to backend web application development by performing basic CRUD operations in Mongoose and ExpressJS.
Now your task is to take this tutorial as the reference for your learning and try to explore more things if you got yourself stuck while doing so, feel free to comment in the comment section.