Exploring the Magic of Local Storage in JavaScript

JavaScript is the queen of all programming languages. It has been ruling in the web development sector over the years.
JavaScript comes with tons of useful features by which you can bring more interactivity to your website. local storage is one of them.
In JavaScript local storage is a property that allows JavaScript sites and apps to save key-value pairs without any expiration date.
In this tutorial, you are going to learn about how to use local storage in JavaScript.
What is local storage?
In simple words, local storage is nothing but a property that allows JavaScript sites and apps to store data in a browser. It saves data in key-value pairs and has no expiration date.
That means it will persist data even after the browser window is closed when data is stored in the browser.
Syntax of local storage
The syntax of local storage is very simple. By typing window.localStorage you can use local storage.
window.localStorage.setItem('key','value')You can simply skip the window before the localStorage and type localStorage.setItem(“key”, “value”) and it will work fine.
localStorage.setItem('key', 'value')There is a syntax for using local storage. Do not worry about the setItem() and other stuff. You will learn more in detail about these.
Methods of local storage
There are a bunch of handy methods in local storage. You can easily run a CRUD(Create, Read, Update, and Delete) operation by using them. We will discover these methods one by one in the next couple of sections.
Local storage setItem(name, value):
For the first time when you type window.localStorage storage in your browser console you will see something like this ;
window.localStorage
Storage {length: 0}
You already know that local storage works with key-value pairs. To save an item in local storage you need to set a key and a value. You can simply call window.localStorage.setItem("key", "value") to do so. Follow the example below :
window.localStorage.setItem('name', 'Deven')It will set the key as name and value as Deven in your browser’s local storage. Now if you again type window.localStorage in your browser’s console you can see the length of the Storage property is increased to 1.
window.localStorage
Storage {name: 'Deven', length: 1}
Local storage getItem(key):
You save an item in local storage. Now how can you get the item? It is very simple. To get an item you have to type getItem(key) and replace the key parameter with your own key name. For example:
window.localStorage.getItem('name')

// 'Deven'
Local storage removeItem(key):
Similarly, you can remove an item. To do so you have to type removeItem(key) and pass the key name.
window.localStorage.removeItem('name')It will remove the value of the name from your browser’s local storage. Now if you type window.localStorage in your browser’s console you can see the length of the Storage property is decreased to 0.
window.localStorage

Storage {length: 0}
Local storage clear():
You can clean all of your local storage items. To perform that action you have to type window.localStorage.clear() and it will clear all the items.
window.localStorage.clear()These are useful methods of local storage. You can use these for different purposes of your application.
When to use local storage?
You know how to use local storage methods but now the most important part is when to use local storage. First of all, you have to always try to avoid storing sensitive data in local storage. Because it remains in the browser and anyone can easily steal your sensitive credentials if they got access to your browser.
Only use local storage if you are properly certain about your data are not that much sensitive and if you have to save a large amount of less secure data.
Pros of using local storage local storage play a major role in various types of situations. Some of the Pros of using local storage are :
- Local storage values never expired from your browser until you clear them manually.
- It gives you to store up to 5 MB – 10 MB data based on your browser.
- You can access local storage values from all tabs and windows with the same origin.
Cons of using local storage Although local storage gives lots more flexibility and advantages it has some cons and security flaws. Some cons of using local storage are :
- Local storage is only able to read Strings. (If you want to pass an Object you have to stringify it).
- As it has no form of data protection, it is quite insecure.
- You can not handle the asynchronous tasks on local storage because it is synchronous.
Project:
This is all about using local storage in JavaScript. Now if you have come to this long then you are welcome. Because now you have already known almost everything about JavaScript local storage.
It is high time to make your knowledge about local storage stronger. To do so we will build a simple project. In this project, the user will give a name as input and it will save in the local storage.
Prerequisite: To complete this project you need to have a basic understanding of HTML, CSS, and JavaScript.
Step 1:In this step, we will create an HTML file and take an input field and add some CSS to give it a better look.
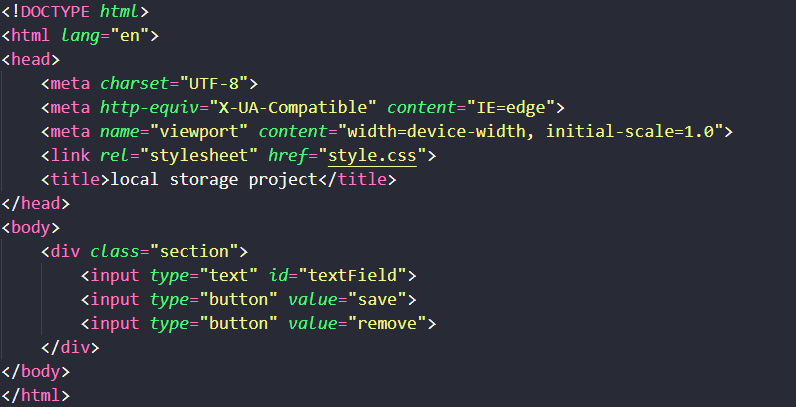
In this section, you can see we take an input field and two buttons one is for saving and another is for removing and linking our CSS file.
In this section, you can see we take an input field and two buttons one is for saving and another is for removing and linking our CSS file.

We write these CSS codes to give a better look.

When you write this code you can see this output in your browser. But now if you write anything and try to save or remove it will not work. Because we didn’t implement any functionality yet.
Step 2: In this step, we will implement the functionality to save the user input. To do this we will use JavaScript local storage.
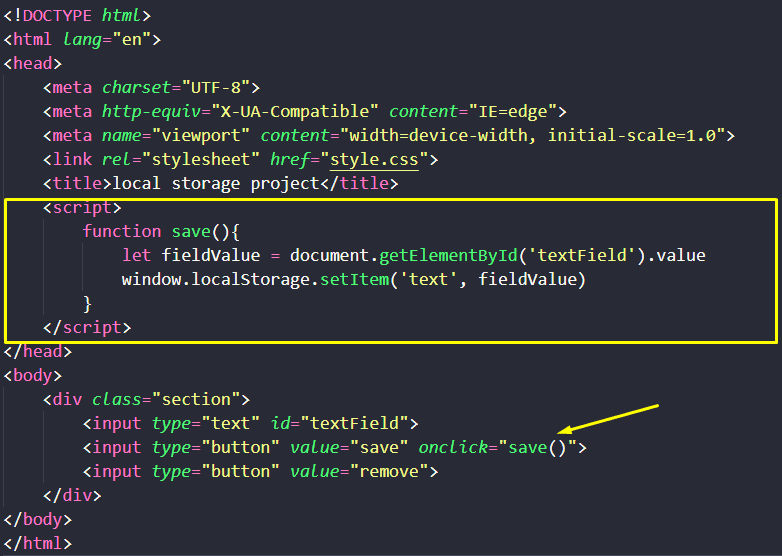
We implement a save() function in the Script tag and set an onclick event.

In the browser, we give input as "hello" and click the save button and it will save the name for you in the browser’s local storage. Do not need to trust my words let’s see.
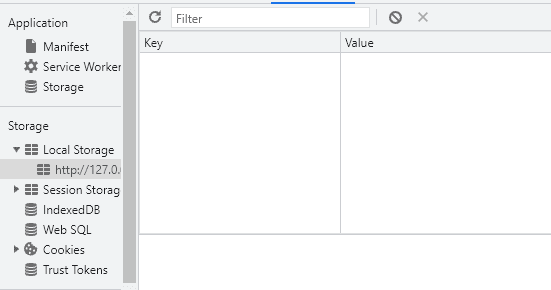
To check this you need to click Ctrl + Shift + I and then go to application:
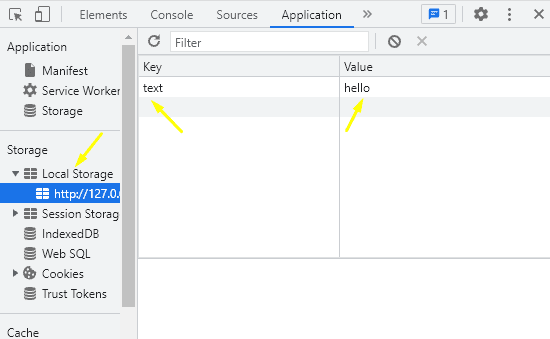
You can see in local storage there’s a value named hello that we give as an input and a key named text. Now if you close the browser and open it again you can see the value still remains there.
That means we successfully implement our JavaScript local storage functionality. But if you try to remove it will simply do nothing because we didn’t implement it yet.
Step 3: In this step, we will implement the remove functionality. Before implementing this I want you to try this by yourself and if you can not then see this solution.
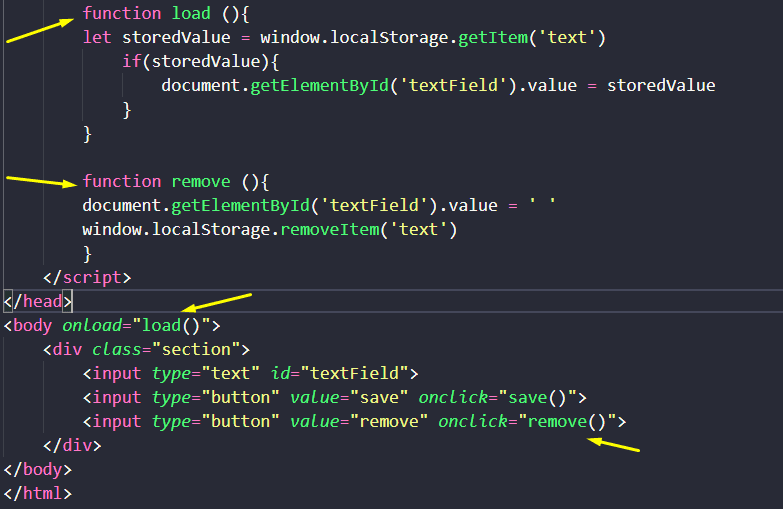
We implemented load() and remove() functionality so that when a user clicks on the remove button it will remove the item from the input field and from local storage as well. let’s see the result:

You can see there is no value in the input field. lets take a look in the browser local storage:
Now guess what? The value is disappear from the local storage as well. This is how you can work with local storage.
Conclusion:
In this whole tutorial we discuss about JavaScript local storage in depth and also complete a small project.
Though, it is not recommended to use local storage to save sensitive data, it can came out with handy solution at some purposes.
You need to practice more to be a master of JavaScript local storage and its usage. Take this tutorial as a reference and it may help you to achieve your desired solution.