How to Upload Excel File to MySQL Database using NodeJS

In this tutorial, we will learn how to Upload Excel File to MySQL Database using NodeJS.
We will be creating two endpoints in our API, one to upload an Excel file using a POST request and another to get all the data using a GET request.
We will be using Express.js, Multer, mysql2, read-excel-file, and sequelize to create our API. The installation methods for all of the mentioned packages are also covered in this tutorial.
Prerequisites
- Installed IDE (Visual Studio Code Recommended)
- Installed Node.js
- Installed and configured MySQL
- Basic knowledge of Express.js, Node.js, and JavaScript
Upload an Excel File to MySQL Database using NodeJS
Before installing the Node packages required for our project, we will initialize a project using npm (Node Package Manager) that comes installed with Node.
Create a directory for your project in your chosen location and cd into the directory using the command-line interface (CLI).
After changing the current directory to your project directory in your console, type npm init to initialize your project.
Then you will be asked some questions about your project which you can answer or use npm init -y to let them be answered automatically.
This will create a package.json file in your project directory.
Installations
We will be using npm to install our packages.
We can install all packages with a single command or write separate commands for each one. Both ways have been shown below.
Write or copy/paste the given commands into your console in the project directory to install the packages for your project.
Single Command
npm install express multer mysql2 read-excel-file sequelizeExpress.js
npm install expressMulter
npm install multermysql2
npm install mysql2read-excel-file
npm install read-excel-filesequelize
npm install sequelizeMySQL Database
Since we will be storing the data from our Excel files in a MySQL database, we will have to create it first. Using the MySQL Command Line Client, create a database with your desired name. For this project, we named the database testdb. If you name it something else, don’t forget to replace it in your code.
To create a database using the MySQL Command Client, type
CREATE DATABASE testdb;Note:- MySQL is case-insensitive but it is a common convention to use uppercase for pre-defined words and lowercase for the part of the command that is up to us.
src directory
Create a directory named src in your project directory to store all the code that we will write.
config
Inside the src directory, create a directory named config that in this project, will store the configuration file of our database.
db.config.js
In this file, we will store the configurations for our database that will be used by sequelize.
module.exports = {
    HOST: "localhost",
    USER: "root",
    PASSWORD: <passsword>,
    DB: "testdb",
    dialect: "mysql",
    pool: {
      max: 5,
      min: 0,
      acquire: 30000,
      idle: 10000
    }
  };
This file exports an object that has multiple keys that define multiple parameters for our sequelize connection. Most of them are self-explanatory except for some, which are explained below.
DB: Name of the database we want to store our data in.
dialect: Defines the database used. It can be one of ‘mysql', 'mariadb', 'postgres' or ‘mssql'.
pool: This defines the configurations used for the connection pool created by Sequelize on initialization.
Models
In the src directory, create another directory named models which will store the model which represents a table in our database.
tutorial.model.js
Create a file named tutorial.model.js inside the model’s directory.
This file exports a function that defines a new Sequelize model to be used in the index.js file we will create next.
module.exports = (sequelize, Sequelize) => {
    const Tutorial = sequelize.define("tutorial", {
      title: {
        type: Sequelize.STRING
      },
      description: {
        type: Sequelize.STRING
      },
      published: {
        type: Sequelize.BOOLEAN
      }
    });
    return Tutorial;
  };
The model definition will name the table ‘tutorial’ and defines three fields named title, description, and published with their types.
The exported function stores the definition in a variable named Tutorial and returns that variable when the function is called.
Index.js
In the model’s directory, create another file named index.js which will initiate our Sequelize connection and run the model definition function.
const dbConfig = require("../config/db.config.js");
const Sequelize = require("sequelize");

const sequelize = new Sequelize(dbConfig.DB, dbConfig.USER, dbConfig.PASSWORD, {
  host: dbConfig.HOST,
  dialect: dbConfig.dialect,
  operatorsAliases: false,
  pool: {
    max: dbConfig.pool.max,
    min: dbConfig.pool.min,
    acquire: dbConfig.pool.acquire,
    idle: dbConfig.pool.idle
  }
});

const db = {};
db.Sequelize = Sequelize;
db.sequelize = sequelize;
db.tutorials = require("./tutorial.model.js")(sequelize, Sequelize);
module.exports = db;
First, we import the db.config.js file and Sequelize to our file. We then, create a new Sequelize connection with the configurations we defined in our db.config.js file.
We then create an object in which we store Sequelize, sequelize (Sequelize connection), and the value returned by our model definition function that we call sequelize and Sequelize.
Middlewares
In the src directory, create a directory named middlewares that will store all middlewares for our routes. Middlewares are functions that are called before a request is sent to a controller.
Upload.js
In the middlewares directory, create a file named upload.js that will use multer to process multipart/form-data which is primarily used for uploading files.
const multer = require("multer");First, we import multer in our file and store it in a variable named multer.
Next, we define two variables, one of which is a function that will ensure the file uploaded is an Excel or a spreadsheet file and the other defines the destination and the filename with which the uploaded file is to be stored.
const excelFilter = (req, file, cb) => {
  if (
    file.mimetype.includes("excel") ||
    file.mimetype.includes("spreadsheetml")
  ) {
    cb(null, true);
  } else {
    cb("Please upload only excel file.", false);
  }
};
This function when called will check the mimetype of the file to check if it includes ‘excel’ or ‘spreadsheetml’ which refers to an Excel/spreadsheet.
If it does, it calls the callback function with null and true, meaning, it passed the filter.
Else, it will call the callback with a message and false, meaning it sends the message in the response and the multer does not proceed further.
var storage = multer.diskStorage({
  destination: (req, file, cb) => {
    cb(null, "./resources/static/assets/uploads/");
  },
  filename: (req, file, cb) => {
    console.log(file.originalname);
    cb(null, `${Date.now()}-${file.originalname}`);
  },
});
Now, we will create some more directories inside which we will store the uploaded Excel/spreadsheet files.
In the root of the project directory, create directories resources, static, assets, and uploads nested inside each other such that the path /resources/static/assets/uploads/ makes sense.
If the file passes the filter, multer stores the file in the disk in the destination and with the filename we defined above.
We prepended the original filename with the upload date and time to prevent duplicates.
var uploadFile = multer({ storage: storage, fileFilter: excelFilter });
module.exports = uploadFile;
Multer accepts an options object. We used the above-defined variables to set the value for two options for storage and fileFilter. A file is passed through the filter and then goes to the storage.
Controllers
In the src directory, create another directory named controllers which stores controllers for our routes. Controllers are functions that process requests and send a response.
excel.controller.js
In the controller’s folder, create a file named excel.controller.js that will store controllers for our API for routes that will be used to upload an Excel file and get all data from the database.
const db = require("../../models");
const Tutorial = db.tutorials;
const readXlsxFile = require("read-excel-file/node");
We import the db object from models and store the value of the tutorials key which is the value returned by the Sequelizer model definition in the Tutorial variable.
We also import read-excel-file/node and store it in the variable readXlsxFile to easily retrieve data from an Excel/spreadsheet file to store in the database.
const upload = async (req, res) => {
  try {
    if (req.file == undefined) {
      return res.status(400).send("Please upload an excel file!");
    }
    let path =
      "./resources/static/assets/uploads/" + req.file.filename;
    readXlsxFile(path).then((rows) => {
      // skip header
      rows.shift();
      let tutorials = [];
      rows.forEach((row) => {
        let tutorial = {
          id: row[0],
          title: row[1],
          description: row[2],
          published: row[3],
        };
        tutorials.push(tutorial);
      });
      Tutorial.bulkCreate(tutorials)
        .then(() => {
          res.status(200).send({
            message: "Uploaded the file successfully: " + req.file.originalname,
          });
        })
        .catch((error) => {
          res.status(500).send({
            message: "Fail to import data into database!",
            error: error.message,
          });
        });
    });
  } catch (error) {
    console.log(error);
    res.status(500).send({
      message: "Could not upload the file: " + req.file.originalname,
    });
  }
};
The upload controller first checks if the file exists. It then gets the file path by concatenating the path ./resources/static/assets/uploads/ with the file name to get the path to the specific file.
It then starts reading that file using readXlsxFile and skips the first (header) row using row.shift().
After that, each row converts the array to an object with appropriate key-value pairs and pushes that object to the tutorials array.
After converting all rows to objects and pushing them into the tutorials array, it uses the bulkCreate method of the model definition to add those values to the table.
If the bulk creation succeeds, it sends a response with status code 200 (OK) and a message indicating successful upload, else if the bulk creation fails, it sends a response with status code 500 and a message indicating failure to import data with the actual error message.
If an error occurs anywhere else in the process, it logs the error to the console and sends a response with status code 500 (Internal Server Error) with the message that it could not upload the file.
const getTutorials = (req, res) => {
  Tutorial.findAll()
    .then((data) => {
      res.send(data);
    })
    .catch((err) => {
      res.status(500).send({
        message:
          err.message || "Some error occurred while retrieving tutorials.",
      });
    });
};
This controller uses the findAll method of Tutorial to get all data and sends it with the response.
If an error occurs, it sends a response with the status code 500 and a message which is the error message if it exists, or a message saying some error occurred.
module.exports = {
  upload,
  getTutorials,
};
We finally export both controller functions.
Routes
In our src directory, create another directory named routes which will store files for routes we define for our app.
Tutorial.routes.js
In the routes directory, create a file named tutorial.routes.js which will store the routes for uploading an excel/spreadsheet file and getting all the data from the database.
const express = require("express");
const router = express.Router();
const excelController = require("../controllers/tutorials/excel.controller");
const upload = require("../middlewares/upload");
We will import express, and store a Router object returned by Express.Router() to a variable named router.
We will also import our controller functions and store them in the excelController variable. and imported our middleware and store it in the upload variable.
let routes = (app) => {
  router.post("/upload", upload.single("file"), excelController.upload);
  router.get("/tutorials", excelController.getTutorials);
  app.use("/api/excel", router);
};
Here we are defining a function named routes which will take an app as a parameter. We define two routes /upload and /tutorials.
The /upload route also uses our middleware and uses the upload controller function. The /tutorials route uses the getTutorials controller function.
We then use the Router object stored in the router variable with our app on the /api/excel path.
module.exports = routes;We export the routes function using module.exports.
Server.js
In the src directory, create a file named server.js which will use all our files to create a server.
const express = require("express");
const app = express();
const db = require("./models");
const initRoutes = require("./routes/tutorial.routes");

app.use(express.urlencoded({ extended: true }));
initRoutes(app);
db.sequelize.sync();
// db.sequelize.sync({ force: true }).then(() => {
//   console.log("Drop and re-sync db.");
// });

let port = 8080;
app.listen(port, () => {
  console.log(`Running at localhost:${port}`);
});
In this file, we import express and execute it and store it in the variable app. We also import our models and the routes function and store them in their variables.
We then tell our app that our app will contain URL-encoded data as well instead of just strings.
Next, we run the routes function with our app as the parameter to define routes for our app and make our app use them. We then use db.sequelize.sync() to create a table with our model definitions if it does not exist.
Note:- You may want to use the force: true option in your options object in development. It will delete the table(if it exists) and create a new one.
Next, we define a variable port with the value 8080 and ask our app to listen to that port.
Starting the server
Now, that we have coded our server, we start it by typing node src/server.js in our command line. Or, we can also define an npm script in our package.json file that will run this command for us.
"scripts": {
    "test": "echo \"Error: no test specified\" && exit 1",
    "start": "node src/server.js"
  }
In our package.json file, in the script object, we define a command for ‘start'. Now, typing npm start in the command line will start our server for us. If you run into a ConnectionRefusedError, make sure your MySQL80 service is running.
Testing the server
We will be using Postman to test our server. You can use other methods if you want to. You can download Postman from here.
Excel file
We will try uploading the below excel file.

Postman
First, we will send a POST request using POSTMAN to the /api/excel/upload path. In the body, we will send form-data and attach our Excel file to the ‘file’ key.
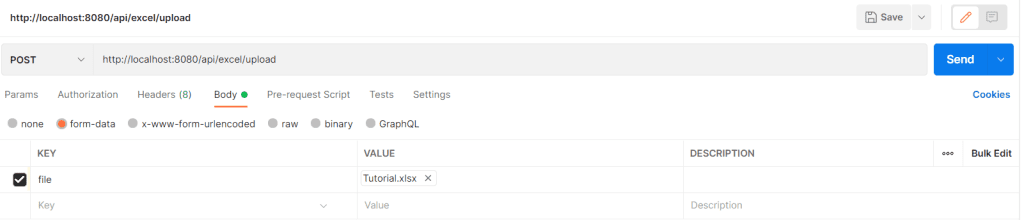
After clicking on send, we receive a response that says that the file was uploaded successfully.

We can verify the data in our database by sending a GET request to the /api/excel/tutorials path.

After clicking on send, we receive a response with all the data in the table.
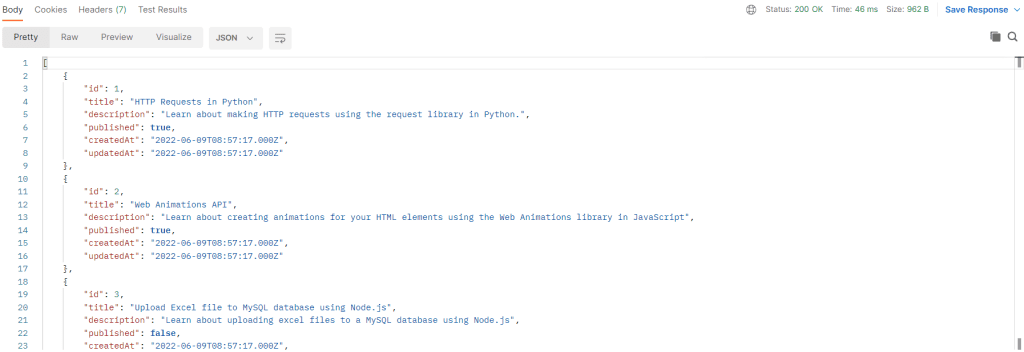
Our API automatically fills the createdAt and updatedAt fields with the time of upload.
If you visit the resources/static/assets/uploads directory, you will find all the Excel files with their unique names stored there.
Summary
- In this tutorial, we learned about creating an API that lets us upload an Excel file to MySQL and retrieve it.
- Before reading the file and storing the data in the database, we verify that the file is an Excel/spreadsheet file and store it in our local disk storage. We used Multer to achieve this.
- We used read-excel-file to read each row in the uploaded Excel file.
- We used sequelize to create tables and insert data into their rows.