Build a CRUD application using CodeIgniter 4 and Mysql

A CodeIgniter CRUD application is one that uses forms to get data into and out of a database. In this tutorial, we’ll build a complete CRUD application using CodeIgniter 4 and Mysql.
CRUD is an acronym for the four basic operations: Create, Read, Update, and Delete.
Most applications have some kind of CRUD functionality, and we can assume that every programmer had to deal with CRUD at some point.
Here’s the demo of our app
Prerequisites
- We have a text editor
- Composer running on your computer
- Have basic knowledge of CodeIgniter
Setting up CodeIgniter
We first need to set up CodeIgniter. For that, we will create a project named CodeIgniter-crud. From the terminal execute the following command:
composer create-project codeigniter4/appstarter CodeIgniter-crudthis command downloads a copy of a starter CodeIgniter application in a folder called CodeIgniter-crud on your desktop folder. If you’re running the command for the first time, it might take a while to complete depending on your internet download speed.
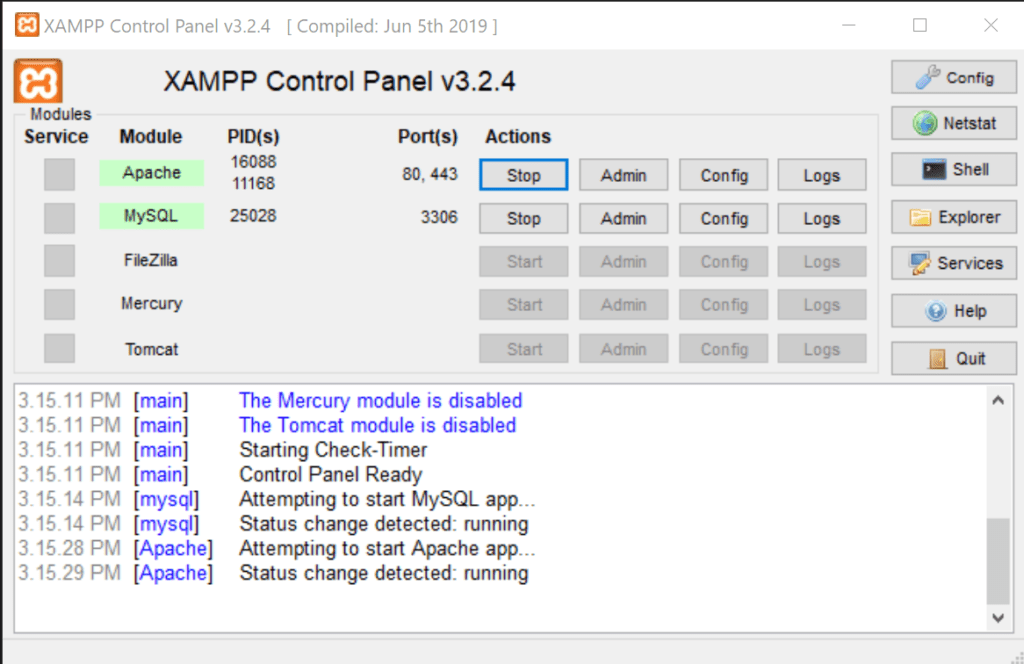
Next, open up the XAMPP application and start your Apache and MySQL server as shown below:
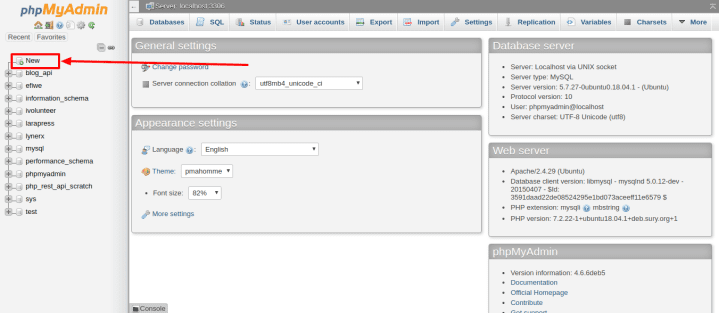
Once Apache and MySQL are running, open up your favorite browser (eg Chrome) and type in localhost/phpmyadmin to open up PHPMyAdmin. PHPMyAdmin is going to be used to create the database used for our application.
Once PHPMyAdmin boots up, click on the ‘new’ button on the left sidebar to create a new database.
On the page that loads, type in your preferred database name here we are using Codeigniter-crud as the database name and click on the create button.
now we will execute SQL query in PHpmyadmin to create our tables.
CREATE TABLE names (
    id int(11) NOT NULL AUTO_INCREMENT COMMENT 'Primary Key',
    name varchar(100) NOT NULL COMMENT 'Name',
    email varchar(255) NOT NULL COMMENT 'Email Address',
    PRIMARY KEY (id)
  ) ENGINE=InnoDB DEFAULT CHARSET=latin1 COMMENT='datatable demo table' AUTO_INCREMENT=1;

INSERT INTO `names` (`id`, `name`, `email`) VALUES
(1, 'Gopal', '[email protected]'),
(2, 'ram', '[email protected]'),
(3, 'shyam', '[email protected]'),
(4, 'gyan', '[email protected]'),
(5, 'dhyan', '[email protected]'),
(6, 'geeta', '[email protected]'),
(7, 'seeta', '[email protected]');
Once that is done, head over to your terminal and cd (change directory) into the CodeIgniter-crud folder.
cd CodeIgniter-crudnow, run cd CodeIgniter-crud && code to move into the folder and open up the project folder in VSCode.
Next, open up the CodeIgniter-crud\app\Config\Database.php file in VSCode and modify the database credentials as such:
<?php namespace Config;

/**
 * Database Configuration
 *
 * @package Config
 */

class Database extends \CodeIgniter\Database\Config
{
	/**
	 * The directory that holds the Migrations
	 * and Seeds directories.
	 *
	 * @var string
	 */
	public $filesPath = APPPATH . 'Database/';

	/**
	 * Lets you choose which connection group to
	 * use if no other is specified.
	 *
	 * @var string
	 */
	public $defaultGroup = 'default';

	/**
	 * The default database connection.
	 *
	 * @var array
	 */
	public $default = [
		'DSN'      => '',
		'hostname' => 'localhost',
		'username' => 'root',
		'password' => '',
		'database' => 'codeigniter-crud',
		'DBDriver' => 'MySQLi',
		'DBPrefix' => '',
		'pConnect' => false,
		'DBDebug'  => (ENVIRONMENT !== 'production'),
		'cacheOn'  => false,
		'cacheDir' => '',
		'charset'  => 'utf8',
		'DBCollat' => 'utf8_general_ci',
		'swapPre'  => '',
		'encrypt'  => false,
		'compress' => false,
		'strictOn' => false,
		'failover' => [],
		'port'     => 3306,
	];

	/**
	 * This database connection is used when
	 * running PHPUnit database tests.
	 *
	 * @var array
	 */
	public $tests = [
		'DSN'      => '',
		'hostname' => '127.0.0.1',
		'username' => '',
		'password' => '',
		'database' => ':memory:',
		'DBDriver' => 'SQLite3',
		'DBPrefix' => 'db_',  // Needed to ensure we're working correctly with prefixes live. DO NOT REMOVE FOR CI DEVS
		'pConnect' => false,
		'DBDebug'  => (ENVIRONMENT !== 'production'),
		'cacheOn'  => false,
		'cacheDir' => '',
		'charset'  => 'utf8',
		'DBCollat' => 'utf8_general_ci',
		'swapPre'  => '',
		'encrypt'  => false,
		'compress' => false,
		'strictOn' => false,
		'failover' => [],
		'port'     => 3306,
	];

	//--------------------------------------------------------------------

	public function __construct()
	{
		parent::__construct();

		// Ensure that we always set the database group to 'tests' if
		// we are currently running an automated test suite, so that
		// we don't overwrite live data on accident.
		if (ENVIRONMENT === 'testing')
		{
			$this->defaultGroup = 'tests';

			// Under Travis-CI, we can set an ENV var named 'DB_GROUP'
			// so that we can test against multiple databases.
			if ($group = getenv('DB'))
			{
				if (is_file(TESTPATH . 'travis/Database.php'))
				{
					require TESTPATH . 'travis/Database.php';

					if (! empty($dbconfig) && array_key_exists($group, $dbconfig))
					{
						$this->tests = $dbconfig[$group];
					}
				}
			}
		}
	}

	//

}
Creating and Setting Up the NamesCrud Controller
Next, we’re going to create a controller to handle CRUD operations in our CodeIgniter Application. Create a file called NamesCrud.php inside CodeIgniter-crud\app\Controllers with the following code:
<?php
namespace App\Controllers;
use App\Models\NameModel;
use CodeIgniter\Controller;

class NamesCrud extends Controller
{
    // show names list
    public function index(){
        $NameModel = new NameModel();
        $data['users'] = $NameModel->orderBy('id', 'DESC')->findAll();
        return view('namelist', $data);
    }

    // add name form
    public function create(){
        return view('addname');
    }

    // add data
    public function store() {
        $NameModel = new NameModel();
        $data = [
            'name' => $this->request->getVar('name'),
            'email'  => $this->request->getVar('email'),
        ];
        $NameModel->insert($data);
        return $this->response->redirect(site_url('/namelist'));
    }

    // show single name
    public function singleUser($id = null){
        $NameModel = new NameModel();
        $data['user_obj'] = $NameModel->where('id', $id)->first();
        return view('editnames', $data);
    }

    // update name data
    public function update(){
        $NameModel = new NameModel();
        $id = $this->request->getVar('id');
        $data = [
            'name' => $this->request->getVar('name'),
            'email'  => $this->request->getVar('email'),
        ];
        $NameModel->update($id, $data);
        return $this->response->redirect(site_url('/namelist'));
    }

    // delete name
    public function delete($id = null){
        $NameModel = new NameModel();
        $data['user'] = $NameModel->where('id', $id)->delete($id);
        return $this->response->redirect(site_url('/namelist'));
    }
}
In the code snippet above the NamesCrud controller class has the following methods to perform CRUD operations (view, add, edit, and delete). The flow of NamesCrud controller works like this:
- show the names list
- add a function to add a name
- add function to store data
- Add a function to show single name
- add a function to update name data
- Finally a function to delete the name
Creating and Setting Up the NameModel Model
The model class provides methods to handle the database-related operations, open up CodeIgniter-crud\app\Models\NameModel.php and add the following code:
<?php
namespace App\Models;
use CodeIgniter\Model;

class NameModel extends Model
{
    protected $table = 'names';

    protected $primaryKey = 'id';

    protected $allowedFields = ['name', 'email'];
}
Creating Routes for our application
Now we will create Routes for our application to handle Crud operations, for that you need to add some rules in CodeIgniter-crud\app\Config\Routes.php file.
<?php namespace Config;

// Create a new instance of our RouteCollection class.
$routes = Services::routes();

// Load the system's routing file first, so that the app and ENVIRONMENT
// can override as needed.
if (file_exists(SYSTEMPATH . 'Config/Routes.php'))
{
	require SYSTEMPATH . 'Config/Routes.php';
}

/**
 * --------------------------------------------------------------------
 * Router Setup
 * --------------------------------------------------------------------
 */
$routes->setDefaultNamespace('App\Controllers');
$routes->setDefaultController('Home');
$routes->setDefaultMethod('index');
$routes->setTranslateURIDashes(false);
$routes->set404Override();
$routes->setAutoRoute(true);

/**
 * --------------------------------------------------------------------
 * Route Definitions
 * --------------------------------------------------------------------
 */

// We get a performance increase by specifying the default
// route since we don't have to scan directories.
$routes->get('/', 'Home::index');

// add these CRUD Routes
$routes->get('namelist', 'NamesCrud::index');
$routes->get('addname', 'NamesCrud::create');
$routes->post('submit-form', 'NamesCrud::store');
$routes->get('editnames/(:num)', 'NamesCrud::singleUser/$1');
$routes->post('update', 'NamesCrud::update');
$routes->get('delete/(:num)', 'NamesCrud::delete/$1');

/**
 * --------------------------------------------------------------------
 * Additional Routing
 * --------------------------------------------------------------------
 *
 * There will often be times that you need additional routing and you
 * need it to be able to override any defaults in this file. Environment
 * based routes is one such time. require() additional route files here
 * to make that happen.
 *
 * You will have access to the $routes object within that file without
 * needing to reload it.
 */
if (file_exists(APPPATH . 'Config/' . ENVIRONMENT . '/Routes.php'))
{
	require APPPATH . 'Config/' . ENVIRONMENT . '/Routes.php';
}
Creating Views
Now that our application structure is done, let’s bring our application to live by displaying it visually. To begin, in the CodeIgniter-crud\app\Views, create the following files.
addname.phpnamelist.phpeditnames.php
Open up the namelist.php and put the code below in it.
<!doctype html>
<html lang="en">
  <head>
  <meta charset="utf-8">
  <meta name="viewport" content="width=device-width, initial-scale=1, shrink-to-fit=no">
  <title>Codeigniter Crud tutorial on code-source.tempurl.host</title>
<!-- Latest compiled and minified CSS -->
<link rel="stylesheet" href="https://stackpath.bootstrapcdn.com/bootstrap/4.5.0/css/bootstrap.min.css">
<div class="container mt-4">
<h1>Codeigniter Crud tutorial on code-source.tempurl.host</h1>

    <div class="d-flex justify-content-end">
        <a href="<?php echo site_url('/addname') ?>" class="btn btn-primary">Add a Name & email</a>
	</div>
    <?php
     if(isset($_SESSION['msg'])){
        echo $_SESSION['msg'];
      }
     ?>
  <div class="mt-3">
     <table class="table table-bordered" id="users-list">
       <thead>
          <tr>
             <th>User Id</th>
             <th>Name</th>
             <th>Email</th>
             <th>Action</th>
          </tr>
       </thead>
       <tbody>
          <?php if($users): ?>
          <?php foreach($users as $user): ?>
          <tr>
             <td><?php echo $user['id']; ?></td>
             <td><?php echo $user['name']; ?></td>
             <td><?php echo $user['email']; ?></td>
             <td>
              <a href="<?php echo base_url('editnames/'.$user['id']);?>" class="btn btn-warning">Edit</a>
              <a href="<?php echo base_url('delete/'.$user['id']);?>" class="btn btn-danger">Delete</a>
              </td>
          </tr>
         <?php endforeach; ?>
         <?php endif; ?>
       </tbody>
     </table>
  </div>
</div>

<script src="https://code.jquery.com/jquery-3.5.1.slim.min.js"></script>
<link rel="stylesheet" type="text/css" href="https://cdn.datatables.net/1.10.21/css/jquery.dataTables.min.css">
<script type="text/javascript" src="https://cdn.datatables.net/1.10.21/js/jquery.dataTables.min.js"></script>
<script>
    $(document).ready( function () {
      $('#users-list').DataTable();
  } );
</script>
</body>
</html>
Here we are fetching data from our database, we are also making use of bootstrap and Jquery datatable to show data.
Next, open up the CodeIgniter-crud\app\Views\addname.php file and add the following code to it.
<!DOCTYPE html>
<html>

<head>
  <title>Codeigniter Crud tutorial on code-source.tempurl.host</title>
<!-- Latest compiled and minified CSS -->
<link rel="stylesheet" href="https://stackpath.bootstrapcdn.com/bootstrap/4.5.0/css/bootstrap.min.css">
<style>

    .container {
      max-width: 500px;
    }

    .error {
      display: block;
      padding-top: 5px;
      font-size: 14px;
      color: red;
    }
  </style>
</head>

<body>
  <div class="container mt-5">
    <form method="post" id="addname" name="addname"
    action="<?= site_url('/submit-form') ?>">
      <div class="form-group">
        <label>Name</label>
        <input type="text" name="name" class="form-control">
      </div>

      <div class="form-group">
        <label>Email</label>
        <input type="text" name="email" class="form-control">
      </div>

      <div class="form-group">
        <button type="submit" class="btn btn-success">Add Name & email</button>
      </div>
    </form>
  </div>

  <script src="https://code.jquery.com/jquery-3.5.1.slim.min.js"></script>
  <script src="https://cdnjs.cloudflare.com/ajax/libs/jquery-validate/1.19.2/jquery.validate.js"></script>
  <script src="https://cdnjs.cloudflare.com/ajax/libs/jquery-validate/1.19.2/additional-methods.min.js"></script>
  <script>
    if ($("#add_create").length > 0) {
      $("#add_create").validate({
        rules: {
          name: {
            required: true,
          },
          email: {
            required: true,
            maxlength: 60,
            email: true,
          },
        },
        messages: {
          name: {
            required: "Name is required.",
          },
          email: {
            required: "Email is required.",
            email: "It does not seem to be a valid email.",
            maxlength: "The email should be or equal to 60 chars.",
          },
        },
      })
    }
  </script>
</body>

</html>
Here we have added a form to store data in our database. Once, we have saved our addname.php view, we need to allow users to edit names. To do that, open up the editnames.php file and type in the following code:
<!DOCTYPE html>
<html>
<head>
<title>Codeigniter Crud tutorial on code-source.tempurl.host</title>
<!-- Latest compiled and minified CSS -->
<link rel="stylesheet" href="https://stackpath.bootstrapcdn.com/bootstrap/4.5.0/css/bootstrap.min.css">
<style> .container {
max-width: 500px;
}
.error {
display: block;
padding-top: 5px;
font-size: 14px;
color: red;
}
</style>
</head>
<body>
<div class="container mt-5">
<h1>Codeigniter Crud tutorial on code-source.tempurl.host</h1>
<form method="post" id="update_user" name="update_user"
action="<?= site_url('/update') ?>">
<input type="hidden" name="id" id="id" value="<?php echo $user_obj['id']; ?>">
<div class="form-group">
<label>Name</label>
<input type="text" name="name" class="form-control" value="<?php echo $user_obj['name']; ?>">
</div>
<div class="form-group">
<label>Email</label>
<input type="email" name="email" class="form-control" value="<?php echo $user_obj['email']; ?>">
</div>
<div class="form-group">
<button type="submit" class="btn btn-warning">Edit Data</button>
</div>
</form>
</div>
<script src="https://code.jquery.com/jquery-3.5.1.slim.min.js"></script>
<script src="https://cdnjs.cloudflare.com/ajax/libs/jquery-validate/1.19.2/jquery.validate.js"></script>
<script src="https://cdnjs.cloudflare.com/ajax/libs/jquery-validate/1.19.2/additional-methods.min.js"></script>
<script>
if ($("#update_user").length > 0) {
$("#update_user").validate({
rules: {
name: {
required: true,
},
email: {
required: true,
maxlength: 60,
email: true,
},
},
messages: {
name: {
required: "Name is required.",
},
email: {
required: "Email is required.",
email: "It does not seem to be a valid email.",
maxlength: "The email should be or equal to 60 chars.",
},
},
})
}
</script>
</body>
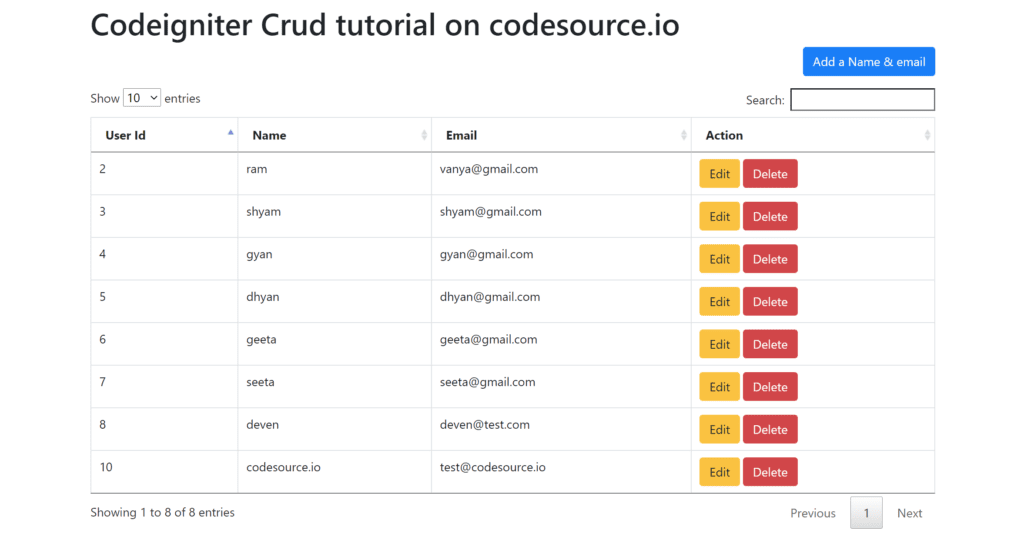
</html>Once that is done run the php spark serve command in your terminal, then head over to http://localhost:8080/index.php/namelist in your browser to see something similar to this.
Conclusion
I hope you learned a few things about CodeIgniter. Every article can be made better, so please leave your suggestions and contributions in the comments below. If you have questions about any of the steps, please do ask also in the comments section below.
You can access CodeSource from here.