Laravel 10 CRUD Example Tutorial for Beginners

In this article, we’ll show you how to create a Laravel CRUD application step by step.
Learn about error handling, pagination, and best practices to improve your Laravel projects.
Get ready to explore Laravel 10 CRUD features and boost your web development skills.
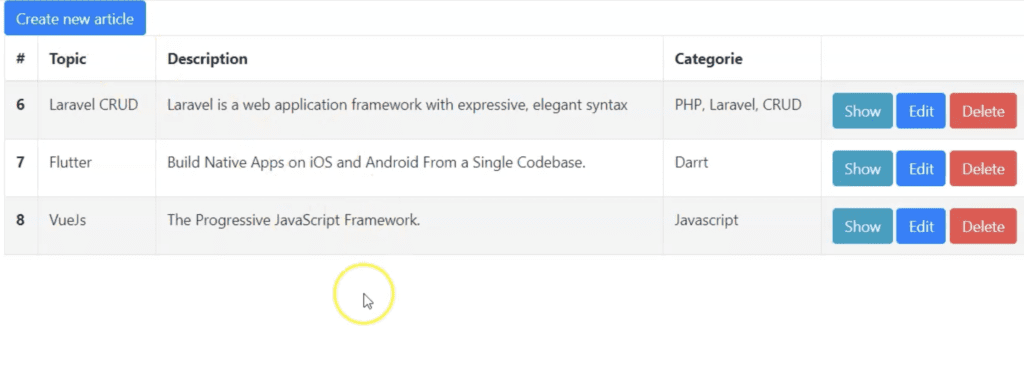
For illustration consider the following application:
Requirements
- We are assuming that you have all the tools to run Laravel.
- Basic knowledge of Laravel and PHP.
Setup Laravel CRUD project
Firstly, we need to install Laravel. You can do it using the Composer create-project command.
composer create-project --prefer-dist laravel/laravel laravel_crudSecondly, create a database named laravel_crud and configure it.
Open the .env file in your root path and set up the username and password.
LOG_CHANNEL=stack

DB_CONNECTION=mysql
DB_HOST=127.0.0.1
DB_PORT=3306
DB_DATABASE=laravel_crud
DB_USERNAME=root
DB_PASSWORD=
In addition, we’ll create a table named articles. You can do it by creating a migration:
php artisan make:migration create_articles_table --create=articlesCheck the file created in database/migrations/ and make this edition:
    public function up()
    {
        Schema::create('articles', function (Blueprint $table) {
            $table->increments('id');
            $table->string('topic');
            $table->text('description');
            $table->string('categorie');
            $table->timestamps();
        });
    }
Migrate it!
php artisan migrateSometimes it can give an error about maxLength, collection, or the charset. Therefore, if it is your case open AppServiceProvider.php in app/Providers/ and make this file looks like this:
<?php
namespace App\Providers;
use Illuminate\Support\ServiceProvider;
use Illuminate\Support\Facades\Schema;
class AppServiceProvider extends ServiceProvider
{
/**
* Register any application services.
*
* @return void
*/
public function register()
{
//
}
/**
* Bootstrap any application services.
*
* @return void
*/
public function boot()
{
Schema::defaultStringLength(191);
}
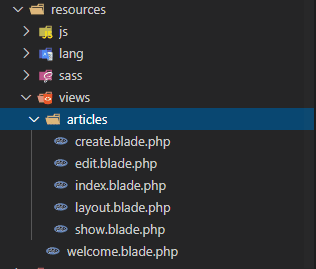
}Create the views.
Set up a Resource Router. Open routes/web.php and add this line:
Route::resource('articles', 'ArticleController');Create Controller and Model
We need to create a new controller as ArcticleController as well as its Model.
php artisan make:controller ArticleController
--resource --model=Article
Enter yes to the question that will appear.
A App\Article model does not exist. Do you want to generate it? (yes/no) [yes]:
 > yes
Open your model Article.php and create these variables:
<?php
namespace App;
use Illuminate\Database\Eloquent\Model;

class Article extends Model
{
    protected $fillable = [
        'topic','description', 'categorie',
    ];
}
Open ArticleController.php:
Laravel left everything ready for us. You can see that you have some methods in your controller and now we’ll see how to manage them.
index() lists table data and make pagination with three elements on each page.
    public function index()
    {
        $articles = DB::table('articles')->paginate(3);

        return view('articles.index', ['articles' => $articles]);
    }
create() – Returns the View to create a table item.
    public function create()
    {
        return view('articles.create');
    }
store() – Saves the new item to the table
    public function store(Request $request)
    {
        $request->validate([
            'topic' => 'required',
            'description' => 'required',
            'categorie' => 'required',
        ]);

        Article::create($request->all());

        return redirect()->route('articles.index')
        ->with('success','Article created successfully.');
    }
show() – Shows a specific item.
    public function show(Article $article)
    {
        return view('articles.show',compact('article'));
    }
edit() – Returns the View for editing the data
    public function edit(Article $article)
    {
        return view('articles.edit',compact('article'));
    }
update() – Save data update.
    public function update(Request $request, Article $article)
    {
        $request->validate([
            'topic' => 'required',
            'description' => 'required',
            'categorie' => 'required',
        ]);

        $article->update($request->all());

        return redirect()->route('articles.index')
                        ->with('success','Article updated successfully');
    }
delete() – Removes data.
    public function destroy(Article $article)
    {
        $article->delete();

        return redirect()->route('articles.index')
                        ->with('success','Article deleted successfully');
    }
Run it:
php artisan serveAnd go to:
http://127.0.0.1:8000/articlesSetup the Layout
Open layout.blade.php
<!DOCTYPE html>
<html lang="en">
<head>
    <meta charset="UTF-8">
    <meta name="viewport" content="width=device-width, initial-scale=1.0">
    <title>Layout</title>
    <link rel="stylesheet" href="https://maxcdn.bootstrapcdn.com/bootstrap/4.0.0/css/bootstrap.min.css" integrity="sha384-Gn5384xqQ1aoWXA+058RXPxPg6fy4IWvTNh0E263XmFcJlSAwiGgFAW/dAiS6JXm" crossorigin="anonymous">
</head>
<body>

<div class="container">
  <!-- Content here -->
  @yield('content')
</div>

</body>
</html>
READ Operation
Open index.blade.php
@extends('articles.layout')
@section('content')
...
...
@endsection
Inside the section content add:
- Button to add a new article
<div class="row">
        <div class="col-lg-12 margin-tb">
            <div class="pull-right">
                <a class="btn btn-primary" href="{{ route('articles.create') }}"> Create new article</a>
            </div>
        </div>
</div>- Section to display a success message
@if ($message = Session::get('success'))
        <div class="alert alert-success">
            <p>{{ $message }}</p>
        </div>
@endif- And a table to display the articles:
<table class="table table-striped table-bordered">
  <thead>
    <tr>
      <th scope="col">#</th>
      <th scope="col">Topic</th>
      <th scope="col">Description</th>
      <th scope="col">Categorie</th>
      <th scope="col"></th>
    </tr>
  </thead>
  <tbody>
@foreach ($articles as $article)
    <tr>
      <th scope="row">{{ $article->id }}</th>
      <td>{{ $article->topic }}</td>
      <td>{{ $article->description }}</td>
      <td>{{ $article->categorie }}</td>
      <td>
      <form action="{{ route('articles.destroy',$article->id) }}" method="POST">

        <a class="btn btn-info" href="{{ route('articles.show',$article->id) }}">Show</a>

        <a class="btn btn-primary" href="{{ route('articles.edit',$article->id) }}">Edit</a>

        @csrf
        @method('DELETE')

        <button type="submit" class="btn btn-danger">Delete</button>
        </form>
      </td>
    </tr>
@endforeach
  </tbody>
</table>- Finally, the links for the pagination:
{{ $articles->links() }}CREATE Operation
Bellow, we have a button to return to the home/initial page, a section to display an error message and the form.
@extends('articles.layout')
@section('content')

<div class="row">
    <div class="col-lg-12 margin-tb">
        <div class="pull-left">
            <h2>Create Ne   w Article</h2>
        </div>
        <div class="pull-right">
            <a class="btn btn-info" href="{{ route('articles.index') }}"> Back</a>
        </div>
    </div>
</div>

@if ($errors->any())
    <div class="alert alert-danger">
        <strong>Warning!</strong> Please check your fields<br><br>
        <ul>
            @foreach ($errors->all() as $error)
                <li>{{ $error }}</li>
            @endforeach
        </ul>
    </div>
@endif

<form action="{{ route('articles.store') }}" method="POST">
@csrf
  <div class="form-group">
    <label for="topic">Topic title</label>
    <input type="text" class="form-control"  placeholder="Enter Topic" name ="topic">
  </div>
  <div class="form-group">
    <label for="description">Description</label>
    <textarea class="form-control" rows="3"placeholer ="Enter description" name="description"></textarea>
  </div>
  <div class="form-group">
    <label for="categorie">Categorie</label>
    <input type="text" class="form-control"  placeholder="Enter Categorie" name ="categorie">
  </div>
  <button type="submit" class="btn btn-primary">Submit</button>
</form>

@endsection
UPDATE Operation
A form to update the article:
@extends('articles.layout')

@section('content')
<div class="row">
    <div class="col-lg-12 margin-tb">
        <div class="pull-left">
            <h2>Edit Article</h2>
        </div>
        <div class="pull-right">
            <a class="btn btn-info" href="{{ route('articles.index') }}"> Back</a>
        </div>
    </div>
</div>

@if ($errors->any())
        <div class="alert alert-danger">
            <strong>Warning!</strong> Please check your fields.<br><br>
            <ul>
                @foreach ($errors->all() as $error)
                    <li>{{ $error }}</li>
                @endforeach
            </ul>
        </div>
@endif

<form action="{{ route('articles.update',$article->id) }}" method="POST">
@csrf
@method('PUT')
  <div class="form-group">
    <label for="topic">Topic title</label>
    <input type="text" class="form-control" value="{{ $article->topic }}" placeholder="Enter Topic" name ="topic">
  </div>
  <div class="form-group">
    <label for="description">Description</label>
    <textarea class="form-control" rows="3" name="description">{{ $article->description }}</textarea>
  </div>
<div class="form-group">
    <label for="categorie">Categorie</label>
    <input type="text" class="form-control" value="{{ $article->categorie }}" placeholder="Enter Categorie" name ="categorie">
  </div>
  <button type="submit" class="btn btn-primary">Submit</button>
</form>

@endsection
DELETE Operation
Within the index.blade.php file, the DELETE operation is invoked through the use of the following lines:
 @method('DELETE')
 <button type="submit" class="btn btn-danger">Delete</button>
These lines are responsible for rendering a button that, when clicked, triggers the HTTP DELETE request to remove the targeted resource.
Conclusion
We hope you found this Laravel 10 CRUD tutorial helpful and easy to follow.
By mastering the concepts covered in this guide, you should now be able to create efficient Laravel CRUD applications with error handling, pagination, and best practices.
Keep practicing and refining your skills to become a proficient Laravel developer.
Don’t hesitate to explore more Laravel resources and stay updated with the latest features and improvements. Happy coding!