Complete React Datepicker Tutorial with Examples

In this tutorial, you will learn how to use React Datepicker in your React project. You will learn from a basic example to a specific use case by creating a hotel booking component using React Datepicker.
Prerequisites
In this tutorial, you will need a configured computer and also basic Javascript & React knowledge. Make sure you have node and npm installed on your computer.
The first step of the configuration step is to install create-react-app globally.
npm i -g create-react-appAfter the create-react-app is installed, we will need to create a new project with this library. To do that, you can use:
npx create-react-app datepicker-appThen after successfully creating the project, go to the project folder, install the required package, and start the project.
cd datepicker-app
npm i --save react-datepicker
npm i --save moment
npm start
Basic Implementation of React Datepicker
Before starting anything, you will need to put the CSS file into your project. Insert the following code into your project. Basically, you can put this anywhere inside your project, but in this tutorial, we will only use the App.js file, so put this on our code:
import "react-datepicker/dist/react-datepicker.css";Then we can start to implement this by importing the DatePicker component from react-datepicker. The mandatory props that we need for this component are only selected and onChange.
The selected props take a date-format value to represent the value of this component, while onChange will act as a handler function to change the selected value.
The onChange function takes a date as an argument and the only thing we need to do on this function is to change the value of the selected date. See the example below for the implementation on our App.js file:
import React, { useState } from "react";
import DatePicker from "react-datepicker";

import "react-datepicker/dist/react-datepicker.css";

const App = () => {
  const [startDate, setStartDate] = useState(new Date());
  return (
    <DatePicker
      selected={startDate}
      onChange={date => setStartDate(date)}
    />
  );
};

export default App;
Basic Implementation: Time Picker
We can use this component as a time-picker by using showTimeSelect props. Times will be displayed at a 30-minute interval by default.
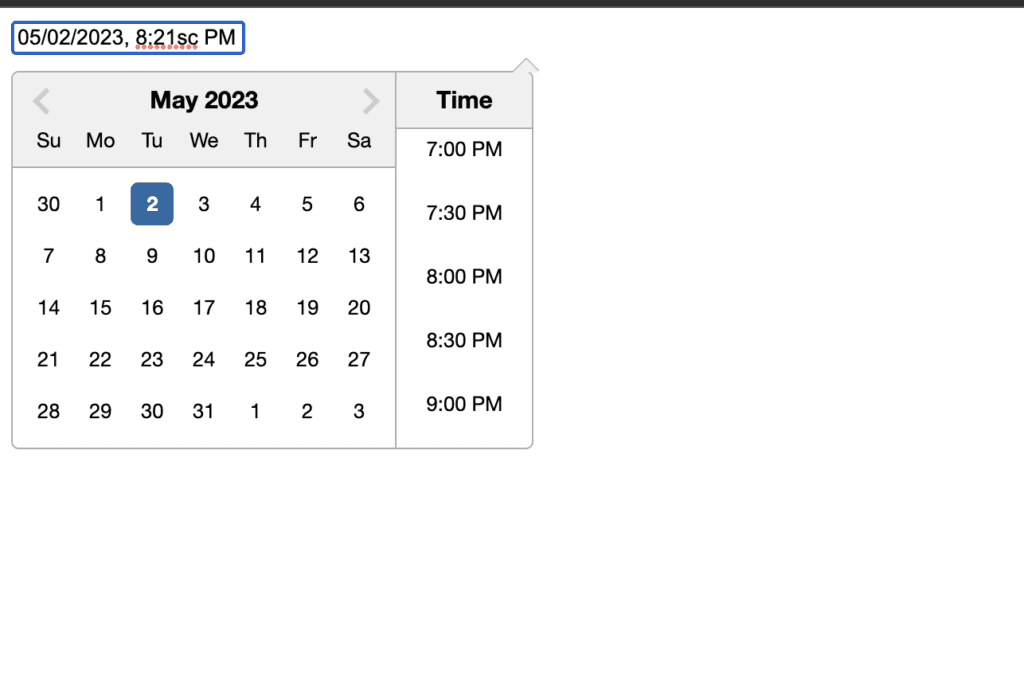
We can format how the date will be displayed by using the dateFormat props. In this case, because we want to display the time inside the component, let’s use dateFormat="Pp". To implement this in our project, change our App.js to looks like this:
import React, { useState } from "react";
import DatePicker from "react-datepicker";

import "react-datepicker/dist/react-datepicker.css";

const App = () => {
  const [selectedDate, setSelectedDate] = useState(new Date());

  const handleDateChange = (date) => {
    setSelectedDate(date);
  };

  return (
    <DatePicker
      selected={selectedDate}
      onChange={handleDateChange}
      showTimeSelect
      dateFormat="Pp"
    />
  );
};

export default App;
The above code the useState hook to create a state variable named selectedDate with an initial value of new Date().
It also defines a function named handleDateChange to update the value of the selectedDate state variable when a new date is selected.
Finally, it returns the DatePicker component with its selected, onChange, showTimeSelect, and dateFormat props set to display the date picker with the correct options.
Month & Year Picker
Besides date & time, the ability to pick a month & year is an important thing to have here. This component also has the feature to select month & year.
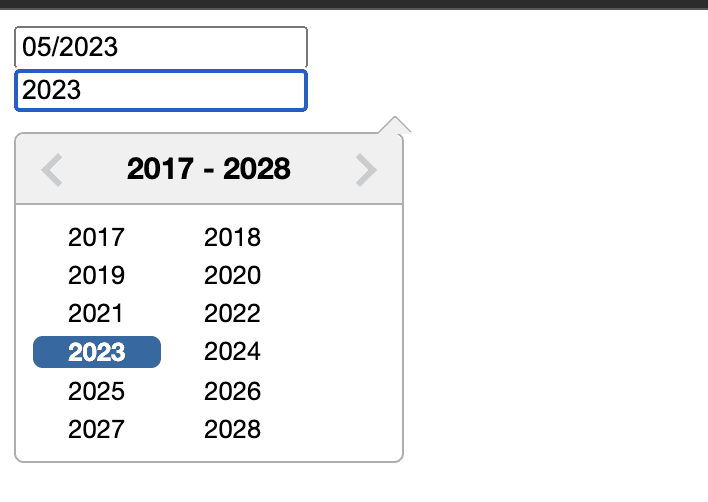
Just make sure we use the correct format of dateFormat to optimize the features. Change our App.js with the following code:
import React, { useState } from "react";
import DatePicker from "react-datepicker";

import "react-datepicker/dist/react-datepicker.css";

const App = () => {
  const [startDate, setStartDate] = useState(new Date());

  const handleDateChange = (date) => {
    setStartDate(date);
  };

  return (
    <>
      <DatePicker
        selected={startDate}
        onChange={handleDateChange}
        showMonthYearPicker
        dateFormat="MM/yyyy"
      />

      <DatePicker
        selected={startDate}
        onChange={handleDateChange}
        showYearPicker
        dateFormat="yyyy"
      />
    </>
  );
};

export default App;
The above code uses the useState hook to create a state variable named startDate with an initial value of new Date(), and a handler function named handleDateChange to update the value of startDate when a new date is selected.
Advanced Example: Hotel Booking Date-Picker
Now, let’s go to the next level. We are going to create a booking hotel date-picker component using react-datepicker. The goal is to build two react-datepicker components, make both connected as check-in and check-out date and then display the selected dates.
NOTE: In this tutorial, we are only using the single
*App.js*file and the code examples below will explain section by section. By the end of this tutorial, you will get the complete code of the whole page and an additional styling file.
First, all we need to do is to create a basic component for check-in and check-out. We don’t really need to use a lot of props here, besides the necessary ones, we will only use the minDate props to put a minimum date limit for the user.
Create a basic React Datepicker Component
import React, { useState } from "react";
import DatePicker from "react-datepicker";

import "react-datepicker/dist/react-datepicker.css";

const App = () => {
  const [checkInDate, setCheckInDate] = useState(new Date());
  const [checkOutDate, setCheckOutDate] = useState(null);

  const handleCheckInDate = (date) => {
    setCheckInDate(date);
    setCheckOutDate(null);
  };

  const handleCheckOutDate = (date) => {
    setCheckOutDate(date);
  };

  return (
    <div className="input-container">
      <div>
        <label>Check-in</label>
        <DatePicker
          selected={checkInDate}
          minDate={new Date()}
          onChange={handleCheckInDate}
        />
      </div>
      <div>
        <label>Check-out</label>
        <DatePicker
          selected={checkOutDate}
          minDate={checkInDate}
          onChange={handleCheckOutDate}
        />
      </div>
    </div>
  );
};

export default App;
For the check-in component, it’s simply using the current date as a minDate, the user cannot pick a date before today. And for the check-out component, we can use the checkInDate value, which means, the user cannot pick a date before the check-in date.
The next step will be defining how we are going to save the value on our state, and how each handle change function works. For this, the main idea is to simply create a state for each checkInDate and checkOutDate value and save the date there.
The only difference is that the minDate of the check-out component will depend on the checkInDate value, we will need to reset the checkOutDate value anytime the checkInDate value changed. So, here is the code you need to add to your App.js file:
import React, { useState } from "react";
...

const App = () => {
  // define check-in and check-out state
  const [checkInDate, setCheckInDate] = useState(null);
  const [checkOutDate, setCheckOutDate] = useState(null);

  // define handler change function on check-in date
  const handleCheckInDate = (date) => {
    setCheckInDate(date);
    setCheckOutDate(null);
  };

  // define handler change function on check-out date
  const handleCheckOutDate = (date) => {
    setCheckOutDate(date);
  };
...
The last part is we need to display the summary of the booking. It will only be displayed when both check-in and check-out date have the value. For this case, we will use moment.js to format the date.
import React, { useState } from "react";
import DatePicker from "react-datepicker";
import moment from "moment";

import "react-datepicker/dist/react-datepicker.css";

const App = () => {
  // define check-in and check-out state
  const [checkInDate, setCheckInDate] = useState(null);
  const [checkOutDate, setCheckOutDate] = useState(null);

  // define handler change function on check-in date
  const handleCheckInDate = (date) => {
    setCheckInDate(date);
    setCheckOutDate(null);
  };

  // define handler change function on check-out date
  const handleCheckOutDate = (date) => {
    setCheckOutDate(date);
  };

  return (
    <div className="input-container">
      <div>
        <label>Check-in</label>
        <DatePicker
          selected={checkInDate}
          minDate={new Date()}
          onChange={handleCheckInDate}
        />
      </div>
      <div>
        <label>Check-out</label>
        <DatePicker
          selected={checkOutDate}
          minDate={checkInDate}
          onChange={handleCheckOutDate}
        />
        {checkInDate && checkOutDate && (
          <div className="summary">
            <p>
              You book a hotel from {moment(checkInDate).format("MMMM Do YYYY")}{" "}
              to {moment(checkOutDate).format("MMMM Do YYYY")}.
            </p>
          </div>
        )}
      </div>
    </div>
  );
};

export default App;
The code defines a hotel booking form with two date pickers for check-in and check-out dates and displays a summary of the selected dates using the moment library for formatting. It uses the useState hook to manage the state of the selected dates and the DatePicker component from the “react-datepicker” library for date selection.
Demo
Conclusion
Now we know how to use a React Datepicker on our project. After following the basic and advanced tutorials, we will be able to use this great component for our next project. I hope you understand every step in this tutorial, if you have any questions or suggestions, please let us know in the comment section below.