Displaying and Manipulating Dynamic List Data in React.js

Dev Bytes: Learn how to efficiently render and manipulate dynamic list data in React.js applications by following this step-by-step guide.
React.js is a popular JavaScript library for building user interfaces, particularly for web applications.
It enables developers to create reusable, interactive, and stateful UI components.
One of the common tasks in React.js applications is to display and manipulate dynamic list data.
This guide provides a comprehensive overview of Displaying and Manipulating Dynamic List Data in React.js by creating a simple to-do application.
ReactJs Read and Display Dynamic List Data Example
- Setting Up the Development Environment
- Creating a New React Application
- Implementing Dynamic List Data
- Manipulating List Data
Creating a New React Application
create-react-app dynamic-list-appAfter the project is created, navigate to the project directory and start the development server:
cd dynamic-list-app
npm start
The application will be available at http://localhost:3000/.
Implementing Dynamic List Data
In this section, you will learn how to create a List component, render list items, add a key prop, and implement conditional rendering.
Creating a List Component
First, create a new file named List.js inside the src directory of your React application. In this file, create a functional component called List that accepts an array of items as a prop:
import React from 'react';

const List = ({ items }) => {
  return (
    // Component implementation
  );
};

export default List;
Rendering List Items
To render the list items, use the JavaScript map() function to iterate over the items array and create an unordered list (<ul>) with list items (<li>):
const List = ({ items }) => {
  return (
    <ul>
      {items.map((item) => (
        <li>{item}</li>
      ))}
    </ul>
  );
};
Adding a Key Prop to List Items
In React, adding a unique key prop to each list item is important to help the reconciliation process when updating the UI. This key prop should be a unique identifier for each item in the list. Update the List component by adding a unique key prop to each list item:
const List = ({ items }) => {
  return (
    <ul>
      {items.map((item, index) => (
        <li key={index}>{item}</li>
      ))}
    </ul>
  );
};
In this example, the item’s index is used as the key prop. However, in real-world applications, it is better to use a unique identifier, such as an ID from a database.
Implementing Conditional Rendering
You may want to display a message when the list is empty. To achieve this, use conditional rendering with a ternary operator in the List component:
const List = ({ items }) => {
  return (
    <>
      {items.length > 0 ? (
        <ul>
          {items.map((item, index) => (
            <li key={index}>{item}</li>
          ))}
        </ul>
      ) : (
        <p>No items in the list.</p>
      )}
    </>
  );
};
Manipulating List Data:
Now, we have gone through the basics let’s explore the real-world example, In this section you will learn how to add, delete, and edit list items.
let’s create a separate ListItem component to make the code more modular and easier to manage. The ListItem component will handle the item’s display, editing, and saving:
import React, { useState } from 'react';

const ListItem = ({ item, index, onDeleteItem, onEditItem }) => {
  const [isEditing, setIsEditing] = useState(false);
  const [editValue, setEditValue] = useState(item);

  const handleSave = () => {
    onEditItem(index, editValue);
    setIsEditing(false);
  };

  return (
    <li key={index}>
      {isEditing ? (
        <>
          <input
            type="text"
            value={editValue}
            onChange={(e) => setEditValue(e.target.value)}
          />
          <button onClick={handleSave}>Save</button>
        </>
      ) : (
        <>
          {item}
          <button onClick={() => onDeleteItem(index)}>Delete</button>
          <button onClick={() => setIsEditing(true)}>Edit</button>
        </>
      )}
    </li>
  );
};
This component displays an item as a list item. It has the ability to edit and delete the item, and it uses the useState hook to manage the state of the component. When editing, the component displays an input field and a save button, and when not editing, it displays the item text, a delete button, and an edit button.
In this List.js file Define the ListItem component:
const ListItem = ({ item, index, onDeleteItem, onEditItem }) => {
  const [isEditing, setIsEditing] = useState(false);
  const [editValue, setEditValue] = useState(item);

  const handleSave = () => {
    onEditItem(index, editValue);
    setIsEditing(false);
  };

  // Rest of the component code
};
The ListItem component is a functional component that accepts item, index, onDeleteItem, and onEditItem as props. It uses local state variables isEditing and editValue for managing the edit mode and the current edit value. The handleSave function is used to call the onEditItem prop function when the user saves their edits.
Render the ListItem component
return (
  <div className={styles.listContainer}>
    {items.length > 0 ? (
      <ul>
        {items.map((item, index) => (
          <ListItem
            key={index}
            item={item}
            index={index}
            onDeleteItem={onDeleteItem}
            onEditItem={onEditItem}
          />
        ))}
      </ul>
    ) : (
      <p>No items in the list.</p>
    )}
  </div>
);
The List component renders a container <div> with a dynamic className. It checks if the items array has any elements.
If there are items, it maps over the array and renders a ListItem component for each item. If there are no items, it displays a message indicating that the list is empty.
Initialize state variables
in the App.js file let’s start by initializing variables.
const [items, setItems] = useState(["Item 1", "Item 2", "Item 3"]);
const [inputValue, setInputValue] = useState("");
Two state variables are initialized: items for managing the list of items and inputValue for storing the value of the input field for adding new items.
Define event handlers
const handleDeleteItem = (index) => {
  const newItems = items.filter((_, itemIndex) => itemIndex !== index);
  setItems(newItems);
};

const handleEditItem = (index, newValue) => {
  const newItems = items.map((item, itemIndex) => {
    if (itemIndex === index) {
      return newValue;
    }
    return item;
  });
  setItems(newItems);
};

const handleAddItem = () => {
  if (inputValue.trim()) {
    setItems([...items, inputValue]);
    setInputValue("");
  }
};
Three event handler functions are defined for managing list items:
handleDeleteItem: Accepts an index and removes the item at that index.handleEditItem: Accepts an index and a new value, then replaces the item at that index with the new value.handleAddItem: Adds the current input value to the items array if it’s not empty.
Render the App component
return (
  <div>
    <div className={styles.addItemContainer}>
      <input
        type="text"
        value={inputValue}
        onChange={(e) => setInputValue(e.target.value)}
        placeholder="Enter a new item"
        className={styles.addItemInput}
      />
      <button
        onClick={handleAddItem}
        className={`${styles.button} ${styles.addItemButton}`}
      >
        Add Item
      </button>
    </div>
    <List
      items={items}
      onDeleteItem={handleDeleteItem}
      onEditItem={handleEditItem}
    />
  </div>
);
The App component renders a container <div>, which includes the “Add Item” input field and button, as well as the List component. The List component receives items, onDeleteItem, and onEditItem as props.
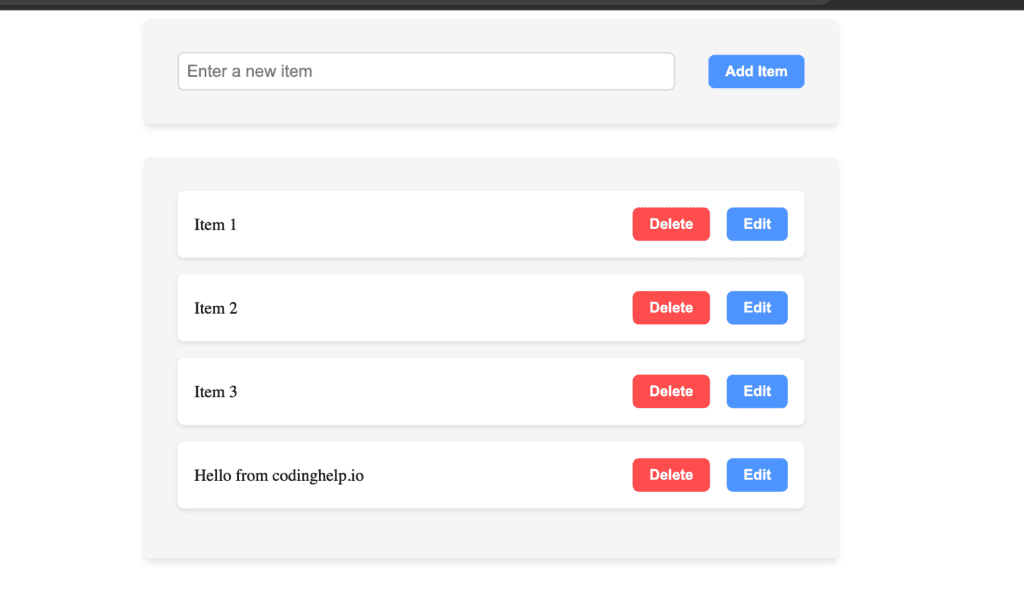
Demo and Source Code:
Conclusion
In this guide, you learned how to display and manipulate dynamic list data in a React.js application. Specifically, you learned how to:
- Set up the development environment for a React application.
- Create a List component that renders dynamic list data.
- Add a unique key prop to list items.
- Implement conditional rendering based on list data.
- Add, delete, and edit list items.
By understanding these concepts, you can create more complex and dynamic applications using React.js. While this guide provides a foundational understanding of managing dynamic list data, you can further explore more advanced techniques and best practices, such as using a state management library like Redux or MobX, or employing a virtualized list for improved performance with large data sets.