Building a TODO List app by implementing Flux Architecture

In this tutorial, we will explore Flux Architecture
It is used for building data layers for JavaScript applications.
We will also be utilizing Flux architecture for a simple TODO List using Redux.
Introduction to Flux
Flux is the application architecture that Facebook uses for building client-side web applications. It complements React’s composable view components by utilizing a unidirectional data flow.
It’s more of a pattern rather than a formal framework, and you can start using Flux immediately without a lot of new code.
A basic flux architecture might look as follows.
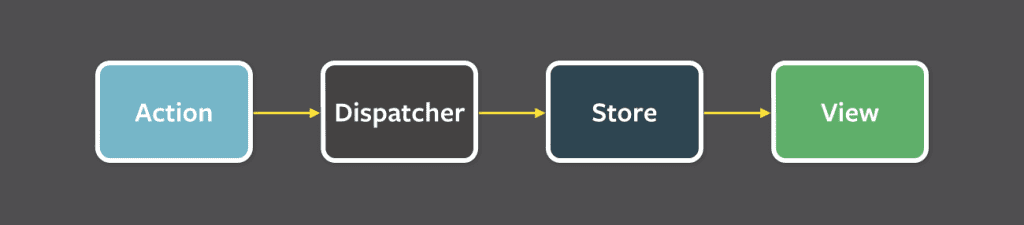
Flux Components
- The Dispatcher is the central hub that manages all data flow in a Flux application. It is essentially a registry of callbacks into the stores and has no real intelligence of its own — it is a simple mechanism for distributing the actions to the stores. Each store registers itself and provides a callback. When an action creator provides the dispatcher with a new action, all stores in the application receive the action via the callbacks in the registry.
- The Store contains the application state and logic. Their role is somewhat similar to a model in a traditional MVC, but they manage the state of many objects — they do not represent a single record of data like ORM models do. More than simply managing a collection of ORM-style objects, stores manage the application state for a particular domain within the application. They receive actions through the dispatcher and after identifying the action type, they modify the state of the store.
- View – React provides the kind of composable and freely re-renderable views we need for the view layer. Views are responsible for listening for events in the store and when an event is triggered by the store, the view fetches updated data from the store and updates its own state and that of its descendants. Close to the top of the nested view hierarchy, a special kind of view listens for events that are broadcast by the stores that it depends on. We call this a controller-view.
- Actions are methods that allow us to trigger a dispatch to the store. They contain a type string that enables the store to interpret the action correctly and a payload that contains the data for the action.
Explicit over Implicit
One major problem with frameworks today is that the abstraction grows as the application grows which makes the underlying functioning of the application more and more far from the developer. Flux solves this issue by making the changes explicit actions and data transformations over implicit abstraction!
Pros
- Separation of concerns – The logic of data manipulation in the store is cleanly separated from the views. The views don’t need to know how to manipulate the state, all they are doing is displaying the data and responding to user interaction.
- Unidirectional flow of data – Flux has a unidirectional flow of data which ensures that the data can flow from A to B to C or A to C, but never B to A. Meaning, in flux the direction of data-flow matters much more than the ordering.
- Easier Debugging – Flux focuses on creating a explicit and understandable data flows. When errors happen in the application state, debugging them becomes easier because you just need to find the action that led to the erroneous state, checking the store for the corresponding action logic, and fixing that.
- Single source of truth – The store acts as a single source of truth about the application state at any point in time. Any action can be tested or a situation can be recreated easily by just setting an initial state to the matching scenario, dispatching the action, and checking the final state!
Cons
- Complexity – Flux can add unnecessary complexity to an application where each view maps to one store. In this kind of application, a separation between view and store is enough.
Flux Libraries
Some libraries inspired by Flux are listed below ( in order of popularity ) with links to their official documentation.
For another overview of the Flux architecture, this document by Facebook is highly recommended.
TODO List
Now that we have understood the Flux architecture, we will be creating a simple TODO List using Redux, which utilizes the Flux architecture and is the de facto state management library developers use with React these days.
To add to Redux’s functionality, we will also be using @reduxjs/toolkit and react-redux.
Initialization
We will be using create-react-app to initialize our project. Type/Paste the below command into your command line in your desired directory. You can give your project any name and create-react-app will create a folder of your project name.
create-react-app todo-list-reduxAfter project initialization, we will change our command-line directory to our project directory using cd todo-list-redux. All changes we will be making to our code will be in the src directory.
We will also be deleting some files that create-react-app created for us in the src directory that we don’t need for this project leaving only index.js, app.js, app.css and index.css.
Installations
Now, we will install our dependency packages for our project using npm using the following command.
npm install redux react-redux @reduxjs/toolkitThis will install redux and some other packages that we will be using in our project.
Reducers
Reducers are functions that take the current state and action as arguments and return the new state.
In the src directory, create a folder named reducers that will store the files for reducers for different states.
We will be storing two states in our store, namely tasks and count which store the count of the number of tasks and the number of remaining tasks respectively.
We will first be implementing the count Reducer due to its simplicity.
CountReducer.js
We will be using the createSlice function of @reduxjs/toolkit which takes an initial state, a slice name, and an object of reducers. It then automatically creates action creators and action types that correspond to the reducers and state.
Inside the reducers directory, create a file named countReducer.js and put the following code in it.
import { createSlice } from "@reduxjs/toolkit";

const initialState = 0;

const countReducer = createSlice({
  name: "count",
  initialState,
  reducers: {
    increment: (state) => {
      return state + 1;
    },
    decrement: (state) => {
      return state - 1;
    },
  },
});

export const { increment, decrement } = countReducer.actions;
export default countReducer.reducer;
First, we import the createSlice function from the redux toolkit. We then define a variable that stores the initial state which in this case, is 0.
We next use the createSlice function inside which, we pass an object which has the name of the slice “count”, the initialState of our state, and the reducers object.
In this state, we have reducers or actions that can be dispatched, which increment or decrement the state.
We then export the actions which are stored in an object inside the count reducer.
actions using Object Destructuring and a default export that exports the reducer to be used to configure the store, which we will see later in this tutorial.
tasksReducer.js
Now, we will write the reducer for the tasks state. Inside the reducers directory, create a file named tasksReducer.js and put the following code in it.
import { createSlice } from "@reduxjs/toolkit";

const initialState = [];

const createTaskObject = (task, id) => {
  return {
    id,
    name: task,
    isDone: false,
  };
};
First, we import the createSlice function from the redux toolkit. Then we define an initial state which is an empty array.
We also define a function named createTaskObject which takes a task and an id and puts them in an object with the isDone key set to false by default.
then use the createSlice function with an object which has the name of the slice “tasks”, the initialState, and the reducers object which has two reducers, addTask which is used to add a task, and remove task which marks the task done.
const tasksReducer = createSlice({
  name: "tasks",
  initialState,
  reducers: {
    addTask: (state, action) => {
      state.push(createTaskObject(action.payload, state.length + 1));
    },
    removeTask: (state, action) => {
      const taskIndex = state.findIndex(
        (task) => task.id === Number(action.payload)
      );
      if (taskIndex === -1) return state;
      const newTasks = [...state];
      newTasks[taskIndex] = { ...newTasks[taskIndex], isDone: true };
      return newTasks;
    },
  },
});

export const { addTask, removeTask } = tasksReducer.actions;
export default tasksReducer.reducer;
We then use the createSlice function with an object which has the name of the slice “tasks”, the initialState, and the reducers object which has two reducers, addTask which is used to add a task, and remove task which marks the task done.
The addTask reducer, before changing state, converts the task string to an object using the createTaskObject function. It sets the id of the new task to the length of the state array.
Note:- The argument passed to the action is stored in action.payload.
The removeTask reducer first tries to find the index of the task in the state array using the id provided to the action.
If it does not find it, it returns the original state, else it creates a new copy of the state and modifies the index at which the done task is present by changing the isDone key to true. It then returns the new array.
We then export the actions and default export the reducer.
index.js
The index.js is the entry point to our app which imports everything and puts them together.
import React from "react";
import ReactDOM from "react-dom/client";
import "./index.css";
import App from "./App";
import { configureStore } from "@reduxjs/toolkit";
import { Provider } from "react-redux";
import countReducer from "./reducers/countReducer";
import tasksReducer from "./reducers/tasksReducer";

const store = configureStore({
  reducer: {
    count: countReducer,
    tasks: tasksReducer,
  },
});

const root = ReactDOM.createRoot(document.getElementById("root"));
root.render(
  <Provider store={store}>
    <App />
  </Provider>
);
We import the configureStore function from the Redux toolkit which assigns our reducers to the states in the store.
We then wrap our app component inside the Provider component from react-redux. This provides our store to the App component.
The rest is simple React syntax.
App.js
In the App.js file, we will use the actions we exported from the reducers inside event handlers.
import "./App.css";
import { useDispatch, useSelector } from "react-redux";
import { addTask, removeTask } from "./reducers/tasksReducer";
import { increment, decrement } from "./reducers/countReducer";
First, we will import useDispatch and useSelector hooks from react-redux. We will use these to dispatch actions and to gain access to the store. We also import actions from our reducers.
function App() {
  const dispatch = useDispatch();
  const state = useSelector((state) => state);

  const handleDone = ({ target }) => {
    dispatch(removeTask(target.dataset.id));
    dispatch(decrement());
  };

  const handleAddTODO = (event) => {
    event.preventDefault();
    const task = event.target.task;
    dispatch(addTask(task.value));
    dispatch(increment());
    event.target.task.value = "";
  };

  return (
    <div className="App">
      <header>
        <h1>TODO-List</h1>
      </header>
      <div className="addTODO">
        <form onSubmit={handleAddTODO}>
          <input name="task" type="text" placeholder="Add TODO" />
          <input type="submit" value="Add" />
        </form>
      </div>
      <div className="todoList">
        <ul>
          {state.tasks.map((task) =>
            task.isDone ? (
              <s key={task.id}>
                <li>{task.name}</li>
              </s>
            ) : (
              <li key={task.id}>
                {task.name}
                <button data-id={task.id} onClick={handleDone}>
                  Done
                </button>
              </li>
            )
          )}
        </ul>
      </div>
      <div className="remaining-count">
        <b>{state.count} remaining tasks</b>
      </div>
    </div>
  );
}

export default App;
We first store the function returned by the useDispatch hook in the const variable dispatch. the state in our store in the const variable state.
Note:- The value returned by the callback function of the useSelector hook is stored in the state. We can also use it to store only a part of the store.
We then define event handlers for form submission and done buttons for task which dispatch appropriate actions using the function stored in the dispatch variable.
JSX defines what is displayed to the users.
We display each task by mapping the tasks array in state and returning a struckthrough task or a task with a button based on the isDone key in the task object.
We also display the count of the remaining tasks using the count variable in the state.
You can play around with the application we built in CodeSandbox.
Summary
- Flux Architecture is used to create explicit and understandable unidirectional data flows.
- The Dispatcher is the central hub that manages all data flow in a Flux application. It is essentially a registry of callbacks into the stores and has no real intelligence of its own — it is a simple mechanism for distributing the actions to the stores.
- Actions are methods that allow us to trigger a dispatch to the store.
- Store contains the application state and logic.