Build a CRUD App with JavaScript, Html, & CSS

In this tutorial, we will build a CRUD App with JavaScript, Html, & CSS.
We are going to build a budget App that allows users to add a budget amount, list down their expenses from the budget amount, get the total balance after making a list of expenses, edit an expense, and delete an expense.
The goal of this article is to teach beginners learning JavaScript, how to use JavaScript Object, JavaScript functions declaration and function invocation, and JavaScript DOM Manipulation.
Building a CRUD App with JavaScript
Create a .html file and write the code below:
<div class="budget-section">
<div class="budget col col-md col-sm">
<h2>budget</h2>
<img src="image/money-bag.svg" width="40" alt="" />
<p class="amount">$ <span id="budgetAmount">0</span></p>
</div>
<div class="expenses col col-md col-sm">
<h2>expenses</h2>
<img src="image/accounting.svg" width="40" alt="" />
<p class="exp-amount">$ <span id="expensesAmount">0</span></p>
</div>
<div class="balance col col-md col-sm">
<h2>balance</h2>
<img src="image/law.svg" width="40" alt="" />
<p class="amount bala">$ <span id="balanceAmount">0</span></p>
</div>
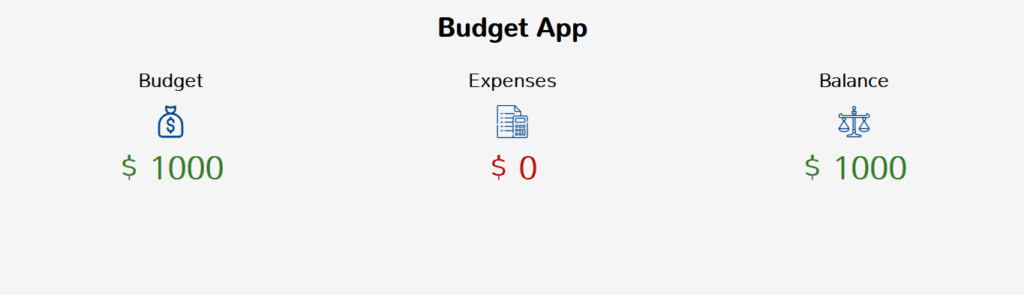
</div>In the above code, we create three div.
One is to display the budget amount, the other one is to display the balance amount after making a list of all expenses and the last is to display the amount of the total expenses.
let’s create a form that takes the budget amount.
<div class="budget-form" id="budgetform">
    <form id="addForm">
       <label for=""> Make a budget</label> <br />
       <input type="number" id="number" /> <br />
       <button type="submit">Add Budget</button>
     </form>
</div>
Add a budget amount
We are going to create a function that takes the budget amount and displays it after the user adds an amount.
In this project, we will create different functions that execute different tasks. let’s create our first function.
const amountInput = document.getElementById("number");
const addForm = document.getElementById("addForm");

const budgetAmount = document.getElementById("budgetAmount");
const balanceAmount = document.getElementById("balanceAmount");

function getBudgetAmount(amount) {
  if (!amount) {
    amountInput.style.border = "1px solid #b80c09";
    amountInput.placeholder = "input can not be empty";
    amountInput.style.color = "#b80c09";
    setTimeout(() => {
      amountInput.style.color = "#495057";
      amountInput.style.border = "1px solid gray";
    }, 3000);
  } else {
    budgetAmount.innerText = amount;
    balanceAmount.innerText = amount;
    expenseForm.style.display = "block";
    budgetform.style.display = "none";
    editForm.style.display = "none";
    amountInput.value = "";
  }
}

addForm.addEventListener("submit", (e) => {
  e.preventDefault();
  getBudgetAmount(amountInput.value);
});
In the above code, we started by declaring a global variable amountInput and addForm. amountInput holds the budget amount that was added and addForm allows us to listen to the submit button inside our form when a user clicks the submit button after adding a budget amount and it also calls the getBudgetAmount() function.
The getBudgetAmount() takes in an argument.
Note: Arguments are values passed to a function when it is invoked.
we invoked or called the getBudgetAmount() function when we click on the submit button.
Inside the getBudgetAmount() function, we created a condition that checks if the user passed in an empty value or not.
If the condition is passed it takes the value and displays it.
We can see that we now have a budget amount and also a balanced amount. You might wonder why a balanced amount when we have not yet made any expenses. At this point, our budget amount is still our balance amount.
The expenses are 0 because we have not yet made any expenses yet.
Make an expense list
We are going to create another form that takes the expense name and expense amount.
<div class="expense-form" id="expense-form">
 <form action="" id="expForm">

   <div class="">
     <label for="">please enter your expense</label> <br />
     <input type="text" id="expName" />
   </div>

   <div class="">
      <label for="">please enter expense amount</label> <br />
      <input type="number" id="expNumber" />
   </div>

   <button type="submit" id="submitExpen">Add expense</button>
 </form>
</div>
let create a function that displays the list of expenses.
const expForm = document.getElementById("expForm");
let expName = document.getElementById("expName");
let expNumber = document.getElementById("expNumber");

let id = 0;
let details = [];

function addExpenses(name, number) {
  if (!name.length || !number.length) {
    expName.style.border = "1px solid #b80c09";
    expName.placeholder = "input can not be empty";
    expName.style.color = "#b80c09";

    expNumber.style.border = "1px solid #b80c09";
    expNumber.placeholder = "input can not be empty";
    expNumber.style.color = "#b80c09";

    setTimeout(() => {
      expName.style.color = "#495057";
      expName.style.border = "1px solid gray";
      expName.placeholder = "input can not be empty";

      expNumber.placeholder = "input can not be empty";
      expNumber.style.border = "1px solid gray";
      expNumber.style.color = "#495057";
    }, 3000);
  } else {
    const userExp = {
      id: id,
      name: name,
      number: parseInt(number),
    };
    details.push(userExp);
    displayExp(details);
    id++;
    expName.value = "";
    expNumber.value = "";
  }
}

expForm.addEventListener("submit", (e) => {
  e.preventDefault();
  addExpenses(expName.value, expNumber.value);
});
In the above code, we started by declaring different variables that we will sign values to and also get values from.
The expNumber and expName variables hold the value of the expense amount and expense name input inside the expense form.
We declared an empty array that will push the list of expenses created by the user and also, we declared an id and set the value to 0.
Lastly expForm variable allows us to listen to the submit button inside our form when a user clicks the submit button after adding an expense list and it also calls the addExpenses() function.
The addExpenses() function takes two arguments, the expense name and the expense amount.
Inside the addExpense() function, we created a condition that checks if the user passed in an empty value or not.
If the condition is not passed it prompts an error to the user but if it passes it creates an object and signs the id we created to the id in the object, the expense name to the name in the object, and the expense amount to amount in the object.
Note: we passed the amount as a number and the parseInt() method we used is a javascript method that converts a number that is passed as a string to a number.
The Html 5 input type number sends a number as a string and we need to convert it to a number before we used it.
After that, we push the object to the empty array we created and increase the Id we declared to 1 using Id++ and we invoke the displayExp() function that takes the array as a parameter.
Now we are going to create the displayExp() function that displays the expense list after the user adds an expense. Note the function we created above only creates an expense.
function displayExp(details) {
  expValue.innerHTML = null;
  for (i = 0; i < details.length; i++) {
    expValue.innerHTML += `
    <div class="expValue" id="${details[i].id}">
      <div id="expTitleName" class="exp"><p>${details[i].name}</p></div>
      <div id="expValueAmount" class="exp"><p> <span>$ </span> ${details[i].number}</p></div>
      <div id="edite_delete">
        <p>
          <button id="${details[i].id}" onclick="editExpDetails(${details[i].id})"> <img src="image/edit.svg" width="15" alt=""  /></button>
          <button id="${details[i].id}" onclick="delExpenseDetails(${details[i].id})"><img src="image/trash.svg" width="15" alt="" /></button>
        </p>
      </div>
    </div>
  `;
  }
  calcExpenses();
  displayExpenses.style.display = "block";
}
The displayExp() function we created takes the array as a parameter and inside the function, we loop through the array using for loop and using . to append the object to the Html tag we created.
If we load our browser now and add a budget amount and also make an expense list from that budget amount we will see the list displayed in the image below.
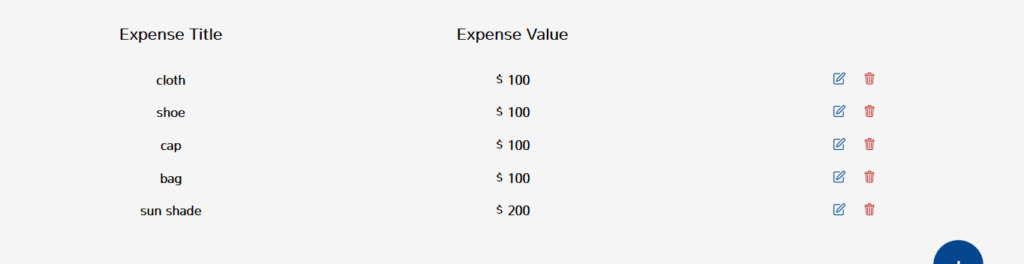
You are free to design your app the way you want. You can see the expenses I have added.
Calculate the total expense
We can now make an expense list and we need to know the total amount after making the list.
We are going to create a function that calculates the expenses and gives us the total amount.
function calcExpenses() {
  let totalExp = 0;
  for (i = 0; i < details.length; i++) {
    totalExp = details[i].number + totalExp;
  }
  expensesAmount.innerText = totalExp;
  updateBalance();
}
In the function above we declared a let variable and assigned it a value of 0, then we loop through the array again to get the expense amount. After that, we reassign another value to the variable we created and the value is the expense amount we got from the array and we pulsed it with the variable again.
We invoked the calcExpenses() function inside the dispalyExp() function and we invoke the updateBalance() function.
Get the total balance after adding expenses
We are going to create a function that minus the total expense from the budget amount and updates the total balance fields as the user makes a list of expenses.
function updateBalance() {
balanceAmount.innerText =
parseInt(budgetAmount.innerText) - parseInt(expensesAmount.innerText);
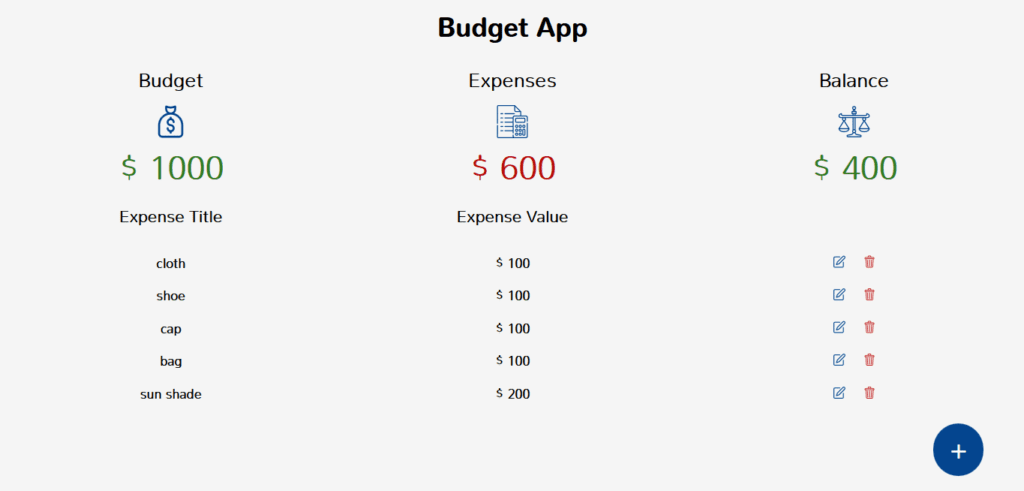
}The function above gets the total expense amount and minus it from the budget amount.
If we load our app now and add a budget amount and make a list of expenses we will see the balance and total expense field updating as we add an expense.
Edit an expense
Let make our app more user-friendly by giving our users access to be able to edit an expense after adding or making a list of expenses.
First, we are going to create another form.
<div class="edit-form" id="editForm">
   <form action="" id="saveEdit">
      <div class="">
          <label for="">Edit your expense</label> <br />
          <input type="text" id="editExpName" />
      </div>
      <div class="">
          <label for="">Edit expense amount</label> <br />
          <input type="number" id="editExpNumber" />
      </div>
      <button type="submit">Save changes</button>
   </form>
</div>
Now let’s create an edit function.
function editExpDetails(id) {
  expenseForm.style.display = "none";
  budgetform.style.display = "none";
  editForm.style.display = "We block";
  details.findIndex((item) => {
    if (item.id === id) {
      editExpName.value = item.name;
      editExpNumber.value = item.number;
      saveEdit.children[2].id = item.id;
      modal.style.display = "block";
    }
  });
}
Remember that each expense has an id and with that id we can find the index of that object and we can modify the object as we want.
The function above takes the id of each object as a parameter and loop through the array of object and get the index of that object sets the values back to the input field and bind the id of that object to the form id.
Note the id is passed when a user clicks on the edit button.
const editForm = document.getElementById("editForm");
const saveEdit = document.getElementById("saveEdit");
const editExpValue = document.getElementById("editExpValue");
const editExpNumber = document.getElementById("editExpNumber");

function getExpValue(editExpName, editExpNumber, id) {
  edited = details.findIndex((obj) => obj.id == id);
  details[edited].name = editExpName;
  details[edited].number = parseInt(editExpNumber);
  displayExp(details);
}

saveEdit.addEventListener("submit", (e) => {
  e.preventDefault();
  getExpValue(editExpName.value, editExpNumber.value, saveEdit.children[2].id);
});
The function above gets the expense name and expense amount from the edit form and also the id. It takes the id that was assigned to the form and finds the index of that id and changes the value of that index to the new values that were typed by a user or still saves the value again if the user decided to leave the value.
Delete an expense
Let also give the user access to delete an expense if the user decides not to edit but to delete.
function delExpenseDetails(id) {
  let index = details.findIndex((item) => item.id === id);
  details.splice(index, 1);
  displayExp(details);
}
Again we going to use an id.
The function above takes an id and find the index of that id and delete the object from the list of objects inside the array of object.
If we load our app on the browser now and try to edit or delete an expense, it will delete and it will also edit. You have now successfully built a CRUD app with JavaScript.
Conclusion
We are able to complete our JavaScript project by building a CRUD App with JavaScript, Html, & CSS and we learned how to use functions and when to invoke or call a function.
If find it helpful don’t forget to share.
The link to the repo is Github.