Laravel Eloquent relationships explained

Eloquent ORM is one of the most exciting and powerful built-in features in Laravel. Before we start we’ve to understand, what ORM means.
ORM means object-relational mapper. It handles database operations by representing data as objects. Database records or as we better know them tables are often related to each other.
Eloquent maintains these relationships very easily through a series of common relationships.
Prerequisite :
To complete this tutorial all you need to have is a configured computer, a text editor, a web browser, a web server installed on your computers like Xampp or WampServer, composer(package manager), and a basic understanding of PHP and laravel.
In this tutorial, we will use Sublime Text 3 as a text editor, xampp server, and Google Chrome as a web browser.
Steps To Be Followed:
In this tutorial, you’re going to learn about eloquent relationships step by step with examples. The following steps are;
- Download Laravel 10 application
- Setup Database
- Create Routes
- Create Controller
- Create Blade View
- Run Development Server
- Eloquent relationships
- One To One
- One To Many
- Many To Many
- Has One Through
- Has Many Through
- Conclusion
Download Laravel 10 application
Before we start, we need to download and set up a laravel application. With Composer installed on your computer, you can download a laravel project with the following command-
composer create-project laravel/laravel laravel-eloquent-relationsSetup Database
To work with Eloquent ORM, obviously, we’re going to need a database. Right? Now the project is installed, we need to set up the database. You can find out the .env file on your laravel project and set up the database name. Like this-
DB_CONNECTION=mysql
DB_HOST=127.0.0.1
DB_PORT=3306
DB_DATABASE=laravel-eloquent
DB_USERNAME=your_database_username
DB_PASSWORD=your_database_password
You can name your project and database name as you want.
Create Routes
Now we need to make a route. In laravel routes makes a relationship with your laravel controller. In our installed laravel project there is a file called web.php. Routes are written in that file.
We need to create a route to view the database results. In this tutorial, we’re going to use the same route for all the examples.
Because our main concern is to learn all the eloquent relationships. You can create a route like this-
Route::get('/index',[App\Http\Controllers\UserController::class,'view'])
->name('user-index');
Create Controller
After creating the route, now we need a controller. The controller is a class where we handle requests, and implement logic.
In your laravel project, they are stored in the app/Http/Controllers directory. In this tutorial, we’re going to use the same controller for all the examples.
You can practice with different controllers if you want. You can use the PHP artisan command to create a controller
php artisan make:controller UserControllerWe’re going to use the name UserController. Inside the controller, we’ll need a function called view to display the data.
class UserController extends Controller
{
    public function view(){
        return view('User.view');
    }
}
Here, the view() function returns a blade file that is stored under the User folder.
Run Development Server:
We’re going to run the development server after every relationship example. To run the development server, the PHP artisan command is-
php artisan serveEloquent relationships:
One To One:
One-to-one relationship is one of the basic relationships. For example, a User model wants to be connected with an Address model. Let’s see a simple diagram to understand it better-
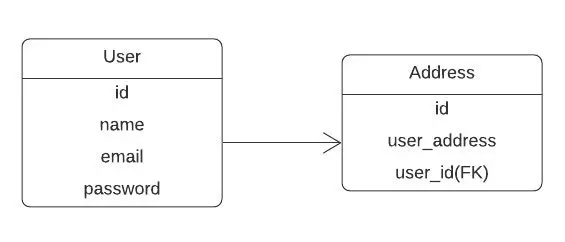
In this user table, we have some fields like id, name, email, and password and in the address table, we’ve id, user address, and the user_id field.
Here the user_id field is the id from the user table which will be used as a foreign key.
We can create an address() model and under the User, model call the hasOne() method to relate the Address model. Like this-
//An user has one address
public function getUserAddress(){
    return $this->hasOne(Address::class);
}
In the User.php model, the getUserAddress() defines the User model has one relation with the Address model. By using that we can get the address of a specific user.
class UserController extends Controller
{
    public function view(){
        $data= User::find(1);
        return view('User.view', compact('data'));
    }
}
In this UserController, we simply call the User model, and with the find(1) method we can get all the data of the user whose id is 1. Then we pass the retrieved data through a compact function. Now, let’s get to the view file-
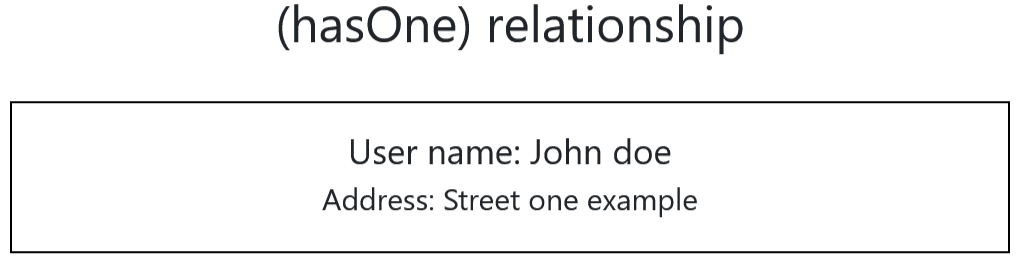
//view.blade.php
<h1>(hasOne) relationship</h1>
<div class="container">
  <h3>User name: {{$data->name}}</h3>
  <h4>Address: {{ $data->getUserAddress->user_address }}</h4>
</div>
In this view.blade.php file, we get the user address through the getUserAddress() function implemented in User.php.
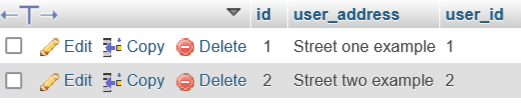
Address table:
OUTPUT:
One To Many:
Now consider a user can post on the site. So, a user can have many posts. The database demo diagram is given below-
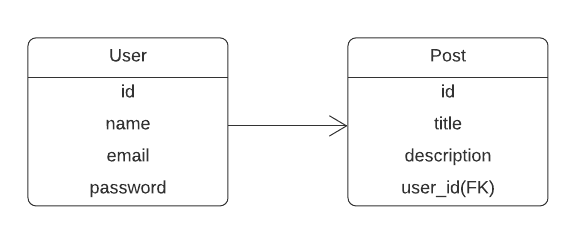
In this user table, we have the same fields as before. On the other hand, the post table has id, title, description, and user_id as foreign key.
We’ll create a Post() model and under the User, model call the hasMany() method to relate the Post model.
//An user can have many posts
public function posts(){
    return $this->hasMany(Post::class);
}
In the User.php model, the posts() define the User model hasMany relations with the Post model. We’ll get all the posts of a specific user.
class UserController extends Controller
{
    public function view(){
        $data= Post::all()->where("user_id", "1");
        return view('User.view', compact('data'));
    }
}
We’re going to retrieve all the posts from the post table of user id 1 and pass the data through the compact() method.
//View.blade.php
<h1>(hasMany) relationship</h1>
<div class="container">
   @foreach($data as $posts)
      <h2>{{ $posts->title }}</h2><hr>
      <p>{{ $posts->description }}</p>
      <p>Posted by: {{ $posts->user_id }}</p>
    @endforeach
</div>
In this view.blade.php file, we looped through the retrieved data from the Post model using @foreach and by using the hasMany() method inside the User model we can get the specific user name. Because we used user_id as a foreign key inside the Post table.
Post table:

Output:
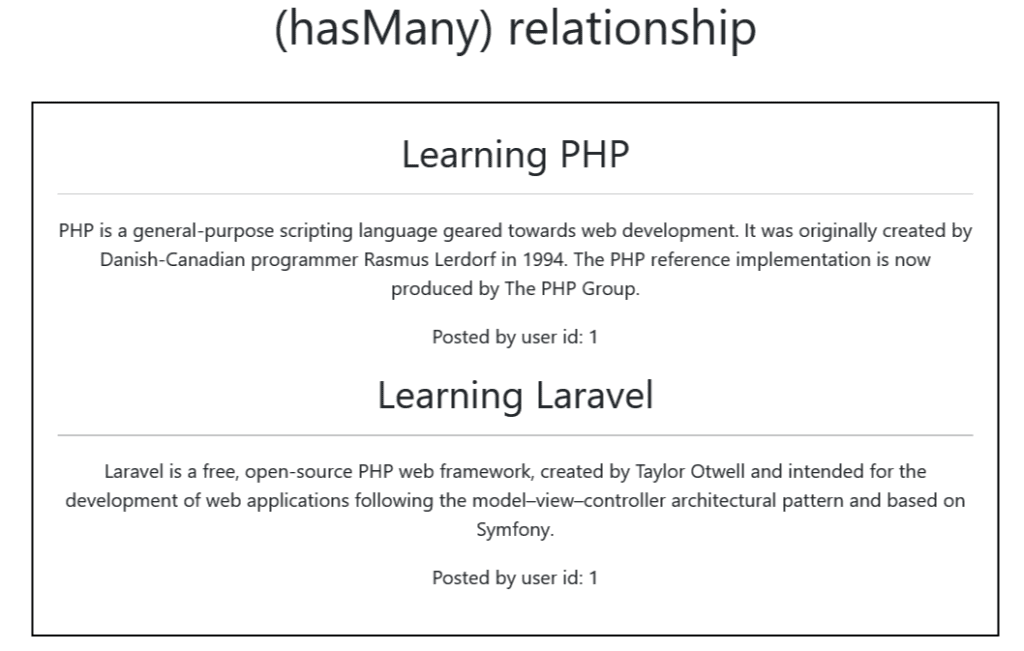
As you can see in the output, we got all the posts of user id 1 through the hasMany relationship.
Many to Many:
Let’s think of an example. We have two database tables called students and subjects. A student can be enrolled in multiple subjects. As the same a subject can have multiple students. That is called many-to-many relationships. To solve the problem, we’re going to need a pivot table called student_subjects. The diagram is given below-
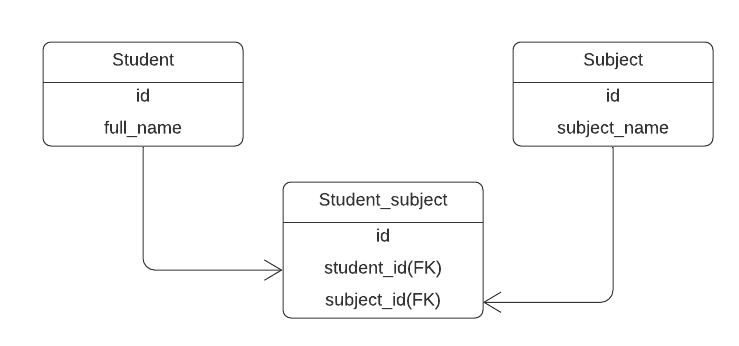
In this student table, we have fields named id and full_name. On the other hand, the subject table has id and subject_name and the Student_subject table takes the student_id and subject_id as foreign keys.
We’ll create another model called Student_subject that will be used as a pivot model making connections between Student and Subject.
Inside the Student model, we can implement the belongsToMany() method to relate Student with the Subject model.
Student:
//Student.php
public function subjects(){
    return $this->belongsToMany(Subject::class, 'student_subjects');
}
In this subjects() function, belongsToMany() defines that a student can have many subjects and pass the pivot table name through the second parameter which is student_subjects. We can use the same concept for Subject model. Like this-
Subject:
//Subject.php
public function students(){
    return $this->belongsToMany(Student::class, 'student_subjects');
}
To access the data, the process is the same for both Student and Subject except for the variable names.
Student:
public function view(){
    $studentData= Student::find(1);
    $subjects= Subject::orderBy('subject_name', 'asc')->get();
    return view('User.view', compact('studentData', 'subjects'));
}
Subject:
public function view(){
    $subjectData= Subject::find(1);
    $students= Student::orderBy('full_name', 'asc')->get();
    return view('User.view', compact('subjectData', 'students'));
}
Now in the view.blade.php, we can display the enrolled subjects under one student and the enrolled students under one subject. The following code is given below:
Student:
//View.blade.php for enrolled subjects under one student
<h1>(belongsToMany) relationship</h1>
<div class="container">
   <h2>Student name: {{ $studentData->full_name }}</h2><hr>
   <p><b>Enrolled subects:</b></p>
   @foreach($studentData->subjects as $subject)
     <p>{{ $subject->subject_name }}</p>
   @endforeach
</div>
Subject:
//View.blade.php for enrolled students under one subject
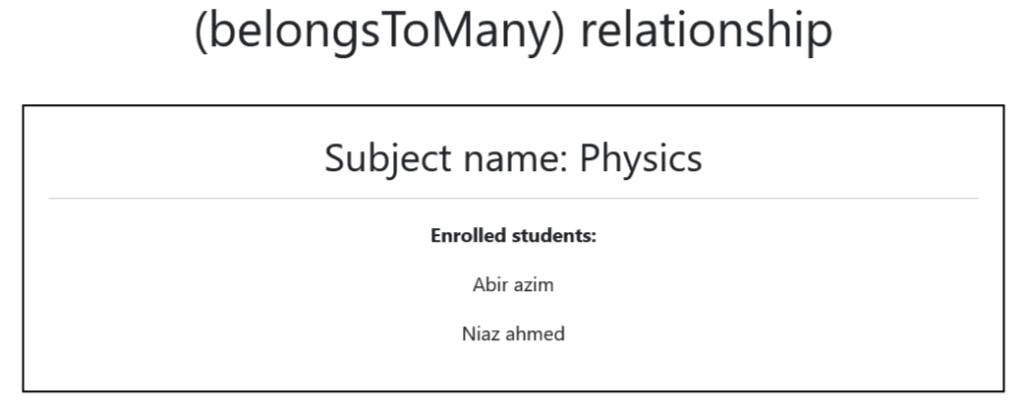
<h1>(belongsToMany) relationship</h1>
<div class="container">
<h2>Subject name: {{ $subjectData->subject_name }}</h2><hr>
<p><b>Enrolled students:</b></p>
@foreach($subjectData->students as $student)
<p>{{ $student->full_name }}</p>
@endforeach
</div>Again, we performed the @foreach loop statement to get results from students() and subjects() methods implemented in the Student and Subject table.
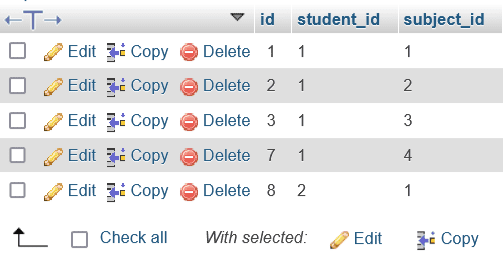
Student_subject table:
Output:
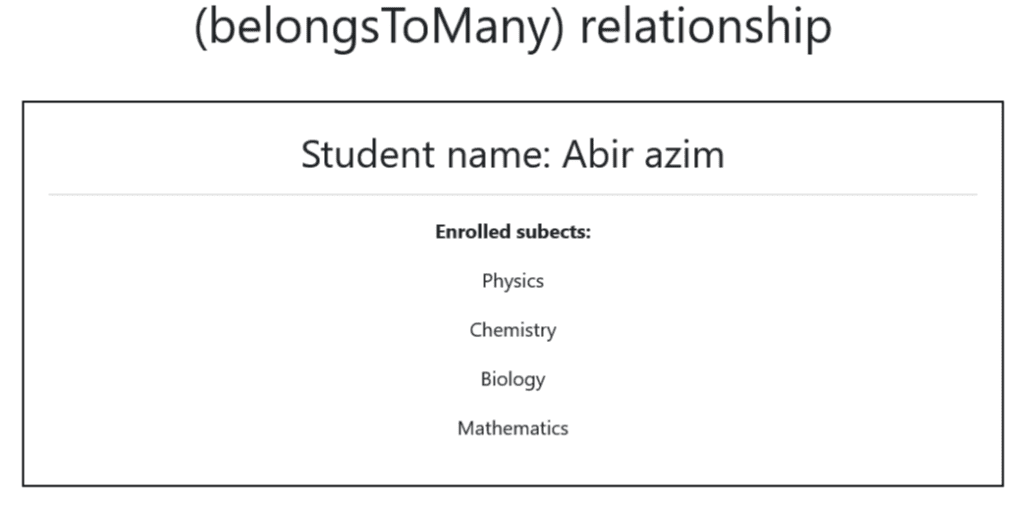
Output:
Has One Through:
Has One Through is a little bit different from what we’ve seen so far. Suppose, on a school management system, we have a Student table for students, a profile table to store all the profiles, and a profile details table to store profile details. Like this-
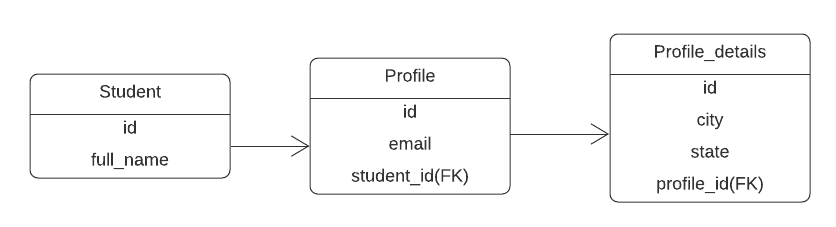
The Profile table takes student_id from the Student table as a foreign key and the Profile_details table has profile_id as a foreign key. So, if we want the Profile_details of a student, we’ve to go through the Profile table first. Inside the Student model, we can implement the hasOneThrough() method to relate Student with the Profile and Profile_details.
//Student connects with Profile model(hasOne)
public function profile(){
   return $this->hasOne(Profile::class);
}
//Student connects with Profile_details model(hasOneThrough)
public function details(){
   return $this->hasOneThrough(Profile_detail::class, Profile::class);
}
Here, the relation between Student and Profile model is hasOne relation. On the other hand, the Student model relates with the Profile_details model with hasOneThrough relationship.
public function view(){
   $data = [
     'students' => Student::where('id', '1')->get(),
   ];
   return view('User.view',$data);
}
In the controller, we took an array named $data. Then simply call a specific student from the Student model and get the data. You can pass the data with the compact() method as well. Now in the view.blade.php, we can display the profile details under one student.
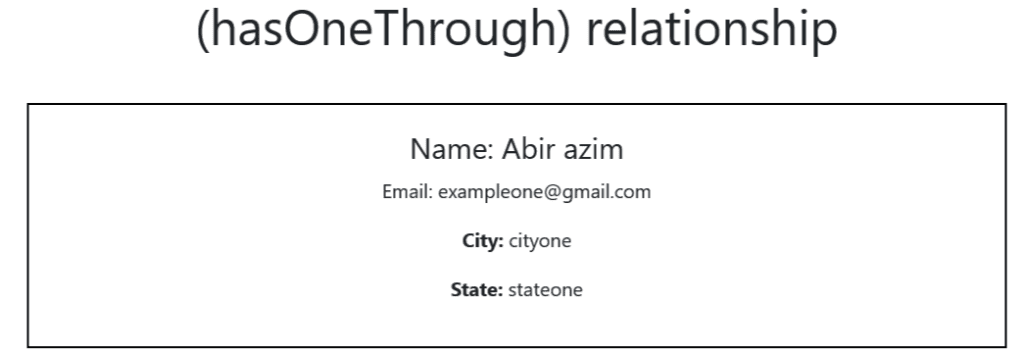
//View.blade.php
<h1>(hasOneThrough) relationship</h1>
<div class="container">
   @foreach($students as $student)
      <h4>Name: {{ $student->full_name }}</h4>
      <p>Email: {{ $student->profile->email }}</p>
      <p><b>City:</b> {{ $student->details->city }}</p>
      <p><b>State:</b> {{ $student->details->state }}</p>
   @endforeach
</div>
As you already know from the previous examples, how to pass the data from the methods defined through eloquent relationships.
Profile_details table:

OUTPUT:
Has Many Through:
The Has Many Through relation has the almost same concept as Has One Through. Suppose a user can have many posts and every post can have multiple comments. With hasManyThrough relation, we can access it.
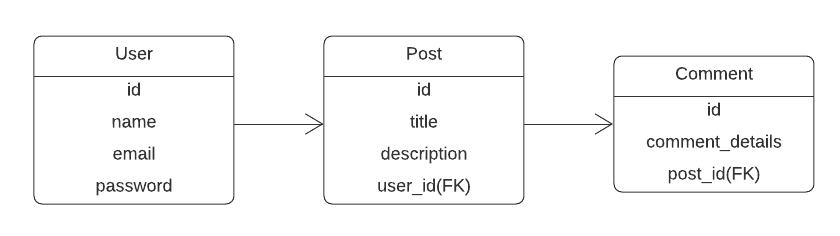
In the Post table, we’ve user_id as a foreign key, and in the Comment, the table we’ve post_id as a foreign key. Now, hasOneThough could work on this problem but we can have multiple posts and multiple comments. That is why we need to implement hasManyThrough relationship among these models.
//User connects with the Post model(hasOneThrough)
public function post(){
    return $this->hasOne(Post::class);
}
//User connects with the Comment model(hasManyThrough)
public function comments(){
    return $this->hasManyThrough(Comment::class, Post::class);
}
Here, the relation between User and Post model is hasOneThrough relation. On the other hand, the User model connects himself with the Comment model with hasManyThrough relationship. We’ve to pass The Comment model as the first parameter and the Post model as the second parameter.
public function view(){
   $data = [
      'users' => User::where('id', '2')->get(),
   ];
   return view('User.view',$data);
}
In the controller, we get the data from the User model and pass the data like before. Let’s see the view file.
//View.blade.php
<h1>(hasManyThrough) relationship</h1>
<div class="container">
    @foreach($users as $user)
      @foreach($user->comments as $comment)
        <h4>Posted by: {{ $user->name}}</h4>
        <p>Post title: {{ $user->post->title }}</p>
        <p><b>Post description:</b> {{ $user->post->description }}</p>
        <p><b>Comment:</b> {{ $comment->comment_details}}</p>
      @endforeach
    @endforeach
</div>
To display the comments of a post, we’ve to perform the @foreach loop twice. At first, we get the user data from the User model, and to access the comment of a post we need to loop through comments data from the comments() method that was implemented in the User model through hasManyThrough relationship.
Comment table:

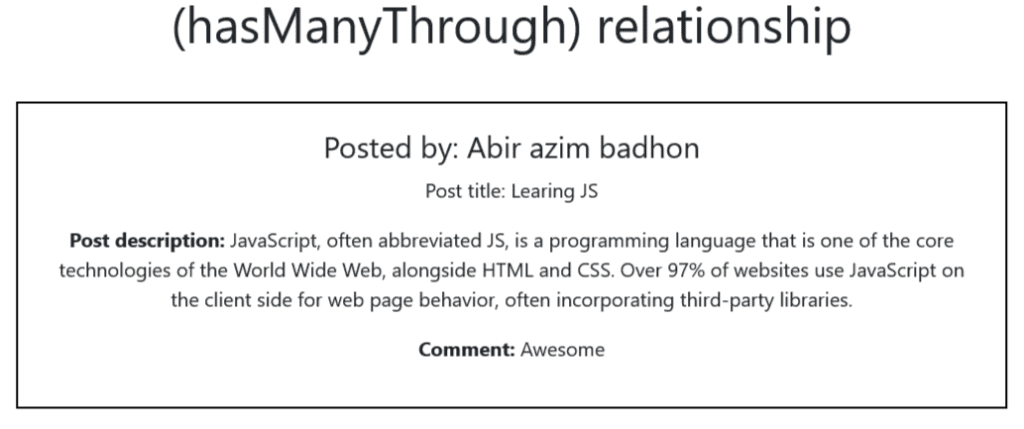
Output:
Conclusion
In this whole tutorial, we discuss Laravel’s eloquent relationships. We can use the query builder also to handle the database process.
But the eloquent ensures a higher quality between application logic and presentation. It reduces the number of queries and load time which makes the application faster.
It’s easy to use, but to understand it better you’ve to understand the concept of Laravel MVC architecture and the eloquent relationships. So, practice the above examples with your own. You’ll find it amazing.